- Login
- Home
- About the Initiative
-
Curricular Resources
- Topical Index of Curriculum Units
- View Topical Index of Curriculum Units
- Search Curricular Resources
- View Volumes of Curriculum Units from National Seminars
- Find Curriculum Units Written in Seminars Led by Yale Faculty
- Find Curriculum Units Written by Teachers in National Seminars
- Browse Curriculum Units Developed in Teachers Institutes
- On Common Ground
- Publications
- League of Institutes
- Video Programs
- Contact
Have a suggestion to improve this page?
To leave a general comment about our Web site, please click here
Geometry and the Real World
byShamsu Abdul-AzizIntroduction
Many students have difficulties when attempting to solve geometry problems. Many reasons are suggested or put forward for the students' lack of success in this area. These reasons include students' lack of exposure to life outside of their neighborhoods, minimal visual skills, and difficulty in understanding basic geometric concepts. I do not dispute these reasons for students' failure, but I propose that there is a way to ensure that geometric concepts, especially transformations and symmetry, permeate the mathematics classroom while, at the same time, maintaining student interest. Wallpaper is an example of a real world item that is seen everyday in most homes across the nation. It is also one of the most important when it comes to the topic of geometry. Some people look at wallpaper and go "wow! That's an incredible pattern" but mathematicians see wallpapers and go "hmm! What's the fundamental domain? What type of symmetry can be found here?" among others. I have tried to develop a series of lessons that will help teachers develop various strategies to teach geometry, with the help of symmetry, in their classrooms. It is my hope that implementing this curriculum unit will help teachers to teach geometry in a way that will excite students, assist their connection and application of "real world" scenarios to the concepts, aid their use of various strategies, and extend students' abilities to solve math problems in other contexts.
I teach in a school district with approximately 23,000 students. They are 86% African American, and 75% are eligible for free or reduced lunch. I have taught in under-resourced, urban areas and my students come with various academic deficiencies. Some of these deficiencies can be positively affected in the classroom, some cannot. Since NCLB has come into existence, for student outcomes, there is not much that matters except for their standardized test scores at the end of each school year. If students meet standards according to state test, schools are viewed as successful and the stress in "passing the test" is put off for another year. Sometimes, students can pass the test while doing poorly on specific domains. One of the domains that my students have consistently performed poorly on is Geometry and Measurement.
Each year, students come into my classroom who are supposed to possess skills that are prerequisites for the math activities that I teach. Usually, most of them don't. Most of the time, there is a great difference between what the students need to know to "get started" and what they actually know. Of course, I have to begin my instruction "where they are." This means that I will not have the advantage of merely working on the concepts and strategies. I will have to teach my students the fundamental parts of geometry, nature and shapes. If they master these skills, I will need to teach them how to approach geometry in an investigative manner using such techniques as collaborative learning; exploration and problem solving to formulate, test, and locally prove or disprove conjectures; and written and oral assignments to develop effective communication skills; and such tools as physical manipulatives, models, and software.
Symmetry is a fundamental part of geometry, nature, and shapes. It creates patterns that help us organize our world conceptually. We see symmetry everyday but often don't realize it. People use concepts of symmetry, including translations, rotations, reflections, and their geometric figures and patterns as part of their careers. Examples of people whose careers that incorporate these ideas are artists, craftspeople, musicians, choreographers, not to mention, mathematicians. It is important for students to grasp the concepts of geometry and symmetry as a means of exposing them to things they see everyday that aren't obviously related to mathematics but have a strong foundation in it. According to the National Council of Teachers of Mathematics grades 6-8 should be able to apply transformations and use symmetry to analyze mathematical situations. This includes predicting and describing the results of translating, reflecting and rotating (aka sliding, flipping, and turning) two-dimensional shapes. They should also be able to describe a motion or a series of motions that will show that two shapes are congruent, and identify and describe line and rotational symmetry in 2 and 3- dimensional shapes and designs.
This unit, "Geometry and the real world" is designed for sixth and seventh grade mathematics classes. The unit could be used in eighth grade classes as well. It will be taught over approximately 2 weeks for 90 minutes each day. The unit will cover basic concepts of geometry beginning with the core assumptions about points, lines, and planes. These are the undefined terms that will provide a starting place for basic mathematical applications used in the real world. We will also examine geometry that exists around us in the real world, both the obvious and not so obvious. Geometry deals with extensive visual reasoning and the ability to picture how certain shapes will look after being transformed into different shapes. This unit will not only bridge the gap but will also help them see how these ideas can be easily related to the environment in which they live. Once they have gotten the basic understanding of all the geometric shapes, the students will investigate isometries. The four basic isometries they will look at are; translation, rotation, reflection, and glide reflections.
All geometric diagrams are comprised of the same basic components: points, lines (and rays or line segments), planar regions. Man-made objects that are made of these geometric structures would be almost everything. If a person looks closely, they would see many geometric shapes in structures. Buildings, cars, airplanes, ships, textbooks, television sets, dishes, pictures, computers, cups all have geometric structures to name a few. Some of these (dishes and cups) are curved rather than being made of flat pieces. However, the curved ones often exhibit circular symmetry. But keep in mind that not only man-made objects are geometric. Nature has its own geometric structures. The world is a big sphere, so is the moon and the other 8 planets in the solar system. The entire world can be thought of as a geometric structure. Measurements on maps are geometric which proves that nature has geometry and that geometry exists even in things humans cannot see but we just know it's there.
Points, lines, and planes are the undefined terms that provide the starting place for geometry. When we define words, we normally use simple words; and these simple words are in turn defined by simpler words. The process must eventually terminate; some definition must use a word whose meaning is accepted as immediately clear. Because that meaning is accepted without definition, we refer to those terms by italicizing or underlining. These undefined terms will be used in defining other terms. Although the terms are not formally defined, a brief discussion is needed.
The unit will begin by providing the students an intuitive history about geometry and its relevance in our environment. We will also look briefly at Euclid and other famous mathematicians' contributions to geometry. In doing so, we will look at real world objects like ships and bridges and figure out the geometric shapes involved and how they are used. We will then explore the differences between basic types of angles and shapes in geometry. With this knowledge, regarding different types of angles and their representations, they will be introduced to transformational geometry. This is where they will learn how to reflect, rotate, and translate, manually, most of the geometric shapes. Transformations have been created way back in ancient civilization- both oriental and occidental. This refers to the art of ornament, called the "oldest aspect of higher mathematics expressed in an implicit form" according to the famous twentieth century mathematician Hermann Weyl.
Computers have become a great resource in our educational system these days. Very soon most of the state standardized tests will be taken online. It is very crucial that as we make strides in preparing our students for these hurdles. I am a crusader in teaching students with technology. Most of my students get very focused anytime an activity is being done using the smart board and computers. In this regard, as I teach this unit, I intend to show them how to use computer programs to achieve the same results they have manually achieved. They will be shown how reach that goal using a computer aided program like the Geometer's Sketchpad.
One of the main concepts of geometry, especially advanced geometry, is the notion of sound logic and proof. In an attempt to show the students how to relate what we have learned in the classroom to our everyday lives and environments, we will look at a very simple everyday item like wallpaper. Creating wallpaper designs is guided by formal geometrical principles. It starts with identifying a fundamental design and then repeating it over and over again. The fundamental design could be a simple square, rectangle, or even a parallelogram. Translating this basic design over and over again in one direction (and its opposite) will produce what is called a frieze pattern. Translating repeatedly in two independent directions produces a wallpaper pattern. Repeating the fundamental designs many times in a specific direction can be achieved by the combination or composition of a translation with itself many times. These ideas will help them realize that mathematics is not always paper and pencil.
Most wallpaper motifs have several designs: some very complicated, some very simple and some in between. We will begin this discussion by looking at the design and trying to figure out what is the basic design element (also known as fundamental domain). In many attractive wallpaper designs, besides translations, there are reflections or rotations or other symmetries of the overall design. The students will eventually come up with their own postulates on how to figure out various fundamental domains of wallpaper. With all this knowledge, the students will each design their own wallpaper and discuss how they came up with their designs.
Rationale
Geometry is a very important aspect of many of the standardized tests that have become so important to school districts throughout the United States. On standardized tests, the concepts are often not so straightforward, but are hidden within other concepts. Some students will automatically give up when they see such questions. Others that know the concept have a difficult time trying to relate it to other concepts and hence are not able answer the questions. By developing the confidence and the skills to tackle geometry and measurements, students will not only improve their math skills with the four basic operations, but will also hopefully transfer their knowledge to other mathematical areas. A key feature of this unit is that students will be required to spend considerable amount of time looking at various isometries. Through this exposure to isometries, not only are the students going to be more knowledgeable about these transformations and understand the main facts about them, but will also hopefully transfer their knowledge to other mathematical areas.
There are several articles in mathematical journals, written by professionals in the field, which expresses the need for teaching symmetry and its properties as a part of the math curriculum. Several articles focus on the different ways of teaching the same concepts and others concentrate more on the tools we have available that link us to technology. All of the articles that I have come across support, at a superficial level, the understanding that symmetry is all around us, and although it doesn't seem to be in mathematics, in fact, it involves very serious mathematics. According to Pumfrey & Beardon (2002), art and math go hand in hand. The connection has been there for a long time as we can trace the inspirations of mathematicians as a "product of the Islamic civilization brought to Europe by the Arab conquests in Spain in the thirteenth century". This relates specifically to tessellations that are a result of rotating, reflecting, and sliding objects in a plane so that there are no gaps or overlaps. Pumfrey & Beardon (2002) sum it up when they state "tessellations are a common feature of decorative art and occur in the natural world all around us."
Objectives
This unit clearly meets national and state standards since geometry and measurement is such an integral part of middle school mathematics. In addition to simply learning individual isometries, this unit looks at the relationships shared by the various isometries. The relationship between reflection and rotation, and the relationship between reflection and translation are all explored through problem solving. By making connections between reflections, rotations, and translations, related word problems and examining different ways to look at rotations in terms of reflections, students should develop a better understanding of the relationships between the four types of isometries. We will also take the time to look at the connections between isometries and symmetry. That is, that a figure is symmetric if it is unchanged by a (non-identity) transformation.
I hope that students will gain an understanding of what symmetry and tessellations are and what they mean to us. I would like to see students adding to their previous knowledge base by expanding on what they already know to understand more mathematical properties in greater depth. I think that by applying the properties and types of symmetry to everyday life through literature, mirrors, and kaleidoscopes students will begin to see math everywhere and as an important part of how we function and see things. Students will be made to do an activity that will help them bridge the gap between geometry and the world around them. This activity will not only bridge the gap but will go a step further to check their knowledge on the concepts.
Strategies
My strategies for teaching this unit will be to: Define and teach the concepts. As I am defining and teaching the concepts, I will be incorporating some helpful classroom activities that will boost the understanding of the concepts.
Defining Concepts
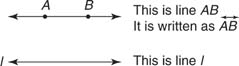
The fundamental elements of geometry are points, lines, and planes. A point is the most fundamental object in geometry. It is represented by a dot and is often named by a capital letter. A point represents position only. A line (straight line) can be thought of as a connected set of infinitely many points. It extends infinitely far in two opposite directions. A line has infinite length, zero width, and zero height. Any two points on the line determine it. The symbol ↔ written on top of two letters is used to denote the line through points A and B. A line may also be named by one small letter.
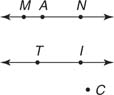
Points that lie on the same line are called collinear points. If there is no line on which all of the points lie, then they are noncollinear points. Points M, A, and N are collinear, and points T, I, and C are noncollinear.
Now, with the understanding of the definitions of a point and a line, you may ask, so how do they relate? A point on a line separates the line into two pieces. Each piece is called a ray. Given three collinear points, one of them is between the other two, and separates them. The collection of points between two points A and B on a line is called the Line Segment.
A plane may be considered as an infinite set of points forming a connected flat surface extending infinitely far in all directions. A plane has infinite length, infinite width, and zero height (or thickness). Planes can be thought of as having two dimensions, length and width. A plane is usually represented in drawings by a four-sided figure. A single capital letter is used to denote a plane. Planes can arise as subspaces of some higher dimensional space, as with the walls of a room, or they may enjoy an independent existence in their own right, as in the setting of Euclidean plane geometry. When working in two-dimensional Euclidean space, the plane is considered to be the whole space. Many fundamental tasks in geometry, trigonometry, and graphing are performed in two-dimensional space, or in other words, in the plane. Just as a line is separated into two parts by a point, a plane is separated into two parts by a line.
Symmetry and Isometry
A symmetry of an (object, design, pattern, etc) is a transformation that leaves that object and its essential properties unchanged. Most of the transformations I will consider are isometries. An isometry of the plane is a transformation that preserves distances. This means that, every line segment is transformed to another line segment of the same length. An isometry can be classified as a reflection, translation, rotation or glide reflection. Two geometric figures related by an isometry are said to be congruent (Coxeter and Greitzer 1967, p. 80). Here is a description of each type of isometry.
A reflection is a "flip" of an object over a line. Let's look at two very common reflections: a horizontal reflection and a vertical reflection.
Notice the colored vertices for each of the triangles. The line of reflection is equidistant from both red points, both blue points, and both green points. In other words, the line of reflection is directly in the middle of any point and its reflection.
The most basic transformation is the translation. The definition of a translation is "every point of the object is moved the same distance in the same direction to form the image." Every line segment is moved to a segment that has the same length and is parallel to the original. Take a look at the picture below for some clarification.
Each translation follows a rule. In this case, the rule is "5 to the right and 3 up." You can also translate a pre-image to the left, down, or any combination of two of the four directions.
A rotation is a transformation that is performed by "spinning" the object around a fixed point known as the center of rotation. You can rotate your object by any degree measure, but 90° and 180° are two of the most common. Also, by convention, rotation angles are measured counterclockwise!
The figure shown at the right shows a rotation of 90° around the center of rotation. Notice that all of the colored points are the same distance from the center of rotation. Also all the pairs of same-colored lines form 90° angles. That's what makes the rotation a rotation of 90°.
A glide reflection (sometimes shortened to just glide) is a type of isometry of the Euclidean plane: the combination of a reflection in a line followed by a translation along that line. Reversing the order of combining gives the same result. In the case of glide symmetry, the symmetry group of an object contains a glide reflection, and hence the group generated by it. If that is all it contains, it creates a new type of pattern called frieze patterns. A Frieze pattern is an infinite strip with a repeating pattern, or a border pattern or an infinite strip pattern. The term "frieze" is from architecture, where a frieze refers to a decorative carving or pattern that runs horizontally just below a roofline or ceiling. In the pattern below, each footprint is a glide reflection of the one just behind it:

The symmetry between the left footprints and the right footprints does not come from translation, nor is it due to a reflection since the prints are not next to each other. Instead, a combination of a translation and a reflection is needed. This results in what is known as glide reflection symmetry.
A special isometry that sometimes gets overlooked, but is absolutely essential is the identity. This means, doing nothing: leaving every point where it is. This is obviously an isometry. But since it leaves every figure fixed, every figure is symmetric under the identity. For this reason, we ignore it when identifying symmetric figures. A symmetric figure is one which is unchanged by some non-identity (also called non-trivial) isometry. But when we are counting symmetries of a figure, it is very crucial to count the identity. If we don't, we get misleading numbers. So every figure has at least one symmetry, namely the identity, but we don't call a figure symmetric unless it has another, non-trivial symmetry.
Introducing and Teaching Concepts
I usually introduce translations, reflections, rotations and glide reflections (collectively called isometries) together. As a firm believer in the use of manipulatives, and since my students work extremely well when they can actually see and feel what they are doing, I pull out my box of assorted triangles and quadrilaterals. I select two congruent non-regular polygons and place one on top of the other; two scalene triangles are my favorite. I then proceed to slide, flip, or rotate the top manipulative to demonstrate a translation, reflection, or rotation. The bottom manipulative remains in place as the original figure. This correlates well with most print textbooks, which may show the original figure in red and the transformed figure in black. If you wish the student to translate a figure to a given point, rotate it to a new position, and reflect it over a given line, you could use four congruent figures. I would probably want to use magnetic manipulatives or ones with velcro in a confined space, to keep things in place. Be sure to show the student the textbook graphics illustrating the same transformations, so they will become familiar with what the textbook furnishes them. If these graphics are not of high quality, make your own using some type of capsule/swell paper. Furthermore, I show my students examples of test questions on transformations from one of the many standardized mathematics release tests. Geometer's Sketchpad or similar dynamic construction program can also be effective in giving a feel for the behavior of the various types of isometries.
When we reach the topic of line or reflection symmetry, I remind my students of when they were younger and made valentine hearts by cutting a folded piece of paper. Believe it or not, my students have fun folding a piece of paper and cutting out hearts or some other symmetrical design. I tell them the folded edge is a line of symmetry. Then, I get out my manipulative box again, selecting two congruent right triangles. After placing one on top of the other, I flip (reflect) the one on top over the line segment formed by one of the legs to create a larger isosceles triangle with a line of symmetry (altitude) down the middle. You can also have your student use paper folding to determine symmetry lines for figures studied so far (quadrilaterals, triangle, etc.). Again, be sure to show the student the textbook illustrations of symmetry and/or make your own graphics as outlined above.
Tessellations or tiling patterns are arrangements of figures that fill a plane but do not overlap or leave gaps. In a pure tessellation, the same figure is used throughout. I usually begin with having my students check out my classroom floor, which is composed of square tiles. I also have a set of tables in the shape of isosceles trapezoids, which create a tessellation. Then I move to textbook or home-made tactile graphics of tessellations using rectangles, equilateral triangles, parallelograms, right triangles, regular hexagons, etc. Let the students explore to find that any triangle or quadrilateral can be used to tessellate a plane, but that only certain polygons with more than four sides tessellate a plane. Tessellations that use more than one type of polygon are called semi-pure tessellations. At this point, I get out my wooden Discovery Blocks from ETA (various and duplicate sizes of triangles, squares, rectangles, and parallelograms) and let them design their own tessellation. One young man designed an incredibly beautiful tessellation and placed the blocks inside a frame. It was quite a magnificent piece of parquetry.
Euclidean geometry is a mathematical system attributed to the Alexandrian Greek mathematician Euclid, whose Elements is the earliest known systematic discussion of geometry. Euclid's method consists in assuming a small set of intuitively appealing axioms, and deducing many other propositions (theorems) from these. Although many of Euclid's results had been stated by earlier mathematicians (Eves (1963), vol. 1., p. 19), Euclid was the first to show how these propositions could be fit into a comprehensive deductive and logical system (Eves (1963), vol. 1, p. 10). The elements begin with plane geometry, still taught in secondary school as the first axiomatic system and the first examples of formal proof. It goes on to the solid geometry of three dimensions. Much of the Elements states results which are now classified as part of algebra and number theory, couched in geometrical language (Eves (1963), vol. 1., p. 19).
We are surrounded by different shapes of objects and these objects contain symmetry. In fact, many people see all the different types of symmetry around us as being a thing of beauty. A shape has a line of symmetry if one half of it contains the mirror image of the other half. The line of symmetry of a two-dimensional figure is a line such that, for each perpendicular constructed, if the perpendicular intersects the figure at a distance 'd' from the axis along the perpendicular, then there exists another intersection of the figure and the perpendicular, at the same distance 'd' from the axis, in the opposite direction along the perpendicular. Another way to think about it is that if you can fold a shape in half and one half exactly covers the other half such that the two halves would be identical: the two halves are each other's mirror image. Thus a square has four axes of symmetry, because there are four different ways to fold it and have the edges all match. A circle has infinitely many axes of symmetry, one for every diameter, for the same reason.
You can use this opportunity to ask your students to investigate different shapes and tell how many lines of symmetry exist in those shapes. Letters and numerals are among the candidates to be scrutinized for symmetries. Use the following questions to guide your class in a conversation about symmetry objects and images. In your discussion, listen for ideas that could lead to interesting classroom investigations. What do you notice about the symmetrical objects? How are they the same and how are they different? Create a list of words describing what you see. Where around the classroom do you see symmetry? What type of symmetry do you see? Make a chart categorizing the symmetry objects. Which type of symmetry is most common? Why do you think things have symmetry?
Another place where the knowledge in symmetry is very important is wallpaper. Everyone will agree that wallpapers are one of the most common things we see everyday. Repeating patterns on floors (especially tiled floors) and ceilings fall into the same category. In our home, public bathrooms, in buildings, banks, etc. Use this opportunity to ask your students if they have ever stopped to give those wallpapers a second look? If they have, ask what see and if they have not, ask them to bring samples of wallpapers they could find to class the next day. You should plan to bring some samples along yourself just in case students are not able to find many. This is a very important activity that will help increase their knowledge and hence will encourage you to turn this into an activity or a project for the class (see Activity 4). When they bring these wallpaper samples in, have them look for any kind of symmetry. Another important observation is that the fundamental domains or the "base shape" of each wallpaper design is some kind of quadrilateral. There are different types of quadrilaterals all around us.
The hierarchy of quadrilaterals
In plane geometry, a quadrilateral is a polygon with four sides (or 'edges') and four vertices or corners. The word quadrilateral is made of the words quad (meaning "four") and lateral (meaning "of sides"). Simple quadrilaterals are either convex or concave. The interior angles of a simple quadrilateral add up to 360 degrees. We will elaborate more on simple quadrilaterals. Any quadrilateral will tile the plane by repeated rotation of 180 ° around the midpoints of its edges. The quadrilaterals that we will focus on are squares, rectangles, rhombi, isosceles trapezoids (trapezium), parallelograms and kites. These are all standard conventional terms that will be related to symmetry. In our discussion below, we assume that the reader knows what all these types of quadrilaterals are, and we will emphasize the symmetry aspects of the various types.
A square has all the characteristics of the rhombus and of the rectangle. It has four lines of symmetry, which results in eight types of symmetry. That is, four reflective symmetries and a 4-fold rotational symmetry.
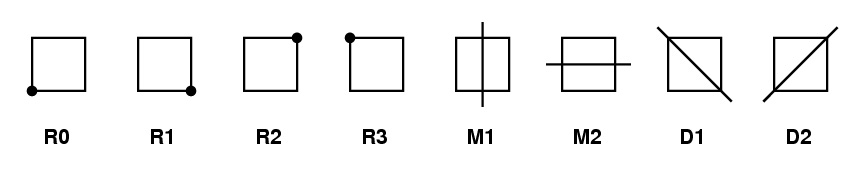
Where:
R0 = Rotation at 0° which means do nothing (also known as Identity),
R1 = Rotation at 90°, R2 = Rotation at 180°, R3 = Rotation at 270°
M1 =Reflection along the given line
M2 = Reflection along the given line
D1 = Reflection along the given diagonal
D2 = Reflection along the given diagonal
A rectangle is a special type of parallelogram, whose angles are all right angles. It has two lines of reflection symmetry and rotational symmetry through 180°, as well as the identity, for a total of four symmetries.

A rhombus is another special type of parallelogram. By definition, a quadrilateral is a rhombus if and only if all sides are congruent.
Thus a rhombus is an equilateral quadrilateral. The diagonals of a rhombus are perpendicular bisectors of each other. A rhombus has 2 lines of symmetry (namely, the two diagonals), which also results in four symmetries. That is, two reflective and two rotational symmetries.
In geometry, a trapezoid (trapezium) is a four-sided figure with one pair of parallel sides. We will take the point of view that a trapezoid is not a parallelogram because only one pair of sides is parallel, figure 1.
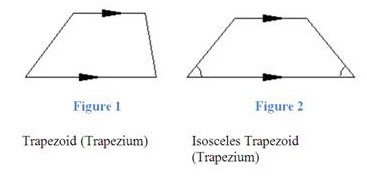
In an isosceles trapezoid (trapezium), the base angles have the same measure, and the other pair of opposite sides also has the same length. Hence you get a figure that looks like figure 2. It is called an isosceles trapezoid (trapezium) if the sides that are not parallel are equal in length. Then both angles coming from a parallel side are equal also, as shown. An alternative definition is: "a quadrilateral with an axis of symmetry bisecting one pair of opposite sides". This means that an isosceles trapezoid (trapezium) has only two symmetries, the identity and a reflection in the perpendicular bisector of the two parallel sides.
A Kite has two pairs of adjacent sides of equal length. This implies that one diagonal divides the kite into congruent triangles, by the SSS congruence condition. We call this diagonal the bisecting diagonal.

It has two pairs of sides, one pair on either side of the bisecting diagonal. The angles are equal where the pairs meet. Diagonals (dashed lines) meet at a right angle, the bisecting diagonal bisects (cuts equally in half) the other. In fact, the bisecting diagonal is a line of symmetry of the kite. With one line of symmetry, it means a kite also has two symmetries, reflection across the bisecting diagonal, and the identity.
Lastly, we look at the parallelogram. The typical parallelogram has no reflection symmetries. However, if you rotate it 180 o around the midpoint of one of the diagonals, the two vertices that are end points of the diagonal will be interchanged. Since any line is sent to a parallel line by rotation of 180 o, the two sides intersecting at one vertex will be taken to the opposite parallel sides intersecting at the other vertex. Therefore, the whole parallelogram is preserved, with pairs of opposite sides (and therefore, both pairs of opposite vertices) being interchanged. (This also shows that the center of rotation is also the midpoint of the other diagonal, and therefore, the diagonals of the parallelogram bisect each other in the center of rotation of the parallelogram.) Thus a (typical) parallelogram has two symmetries, rotation by 180 o, and the identity. Running this argument in reverse shows that a quadrilateral that is invariant by a rotation of 180 o must be a parallelogram.
Generally, an object with rotational symmetry is an object that looks the same after a certain amount of rotation. An object may have more than one rotational symmetry; for instance, a square can be rotated about 4 times and it will still look the same in all four rotations and hence it is said that a square has rotational symmetry of order 4. The parallelogram has a rotational symmetry of order 2. Also, if a shape only matches itself once as you go around (i.e. it matches itself after one full rotation) there is really no symmetry at all. This is also what is known as "do nothing" (identity).
With all these a really great hierarchy of quadrilaterals can be developed, based on their symmetry properties. The chart below shows the various quadrilaterals grouped according to the number of symmetries they have. All the arrows point to the square because the square has the most symmetries (eight in all). This is followed by the rhombus and the rectangle with four symmetries. The kite, parallelogram and isosceles trapezoid (trapezium) follow with 2 symmetries. (The kite really should be on the same line with the other two.) The arrows are seen originating from the quadrilateral because all the shapes are examples of quadrilaterals.
This will be a great tool in helping your students understand the quadrilaterals a lot better. Some of my struggling students are very happy when I am able to summarize my lessons. They say it helps them "tie it all together". To make sure that, summarizing indeed really works, I quizzed them on four lessons, one summarized and two not summarized. I realized that they did extremely well on the summarized lesson and not so well on the lessons that were not summarized.
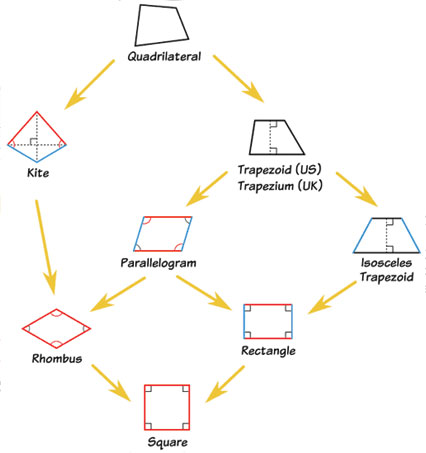
Symmetry Hierarchy of quadrilaterals
Tessellation
Tessellation is a repeated geometric design that covers a plane without gaps or overlaps, like wallpapers. Tessellations in principle do not end, they should be thought of as continuing infinitely. M.C. Escher was a famous artist who enjoyed twisting perceptions of reality. He was responsible for works such as Reptiles, Horseman and many more that incorporated the use of tessellations. Tessellations can be seen all around us, on the pavements, in our bathroom floor tiles, hardwood floors, just to name a few. Tesselations can have any of the four types of isometry as symmetry, namely reflectional symmetry, translational symmetry, rotational symmetry, and glide reflection symmetry. Students should be able to recognize each of these symmetries in wallpaper patterns. If they study a variety of tessellations, they should see that a tessellation can have rotational symmetry of order 1, 2, 3, 4 or 6, and only these. (This is the crystallographic restriction.) Among the patterns with a given order of rotational symmetry, it is possible to find some that have reflectional or glide reflectional symmetry, and some that have only rotational symmetry. This already creates 10 different types of wallpaper. Some of these 10 bins can be further refined, making 17 different types in all. See how many your students can distinguish!
Tessellation using Geometer's Sketchpad
This is the part of the unit where the students will begin to learn about the computer program called Geometer's Sketchpad. This program is a geometry software program for exploring mathematics and it is very user friendly. I will teach the students how to, first, open the program on their computers. The next step will be to show them how to draw on the sketchpad. The software comes with a toolbox that allows you to
- select parts of your drawings,
- point tool that helps with drawing points,
- compass tool that are used for drawing circles,
- straightedge tool for drawing straight lines (or edges), and
- text and custom tool that helps with inputting text in your drawings and customizing your drawings respectively.
The software also comes with a taskbar full of functions that will help you with any geometry drawing. When they are able to draw (or sketch) any shape on the sketchpad, then I will show them how to do some very basic tessellation. Simple tessellation on the sketchpad can be achieved by maneuvering the shape (or object) in different ways. By different ways, I mean you could, flip the shape (or object), slide the object, or even turn the object repeatedly. You can also use a combination of these to achieve some very beautiful tessellations. For example, it is described above how to create a tessellation starting with any quadrilateral, using only repeated rotations of 180 o in the midpoints of its sides.
The idea of tessellation is what is incorporated in the use of various wallpaper designs. Students will be shown different types of wallpaper designs and see how the idea of tessellation is used in them. Students will have a final project creating their own wallpaper design. They will begin this project by first choosing an object of interest, sketching the object using Geometer's Sketchpad and using the idea of tessellation to create wallpaper design.
Activities 1
This activity is a two part activity. Activity 1a is for the students to know the different types of quadrilaterals. Activity 1b is for them to know the hierarchy of quadrilaterals
Materials/Resources:
Foldable, color pencils, markers, ruler, paper, and scissors
Activity 1a
1. Give each student a copy of quadrilaterals and dot paper.
2. Have the students use dot paper to draw and label the different quadrilaterals.
3.Have the students answer the following questions:
- Which quadrilateral(s) have all four sides congruent?
- Which quadrilateral(s) have two pairs of parallel sides?
- Which quadrilateral(s) have all angles congruent?
- Which quadrilateral(s) have one pair of parallel sides?
4. Have the students find examples of quadrilaterals in the classroom.
Activity 1b
1. Give each student a sheet of paper.
2. Have the students fold a sheet of paper in half like a hotdog.
3. Have the students write the five types of quadrilaterals on the outside (leave space between each quadrilateral).
4. Have the students describe the characteristics of each quadrilateral on the inside that correspond to the quadrilateral on the outside.
5. Have the students use their drawings and foldables from the above activity.
6. Ask the students to describe the difference between a parallelogram and a trapezoid. Notice that there is an interesting relationship between parallelograms and trapezoids: if you cut a parallelogram by a line through the center, the two halves will be trapezoids, congruent to each other by a rotation of 180 o around the center of the parallelogram (In some exceptional cases, the halves will again be parallelograms, or triangles). Conversely, if you take a trapezoid and rotate it by 180 o around the midpoint of one of its non-parallel sides, you will create a parallelogram of which the trapezoid is half. Your students might enjoy this.
7. Have the students note that the trapezoid has exactly one pair of parallel sides and a parallelogram has two pairs of parallel sides. The only relationship that they have is that they both have four sides. This means that parallelograms and trapezoids are both quadrilaterals, but do not share other characteristics.
8. Have the students compare the rhombus, square, and rectangle. Ask the students what are the similarities.
9. Explain to students that a rhombus, square, and rectangle are four sided polygons with two pairs of parallel sides. Therefore they are both quadrilaterals and parallelograms.
10. Using the shapes, show the students the relationships among the square, rhombus, and rectangle. A square has four right angles and four congruent sides; a rhombus has four congruent sides; and a rectangle has four right angles. Then explain that a square is always a rhombus and a rectangle. A square is always a rhombus because they both have four congruent sides and a rhombus is a square only when the rhombus has four right angles. A square is always a rectangle because it has four right angles and a rectangle is only a square if it has four congruent sides. Have the students write the relationships in their math notebook.
11.Have the students complete an online activity-www.math.com-Polygons and Quadrilaterals Workout.
Activity 2
In this activity you will be using Geometer's Sketchpad to draw a figure and the figure will be "flipped" over a line of reflection. You will make observations that compare the new figure with the original.
Materials/Resources:
Geometer's Sketchpad on a computer
Procedure
1. Open Geometer's Sketchpad program on your computer and draw a half head as shown below.

2. Double click on the line of reflection.
3. Select the entire half head. (With the arrow tool, click and drag a rectangular region around the half head.)
4. Choose Reflect from the Transform menu.
5. Drag around any points or segments on the figure. What do you notice? Comment on the lengths of the segments, the size of each side and the angles on each side of the line of reflection.
6. What do you notice about the two red segments when you drag the earring? (Hint: to measure a segment, select the segment and choose Length from the Measure menu.)
7. Can you make the angle at one earring different from the angle at the other earring? (Hint: to measure an angle, select the 3 points that make up the angle and choose Angle from the Measure menu.) Why or why not?
8. Describe the relationship between the segments and angles on each side of the line of reflection.
9. Click Next. Now you are going to try to create a reflection yourself, without the help of Sketchpad! Use the segment tool to draw what you think the other side of the "half-shape" should look like. When you are done, use Sketchpad to reflect the "half-shape." How well did you do? If you want to try again, choose Undo from the Edit menu and start again.
10. Now it's your turn to create a reflected shape. Click Next to go to a blank sketch. Use the segment tool to draw a new "half-shape". Reflect your half-shape using Sketchpad.
Activity 3
In this activity you will complete some investigations using Geometer's Sketchpad. Remember to record all your responses. [NOTE: This activity is suitable for students who are a bit conversant with the Geometer's Sketchpad software]
Procedures:
1. Open a New Sketch.
2. In the Display menu go to Preferences and set the labeling for points and straight objects to automatic by clicking next to them, putting a check mark in the box at the left. Change the distance options to cm. Change the precision options to hundredths. Click okay to return to the sketch screen.
3. Construct a set of parallel lines using the construct menu. [Remember that you will need a line and a point to construct parallel lines.]
4. Construct a transversal. [You will need to draw a point on each line to construct your transversal. Note that each of these objects should now be labeled.]
- How many points are shown on each line? _______ Name them. ________
- What do you notice about how the points and lines are labeled?
5. Use the label tool to write "interior" and "exterior" in the appropriate areas of the parallel lines.
How can you determine the measures of the angles formed by these intersecting lines?
To measure an angle in Sketchpad, you must select three points with the vertex point as the middle point selected. Since your transversal has only ____ points, you will need to add points to the line.
6. Select the point tool from the tool bar and draw on your transversal on each exterior of the parallel lines.
7. Starting with the left uppermost angle, measure each angle of the diagram working in a clockwise direction.
Answer the following questions by observing your drawing and the measurements of the angles.
- What angles have the same measure? Name them using the three point method and the symbol for angle.
- How can you describe the locations of these angles with respect to the intersecting lines?
Activity 4
This is more like a class project. This activity can be used as a pre-activity before introducing the concept of symmetry. Through the course of the class, as you teach the concepts, the students will look back at their results and make changes, if necessary, to their observation and results. Students will use the knowledge of symmetry and isometry to group different types of wallpaper.
Procedures:
1. Each student will bring to class different wallpaper patterns they can find.
2. Students should be grouped into groups of three.
3. Lay all the wallpapers on a table.
4. Each group should group the different wallpaper patterns into different piles. Make sure that each pile you create has a peculiar characteristic. Example, pile A should contain all the wallpaper patterns that has reflective symmetry, pile B should have only rotational symmetry, pile three should have only translational symmetry. Some piles can have more than one characteristic.
5. The following questions need to be answered by each group after making their piles. Seek the help of your teacher if necessary.
- How many piles did you get?
- Name the piles according to the type of symmetry seen in the pattern.
- Are there any piles that have the same type of symmetry seen in the pattern? If yes why?
- How many piles have rotational symmetry?
- Is there any pattern that has a different order of rotational symmetry other than 1, 2, 3, 4, and 6? If yes, explain why?
Notes:
- Barker, W. and Howe, R, Continuous Symmetry. American Mathematical Society, 2000.
- Britton, Jim, Investigating Patterns, Symmetry and Tessellations. Dale Seymour Publications, 2000.
- Brown, G. Richard (1973), Transformational Geometry, p.30
- Coxeter, H. S. M. and Greitzer, S. L. Geometry Revisited. Washington, DC: Mathematics Association of America, p. 80, 1967.
- Durzhin, S.V and Chebotarevsky, Transformation Groups for beginners.
- Eves (1963), vol. 1., p. 19
- Eves (1963), vol. 1., p. 10
- Joyce, D. E. (1996), Euclid's Elements, Book I, Definition 7, Clark University, http://aleph0.clarku.edu/~djoyce/java/elements/bookI/defI7.html.
- Mathematics in School, 28(5), Nov. 1999, p. 30
- Pumfrey and Beardon (2002)
- Seidel (1998)
- Schattschneider, Doris and Freeman, W. M.C. Escher: Visions of Geometry.
- Weyl, Hermann, Symmetry.
Appendix A: Annotated Bibliography
Barker, W. and Howe, R, Continuous Symmetry. American Mathematical Society, 2000. This book explains in detail, everything about symmetry. The book also has clear and concise illustrations that vividly describe each concept.
Britton, Jim, Investigating Patterns, Symmetry and Tessellations. Dale Seymour Publications, 2000. This book contains background knowledge of symmetry and tessellations which will be beneficial to teachers. It comes with vocabulary and activities.
Brown, G. Richard (1973), Transformational Geometry, p.30
Coxeter, H. S. M. and Greitzer, S. L. Geometry Revisited. Washington, DC: Mathematics Association of America, p. 80, 1967. This book served as a reference book while writing this unit. It contains all the background knowledge of geometry.
Durzhin, S.V and Chebotarevsky, Transformation Groups for beginners. This is a book that is good for both students and teachers. It talks about all the transformational groups while giving detailed examples and concise illustrations.
Schattschneider, Doris and Freeman, W. M.C. Escher: Visions of Geometry. I really did not use this book in my unit but it does give interesting examples of wallpaper designs that can be used as kaleidoscopes. It will be very essential if you decide to do an activity where your students create kaleidoscopes.
Weyl, Hermann, Symmetry. This book is a bit of an advanced read but it does provide essential knowledge in symmetry.
Appendix B: Implementing District Standards
Virginia Standards of Learning Grade 6, 7, and 8:
6.14 The student will identify, classify, and describe the characteristics of plane figures, describing their similarities, differences, and defining properties.
7.9 The student will compare and contrast the following quadrilaterals: parallelogram, rectangle, square, rhombus, and trapezoid. Deductive reasoning and inference will be used to classify quadrilaterals.
8.8 The student will apply transformations (rotate or turn, reflect or flip, translate or slide, and dilate or scale) to geometric figures represented on graph paper. The student will identify applications of transformations, such as tiling, fabric design, art, and scaling.
Appendix C: Collection of Problems


Comments (0)
THANK YOU — your feedback is very important to us! Give Feedback