- Login
- Home
- About the Initiative
-
Curricular Resources
- Topical Index of Curriculum Units
- View Topical Index of Curriculum Units
- Search Curricular Resources
- View Volumes of Curriculum Units from National Seminars
- Find Curriculum Units Written in Seminars Led by Yale Faculty
- Find Curriculum Units Written by Teachers in National Seminars
- Browse Curriculum Units Developed in Teachers Institutes
- On Common Ground
- Publications
- League of Institutes
- Video Programs
- Contact
Have a suggestion to improve this page?
To leave a general comment about our Web site, please click here
Native American Geometric Community
byMarnita A. ChischillyIntroduction
Geometry has been a part of Native American history for centuries, as is clear from the study of the architectural techniques of Native American dwellings. Over the years the dwellings have changed and some are now only a part of history, but some Native American tribes still build their historical dwellings for ceremonial purposes. These dwellings are an important part of our heritage, a heritage that is fading from the memories of our youth. One approach in reconnecting students to their heritage is by using cultural relevancy in the teaching of mathematics, which is also a recommended approach in closing the achievement gap.
Background
Our school is under the Bureau of Indian Education (BIE), classified as a K-8th Elementary School located in a rural area, about 17 miles east of the nearest city. Our student population is 100% Native American in ethnicity, coming predominantly from the Navajo or Dine’ tribe, a few from other tribes such as Zuni, Apache and Sioux. As for our student body academically, we have 18% Special Education students, 98% designated English Language Learners (ELL), 10% Gifted and Talented (GT) students, with majority of 8% GT students placed on referrals for Leadership, leaving only 2% placed by Academic Achievements. All our students are receive free/reduced lunch, which indicates a majority of the student population is from low socio-economic backgrounds.
The assessment tools used by our school for evaluating Math area are from local teacher developed formative and summative assessments, resource material unit assessments and daily monitoring techniques, the standardized assessment of Partnership for Assessment of Readiness for College and Careers (PARCC) for Grades 3rd – 8th, and the Northwest Evaluation Assessment (NWEA) Measures of Academic Progress (MAP) tool for Reading, Mathematics, Language Arts and Science.
A majority of the students are identified as ELL according to the results of the state sponsored ACCESS/WIDA, given to grades K-8th to evaluate the five English Language Development standards. Currently, the demographic data of my upcoming 8th grade Math class consist of 58 students, ages 12 -15, comprised of 3 Inclusion Special Education students, 55 students classified as English Language Learners. There are 15 residential students and 43 day students. Six of the students are Gifted and Talented students eligible by the Leadership strand, and 2 by academic achievement. Five students are new, having transferred from other schools. The NWEA Fall 2018 overall Math scores indicate a high percentage of my students were in the lowest division of Levels - 23% being in the Basic Low level, 50% in the Average Low level, and 23% are in the Hi Low level; leaving the remaining 4% in the higher levels or proficient level.
Another important factor regarding my students is their cultural background. We are at a point where our youth are losing their cultural knowledge, language, clan system, and identity. As educators how do we bring our children back into learning their cultural heritage and their self-identity? How can we plant the seed of pride and passion back into them so they can understand the importance of their language and culture? What can we do to bring back the pride of living in a world of the beauty way (hozho)?
In researching this phenomenon, I feel a need for a different approach of instruction. To address this issue, it is the basis of my unit to instruct this math domain of geometry using cultural relevancy to deepen the understanding of math concepts and in the process bridging the knowledge of cultural heritage.
As part of our school district mandates, mathematics teachers are asked to seek activities that “model real-world phenomena to include cultural relevancy” and “represent and analyze relationships using mathematical concepts, verbal rules, geometric strands, and common core standards”. By utilizing the common core standards, teachers generally give students the opportunity to be actively involved in math through mathematical analysis and correlations that are integrated into cross-curricular lessons. I intend to demonstrate how these types of activities can be incorporated into a geometry unit as a way of conveying that history can have a strong impact on motivating students in learning math.
Content
Native Dwellings
Students will have a better understanding of the attributes and relationships of geometric shapes when they have the opportunity of learning the architectural practices of Native American dwellings by analyzing the region and history of the tribes and their reasons for building their structures in a specific manner. A key part of this unit is the attributes of three-dimensional objects and measurement, as students use the shapes, analyzing how they relate to the Native American historical dwellings. By relating these two concepts of math and history, my students will learn with a deeper understanding and will develop an insightful outlook of the importance in understanding mathematical concepts as their ancestors did. Also, by developing a critical domain of the common core standard such as geometry in an organized unit, I will deepen and extend understanding of the concept for my students.
The curriculum and student outcomes will focus on using common core mathematical standards regarding two- and three-dimensional objects by drawing, constructing and describing geometrical figures, and explaining the relationships between them. The math instruction will scaffold using dimension of shapes. A line segment is a one dimensional shape with a measurement of length. A two dimensional shape is on a flat plane. Length and width are only directly relevant for rectangles. The key measure of a planar figure is area. Polygons, such as squares and rectangles, are examples of simple two-dimensional shapes. Rectangles have two pairs of equal, opposite sides. The lengths of these sides are usually called the length and the width of the rectangle. A three dimensional shape is more complex, so the focus for this unit are cube, rectangular prism (cuboid), hexagonal prism and cone.
During my research for the best method of instructing geometry concepts, I found research articles affirming that using visuals, hands on activities and constructing physical models provided an in-depth understanding of math concepts. By using physical models in enhancing their knowledge of the concepts of shapes students can come to understand the reasoning behind the formulas used in geometry for perimeter, area, and surface area.
This unit incorporates a variety of ELL strategies to include cultural relevancy, vocabulary, visuals, hands on, and math talk/discussion/writing. I plan to teach this unit during the third nine weeks of class, which will begin with the history of Native American dwellings as a motivational piece and will be integrated throughout the unit. Then I will review the two dimensional geometric concepts of area and perimeter, which are important basic foundational concepts. Subsequently, we will study the geometry concepts of surface area of two- and three-dimensional shapes.
Using guided reading of articles regarding the history of Native American dwellings and showing pictures from the internet will support students’ comprehension of the history Native American dwellings. The students will learn or revitalize their memory that there are tribes that use cones, rectangular prisms, cubes, and hexagonal prism shapes for their dwellings.
Most native peoples live in modern homes today, but years ago, they lived in vastly different dwellings. These inventive buildings were constructed using the available natural resources, such as buffalo hide, wooden poles, grass, adobe bricks, twigs, wooden logs, boulders, and mud, not requiring the modern tools and resources we rely on today.
Native Dwellings
Tipi

Most people are familiar with the symbolic structure of North American conical dwellings best known by the Sioux word “tipi” (also spelled teepee). These structures have such international fame and recognition relating to the Native American people. These dwellings are from the plains nomadic tribes who were buffalo hunters. The tipi dwellings were common among the Plains tribes when the first Europeans came into the country during the 1500s. Tipis were not too big and had meager furnishings since everything had to be packed and hauled to different places. Long heavy poles were out of the question for these nomadic people who needed to follow the buffalo herd. These transportable dwellings were made to protect the people in their daily struggle for survival in a harsh and ruthless environment. So, the tipi has more meaning to the tribe than just a home, but as a sacred place of being for family and friends to keep the relationship bond strong.
The foundation for the tipi framework was four forked poles, interlocking at the top, with an additional dozen poles with no forks placed to make a complete circle. The cover consisted of rectangular shaped pieces of skin that were pierced at the corners so the skins could be tied or sewn together in a series, and with a slight overlapping so water would run off. The bottom series is longer than the top series of hides, which were then put together and cut to form the conical shape. Thus, when it is set up for living in, the tipi has the shape of a cone.
Pueblo

The longest enduring Native architecture in North America was built about three thousand years ago by the Native tribe that roamed the mountains and plateaus of the southwest. By the late 1190s, after primarily living on the mesa top for over 600 years, the native tribe began living in dwellings they built beneath the overhanging cliffs. The structures ranged in sizes from one-room storage units to villages of more than 150 rooms. While still farming the mesa tops, they continued to reside in these cliff dwellings, with continuous repairing, remodeling, and construction of new rooms for family. In the late 1270s, the population began migrating south into New Mexico and Arizona. From the ancient cliff dwellings evolved the kiva and above-ground dwellings called pueblos, named according to their resemblance to the houses and courtyards in Spain. Most pueblo villages housed family members and extended family relations. Families typically had several connecting rooms, which are often arranged in a line radiating out from the central plaza. Additions to a family’s section of the pueblo are generally added above or behind the original rooms. Traditionally, each pueblo also had two or more kivas or ceremonial rooms situated in the center of the complex.
The Pueblo structures were made of adobe and built like an apartment complex. Usually each floor is set back from the floor below, so it kind of looked like a stepped pyramid. This architectural form provided the roof of each level to serve as a terrace for the level above. Movement between the levels was accomplished by using wooden ladders. Most rooms above the ground floor could be entered by doorways between the adjoining rooms. However, the at the ground level, there were no doors because these rooms were used for storing grain. They were entered through rooftop openings. This limited the access to the buildings, so movable ladders were important and also used as a defense mechanism.
Pueblo buildings feature a box base, smaller box on top, and an even smaller one on top of that, with the tallest reaching four and five stories. Therefore, this dwelling uses the rectangular prism for their architectural design, with several prisms stacked up, each one smaller than the one below it.
Hogan

The hogan is an important part of the Navajo culture as it is defined as a sacred home for the Diné (Navajo) people. In the Diné culture a majority of the families have a hogan nearby even if they live in a modern style home, so that they can continue their traditional ceremonies, and to keep themselves in balance with mother earth. Today, although there is a decrease in Diné families living in hogans, as trailers or modern houses are becoming the trend on the reservation, the hogans are still built alongside these homes.
The older form of the dwelling is round and cone-shaped, but hogans are now made of logs in a polygonal form. The traditional hogans are built with wooden poles, tree bark and mud. The doorway of a hogan faces to the east to receive blessings from father sun. Except for a circular opening in the roof to allow smoke to escape, the traditional hogans are without windows or interior divisions. By the early 21st century, the architectural design of the hogan went through a few changes due to new construction materials and techniques. Hogans are now being built with windows and sometimes built into the floor plan of a modern home. Hence, hogans are still hexagonal or octagonal in shape with an open circular floor plan, an eastward-facing door, but currently being built with notched-log construction. For the Native village activity, I will use the hexagonal shape. The following is common knowledge amongst the older generation of the Diné people regarding the hogan.
Hooghan baah hashne’ dooleeł (I will speak about the hogan.)
East. Ha’ahaahdéé’ yah ajighááh. Ákwe’é nitsáhákees silá. (You enter from the East. Here ideas exist.)
South. Shádi’ááhjigo dashdiighááh. Ákwe’é nahat’á silá. (You head toward the South. Here planning exist.)
West. Áádóó E’e’aahjigo dashdiighááh. Ákwe’é iiná silá. (You head toward the west. Here life exist.)
North. Áádóó Nahookǫsjigo dashdiighááh. Ákwe’é sih hasin silá. (You head toward the west. Here older life exist.)
Perimeter and Area
The perimeter and the area are two different types of measurement of a polygon or geometric figure. Some students continually get them confused as well as believing that if one gets larger, then the other must get larger too. This is indeed a confusing concept for some students, which is why the concepts of perimeter and area need to be revisited on a yearly basis during the teaching of a geometry unit. One suggestion to avoid such confusion is teaching the concept using graph to show area grid which will support the foundation for a deeper understanding of perimeter and area measurement. Another recommendation is the use of square tiles to have a visual to make formulas of perimeter and area understandable. The use of Polyominos is another method in solidifying the understanding of the concepts.
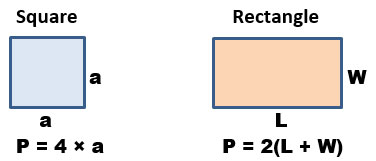
These instructional methods incorporate the same concept of providing visuals for students to grasp the mathematical concept. For instance, using the graph paper. A simple shape to use in teaching perimeter and area is the rectangle. On the graph draw a row of three tiles, then right above that array draw one more row of three tiles to form a two-by-three array, which is a rectangle. The rectangle you drew has a width of 2 units and a length of 3 units. Perimeter means the total length of all the sides of the shape. Now that we know the measurement of each side of our shape we can calculate the perimeter by adding the measurement of all the sides, as follows: 2+2+3+3 = 10 units. Now what do you notice? I notice there are two 2s and two 3s, because there are two sides with a measure of 2 (width) and the other two sides have a measure of 3 (length), so this helps us understand the formula for the rectangle, that A = 2 × (w + l) or A = 2(w) + 2(l). So, there are various methods that can be implemented to teach perimeter but selecting the methods and resources that fits your students’ learning style is optimal.
Perimeter
Most elementary school students have a good understanding of perimeter as the measurement of the distance around a figure. But sometimes students are so accustomed to finding perimeters where the length of every part of a figure is given and they just have to add all the given numbers. So, students who do not have this understanding of perimeter will find it difficult to determine the length of a side if it was not stated explicitly. On the other hand, a good relational understanding of perimeter includes reasoning based on relationships among the sides of a given figure.
By using the hands on investigation approach students will understand how the formulas are short cut methods used in calculating the perimeter of a given shape. With this in mind, investigating perimeter using differentiated centers would be ideal. Once students master the concept they can be asked to explain or justify why the following formulas are true.
Area
The definition for area is the amount of space in an enclosed figure. This is not meaningful to students when they don’t understand the concept. Therefore, one meaningful way of understanding the definition is for students to investigate area. Squares are easy to quantify because they are distinct quantities. If a shape is made of unit squares (that is, squares of area 1), the measurement of its area simply takes the form of counting the squares. If the region is a rectangle with sides of whole number length, and if students have seen that a rectangle can be decomposed into an array of squares (as in the 2 by 3 example above), then the multiplication method to find the area can be used. For instance, if we use the simple shape of a rectangle with a width of 3 units and a length of 4 units using square unit tiles, we see 3 rows of 4 tiles. To find the area of this shape we can count each unit tile, 1,2,3,4,5,6,7,8,9,10,11,12 units or add all the units 1+1+1+1+1+1+1+1+1+1+1+1 = 12 units or multiply the dimensions, 3 length units x 4 length units = 12 square units. Hence, the formula for the area of a rectangle is A= l × w or Area equals length times the width, with the units of each term understood.

Another important component when I teach measurement is to make sure that students use appropriate units. They should state their units of length when computing area and perimeter, and use units of area when explaining measures of area. Measures must be labeled with a unit or they lose their meaning. A unit is a fixed, reference amount. For instance, if a measurement is a big number, we need to know the quantity of the units and what unit is being used as measurement. In other words, the measurement of 10 inches is smaller than the measurement of 10 feet because of the unit of measure being used. Therefore, it’s important to have students write the solution of the measurement using the appropriate unit of measure.
So far we have gone over the measurement of perimeter and area. How are these related to surface area and volume? We know that all real world objects have several different measurable attributes such as length, area and volume. Length is a measure of the object that is one-dimensional such as a line segment. When we measured the perimeter of a planar shape we are actually finding the length or the one dimensional distance around the shape. The area of the shape was then measured by square units, which in other words means how many square units does it take to cover the shape. We will now move into our next content objective, of surface area.
Surface Area
In this topic, we are finding the surface area of three dimensional objects or the total area of the outside surface of a 3-D shape. A net is a mathematical tool used by many educators to help students in learning the concept of surface area. A net is a 2-dimensional pattern shape that can be folded to form a 3-dimensional shape or a solid. In other words a pattern made when the surface of a three-dimensional figure is laid out flat showing each face of the figure, which the students will use to find the surface area of the three dimensional figures.
First students should understand the use of nets with two-dimensional shapes which relates to the concept of finding area using graph paper. By using the net to find the area of the two dimensional figure students will be able to connect this concept to three dimensional shapes. Also, students need to be able to recognize, describe and build simple 3-D shapes, including making nets for the shapes. For example: they can be shown or handed a cube or cuboid for the 3-D model and then given some squared paper on which to make a net that will make an identical shape. This involves using guided instruction to support the students as they develop the understanding of what shapes are needed for the faces in order to make the net and how it will all fit together. The students will also need to measure the sides of the given shape so that they know how long the lines on their net need to be. So, a net of a 3-D shape is what it looks like if it is opened out flat. A net can also be folded up to make three-dimensional shape. There may be several possible nets for one 3-D shape. It is important for students to recognize the attributes connected to the 3-D shape on the net. It is also important for students to understand how the net relates to the three-dimensional shape because when they start calculating the surface area they tend to get confused when they don’t understand that some faces on three dimensional shapes will have congruent dimensions.
Once students have a good grasp on the concept of making a net for the 3-D shape the next step is for students to use the nets in finding the surface area of three-dimensional figures. To calculate the surface area of the object we need to find the area of each face and add them all together. For example, if we want the surface area of a cuboid or rectangular prism we would need to find the area of each face of the prism. Below is an illustration of a cuboid and its net. As you can see the area of Face A is product of w and h, Face B is the product of l and w, and Face C is the product of l and h. Since this is a cuboid we know the opposite face of A is F, then Face F will have the same area, the opposite face of B is D, then Face D has the same area as B, and the opposite of Face C is E, then E has the same area as C, and the last step is to add all the areas together. Hence the formula for the surface area of this cuboid is
SA=2lw + 2lh + 2wh.
This is shown in the following illustration.

Strategies
To improve student achievement, this unit incorporates ELL strategies that will be used to enhance the learning of the math concepts, which include; cultural relevancy, vocabulary, visuals, hands on activities, and math discourse.
Vocabulary
An important component for this unit is the geometry vocabulary, which we will review throughout the unit and use during student discourse. When it comes to learning math, English language learners (ELLs) have a unique challenge because they have the task of learning academic language and learning math content simultaneously. I know that language plays a critical role not just in reading and writing, but in learning mathematics as well. As a teacher, it is important for me to make math lessons comprehensible for my students as well as providing them with the opportunity to develop their language skills. Providing students ample opportunity to interact with math vocabulary is an important strategy. Students need to understand math vocabulary in order to be successful in solving word problems, following instructions, understanding and using mathematical terms correctly in math discourse. We tend to think of mathematics as a subject that does not require a strong command of language. In reality, however, mathematical reasoning and problem solving are closely linked to language and rely upon a firm understanding of basic math vocabulary.
I dedicate a wall in my classroom to be used as a word wall. I always add key words important to the concept, along with their definitions, and short examples of the word for the class to refer to as they learn. I encourage students to contribute to the word wall as well. Some vocabulary terms that should be added to the word wall for this unit include evaluate, justify, evidence, describe, establish, area, perimeter, surface area, volume, congruent, similar, polyomino, hexomino, rectangular prism, cuboid, cube, cone, hexagonal prism, triangular prism, rectangle, square, triangle, cone, length, width, height, dimension, angle, plane, vertex, segment, edge, face, and other pertinent geometry terms as needed.
Activity: The class will begin the vocabulary part of the unit by defining the terms in their own words after the instructor has given them lessons on their meanings and has provided visual clarifications and discussions. Students will create a vocabulary list using index cards, the cards will be kept in the folder for them to use during instructional lessons and during intervention time in small groups or in pair-share. Vocabulary review cards supports their learning.
Visuals
There are specific techniques that will help students be more engaged in learning math. These include the usage of visuals. The technique of providing visuals is an important instructional strategy in teaching math. Any of the following will not only make math more interesting, but will also help my students retain what they learn. Using colorful anchor charts, math posters, word walls, math procedures, guided instruction, whiteboard modeling, and other math instructional tools. In learning sequential step problems, highlighting each step in a different color can also support the learning process. Visuals would include learning math using online resources such as math tutorials or math video games. Another strategy is to have students keep journals to write about what they have learned, address questions they may have relating to recent lessons, create colorful notebook anchor charts, justifications, summarizing and reflect on lessons. Throughout this unit students will be using their math journals as part of their learning tool.
Activity: When modeling math procedures or providing guided instruction, I like to create an anchor chart alongside the lesson to post afterwards as a reference tool. These anchor charts should be colorful to help students distinguish each step of the math procedure. Anchor charts developed during lessons are more meaningful to students than math poster that are hard to see.
Math Discourse
Math discourse is another important strategy as it entails ways of discussing, representing, thinking, sharing ideas, and expressing thoughts orally or in writing. A tool to encourage discourse is sentence starters. They provide the support English language learners need in order to fully participate in math discussions; they contextualize and bring meaning to vocabulary; they provide a structure for practicing and extending English language skills; and they help students use the vocabulary they learn in grammatically correct and complete sentences. These sentence starters can also be used for partner talk, asking a question, and group discussions.
During class lessons incorporating partner talk allows more students to participate in classroom discussions, and eliminates the pressure that comes with speaking alone in front of a large group. It also support positive peer collaboration. I enjoy students figuring something out together because it builds trust and a good collaborative relationship.
A variety of other ELL strategies which I use throughout the school year that are not detailed in the unit include one on one, small group and whole group instruction, guided instruction, modeling, demonstrations, student presentations, peer tutoring, summarizing information, and think aloud.
Hands on Activities
We will also use hands-on activities to engage student in their learning. By using hands-on learning, students have a better understanding of math concepts and how they are applied in the real world. Manipulatives are important tools that make math content comprehensible. They give students ways to construct physical models of abstract mathematical ideas; they build students' confidence by giving them a way to test and confirm their reasoning; they are useful for solving problems; and they make learning math interesting and enjoyable.
An engaging way to have students have a deeper understanding of concepts is the use of manipulatives. With this unit I plan to use the hexominoes or tiles to engage students in higher level problem solving skills for understanding perimeter and area. By using hands on activities students are facilitating their own learning, learning with a partner or learning within a small group.
When students are working with perimeter and area, it’s important for me to give students an opportunity to explore by problem solving in order to gain information. By providing students the following activities, students will facilitate their own learning using hands on activities whether they work individually, with a partner or in a small group:
Teaching Activities
Here are some examples of hands-on activities that can be used to instruct these concepts:
- Have students create rectangles and squares on dot paper, geoboard, tiles or graph paper and have them determine the perimeter and the area of each one.
- The instructor draws irregular shapes to have students find the perimeter and area.
- Students write the definitions of perimeter and area in their own words.
- Students investigate hexominoes to find perimeter and area.
In using the hexomino investigation, give each student a set of 6 individual tiles and have students look at the common attributes of the models. In the activity, students will create polygons according to the instructions of using all six tiles to make different polygons. Students then find the area and perimeter of each of the polygons they created. I like to have students explain what they noticed about the areas and perimeters of the polygons.

Allow students to start out by working independently writing down their process. Ask questions such as:
- How many different figures did you make?
- Which model has the greatest perimeter measurement?
- Which model has the least perimeter measurement?
- What are some strategies that were used to arrive at this solution?
This activity allows students at every level to experience success. When the students come together after working independently, group students for a discussion to share strategies and solutions. This will allow students to learn from each other as well as developing an in-depth understanding of the learning outcome.
To make a connection to area or as an extension with this activity, students will be placed in small cooperative learning groups to come up with answers to the following questions:
- What is the area of the figure?
- Construct as many different rectangles as you can with an area of 24. 5. Do they all have the same perimeter?
- Construct as many different rectangles as you can with a perimeter of 16.
- Do they all have the same area?
Activity: To develop a strong foundational understanding of geometric concepts, which will involve activities in creating concrete models, discussions, hands-on activities, and practice. Using nets to find surface area of three dimensional shapes and have students trace each side of the solid to determine its net (a two-dimensional figure that when folded forms the surface of a three-dimensional object) Students could then construct the object from the net. Another strategy is to have students draw a net and have them fold their net to investigate if it makes a three dimensional shape.
Activity: Next students will investigate Three-dimensional concepts
In teaching geometric solids to middle school students, my students will benefit from using hands on activities for learning surface area and volume. I will start by showing students a container, such as a cereal box. I will ask these questions prior to starting the hands on activity:
- What is the math term for this object? (show the cereal box)
- How many faces does it have? Vertices? Edges?
- What shapes make up the faces?
- Turn to your partner and explain the difference between surface area and volume of the container?
- How would we measure the surface area of the container?
Next, ask students to imagine the net of the container, or the two-dimensional flat piece, that when folded will result in the three-dimensional container you are holding. When I use a cereal box, I point out that it is actually made by being folded up from a net (with a couple of extra flaps). After demonstrating and discussing the possible net of the container, have students use graph paper to sketch other possible net for the container. While they are completing this task cut the cereal box to reveal a net. Make sure to cut off any excess pieces that don’t belong to the net of the container. Next, have students discuss in their small groups how the net can be used to find the surface area of the container. I will listen to their conversations to make sure part of the discussion is about surface area as the sum of the area of all the faces on the net. I will use think-pair-share strategy at this point to have students share their ideas. After this guided instruction, in the next activity, I will pair the students and have them choose a container to answer the questions and allow them to investigate, as I monitor and give them support if needed.
First have each pair of students choose a container then have them complete the questions on the sheet which are:
- What do you know about surface area?
- Measure the dimensions of the object using mathematical tools.
- Draw a mathematical net for the container and determine each area of the faces.
- Explain the process you used to find the surface area of the container.
Authentic tasks such as this offer realistic problem solving that target students’ preferences and interests. More importantly the task allows students to work collaboratively and assess one another’s’ understanding.
Architecture Activity
Students will design and build a 3-D model of Native American dwellings, and find the surface area and volume of its structures aligned to common cores standards for middle school math. Students will need rulers, large pieces of paper, pencils, tape, glue, markers, cardboard or thick paper and sticks.
Show students examples of teepees, pueblos, and hogans both as structures of the past and present. Students will note characteristics of the dwellings, and identify the 3-D shapes they see, which are cones, rectangular prisms, and hexagonal prism.
Use cooperative learning strategy by pairing students or in groups of three. Students will work together to generate ideas for their structures and plan their community. In learning about the importance of community among the Native American tribes, students will design their community to show the important aspects in building a tribal community. Distribute large sheets of paper and ask students to draw basic blueprints for their cities, using rulers and compasses to create the shapes of the floors of their buildings. Students will need to label the area for the structure, and measure the dimensions of the floor of each building or designated area (remind students pueblos will need a large area). Using the planned dimensions given for the floor of each structure, students will create their dwellings out of paper to place in their community. You may want to demonstrate the basic method for measuring and drawing out pieces to tape together to make cubes, rectangular prisms, and hexagonal structures. Students can either decide on a height for their buildings before creating them, or create the buildings and measure them for height afterward. For visual examples the resources that would be optimal for this activity is using the pinterest website and online three dimensional nets for the shapes. Also, for modification, guide students who need assistance by providing blueprints and by helping them create their structures from copies of sheets with the pieces for the dwellings already drawn on them.
Once structures are drawn and created on paper, students can begin writing down and measuring the dimensions (height, length, width, radius, circumference) of each one. It’s easier to create a basic chart using these headings and students can begin filling in the chart.
Once students have measured their buildings and filled the dimensions in on the chart, they can begin finding the surface area of each building. Briefly remind students of the formula to find surface area:
- Surface area of a cube: A= 6 l2
- Surface area of a rectangular prism: A= 2(l∙w) + 2(w∙h) + 2(l∙h)
Once students have completed their charts, they can begin decorating their structures with paint or markers.
Assessment: Collect students’ charts and assess the accuracy of their calculations based on the buildings’ measurements.
I will offer students the opportunity to write and solve real-world word problems using the measurements of their structures, or encourage students to create a scale and calculate real-life dimensions of structures according to the information they learned during the lesson.
Integration of the final phase. In this phase, students do not learn any new material. Instead they review and summarize the work done in this unit through activities such as the following:
Relevant Project Idea
- Create a Native American community using three-dimensional shapes as the dwellings and have students use their shapes as models in finding measurement (surface area)
- Write an essay of what they learned in bridging heritage and math
- Show and tell - students will bring artifacts of their heritage or artifacts of the geometry concept they learned.
Resources
Marzano, Robert. J. & Simms, Julia. A., Vocabulary for the Common Core, Marzano Research Laboratory, Bloomington, IN, 2013
Elliott, Andrew C, Is That A Big Number?, Oxford University Press, Oxford, United Kingdom, 2018
Van de Walle, John A; Bay-Williams, Jennifer M., Lovin, LouAnn H., Karp, Karen S., Teaching Student-Centered Mathematics Developmentally Appropriate Instruction for Grades 6-8, 2nd Edition, Pearson Education, Inc., Boston, MA, 2014
Howe, Roger, Perimeter, Area, Volume, and All That; A Study of Measurement, 2019
Envision Math, Grade 6, Pearson Education, Inc. 2107
Websites
https://www.teepeejoy.com/teepee-history/
https://www.britannica.com/technology/pueblo-architecture
https://navajopeople.org/navajo-hogans.htm
www.virtualnerd.com
https://www.google.com/search?q=three+dimensional+tipi+construction
https://www.google.com/search?q=three+dimensional+hexagonal+prism+construction
https://www.teacherspayteachers.com
www.commoncoresheets.com
https://www.mathworksheetsland.com
https://tasks.illustrativemathematics.org/content-standards/6/G/A/4/tasks/1985
Appendix
Our school is implementing the Common Core State Standard (CCSS) which is a research-based set of learning progression detailing how students’ mathematical knowledge, skill, and understanding develop at each grade level. The standards support the development of knowledge and skills students need in order to prepare for mathematics in college, career, and in life. These standards define what students should understand and be able to do at each grade level. The standards encourage students to solve real-world problems using the components of mathematical practices.
The Dine’ Cultural Standards was developed by the Navajo Tribe to support the instruction and revitalization of the Dine’ language and culture. The standards are still in the development stages and are used by many schools on the Navajo Reservation. There are only a few standards created, but are the very foundation of our tradition.
Therefore, my unit is created to support my students develop a concrete understanding of the geometry strands from the Common Core Standards integrated with the cultural relevancy using the Dine’ Cultural Standards. The following are the list of standards addressed in this unit:
Standard 6.G Solve real-world and mathematical problems involving area and surface area.
6.G.4 Represent three-dimensional figures using nets made up of rectangles and triangles, and use the nets to find the surface area of these figures. Apply these techniques in the context of solving real-world and mathematical problems.
Standard 7.G.6 Solve real world and mathematical problems involving area and surface area of two- and three-dimensional objects composed of quadrilaterals, polygons, cubes and right prisms.
Dine’ Standard Concept 1 Nitsahakees – Shintsahakees bee adil nishdlii doo bee adaa akonisdzin dooleel - I will engage in activities that will increase my sense of self worth.
Dine’ Standard Concept 3 – Iina – Bits aadoo bee da iinaanii baa akonisin dooleel – I will implement and recognize the Dine’ lifestyle.
Comments (0)
THANK YOU — your feedback is very important to us! Give Feedback