- Login
- Home
- About the Initiative
-
Curricular Resources
- Topical Index of Curriculum Units
- View Topical Index of Curriculum Units
- Search Curricular Resources
- View Volumes of Curriculum Units from National Seminars
- Find Curriculum Units Written in Seminars Led by Yale Faculty
- Find Curriculum Units Written by Teachers in National Seminars
- Browse Curriculum Units Developed in Teachers Institutes
- On Common Ground
- Publications
- League of Institutes
- Video Programs
- Contact
Have a suggestion to improve this page?
To leave a general comment about our Web site, please click here
Area and Perimeter: Farming Polyominos on the Navajo Nation
byAndrea K. ThomasIntroduction
At the beginning of the school year I spend most of my time getting know my students. The effort I make is to help me understand where each one sees him/herself as a learner across all subject areas. For the past two years I have had the opportunity to be a 3rd and 4th grade looping teacher. This upcoming school year I will continue with my class of two years into the fifth grade. As students entered third grade, I can recall that 75% of my students (mostly boys) responded that math was their favorite subject. This percentage dropped the following year when students were asked the same question as fourth graders. About 50% of students, a larger amount who are boys, stated that math was their favorite subject. These results made me think about the possible reasons why students felt less confident in math after third grade.
After further investigating, through class discussions and individual student feedback, I came to the conclusion that my students were struggling to understand the conceptually abstract math that they were learning. As the teacher, I began to reflect on my own teaching approaches and experience with math as a learner. In my own personal experience when learning math, I can remember the emphasis of recalling multiplication facts and the emphasis of relying on formulas to help solve problems that had no connection to real world application. Instead the emphasis was ‘drill and kill’ and learning that one ‘right’ way to solve math problems.
The challenges that many of my students face when it comes to math is something that I can relate to. In an effort to encourage students to have a growth mindset about math, I have begun to rethink my approach to teaching math content. For this particular unit I want to help my students to gain a better foundation for measurement. The educational goal of the lesson is to get students to have a conceptual understanding on how to apply the area formula through hands on activities and real-world application.
Diné Culture Environment
I am Diné (known to the general public also as Navajo), and most of my students are also Diné. It is well to start with a clear statement of the overall situation. As indigenous people, the relationship that we have with our environment is something we hold dear to our culture. We believe that knowledge and respect of the natural world provides us what we need to survive. Agriculture continues to be very important to the livelihoods of many families. It not only provides food and economic revenue but is closely tied to the traditions and knowledge that have been passed down from generation to generation. The Diné people use plants for spiritual and medicinal purposes. Across the Navajo Nation there are communities that continue to use ancient farming techniques and (now enhanced with) modern technology to continue this tradition. In the community of Shiprock, which is located alongside the San Juan River, many farmers are making an effort to revitalize ancient farming traditions, not only for economic purposes, but for the revived purpose of sharing these practices with our future generations. Even more relevant, the Diné believe that farming is a way to learn life lessons such as strength, patience and peace within us. It is through these farming techniques that we are gifted with stories that have been passed down by our ancestors. In addition to reconnecting our youth with these traditional practices, there is an effort to promote food sovereignty in hopes of improving the health and wellness of the community.
Through our Diné oral history, it has been shared by our ancestors that we have four sacred plants: corn, squash, beans and tobacco. Corn is often considered to represent human life, as corn has different stages in its growth and development. A phrase heard quite often: “Oh beauty before me, beauty behind me, beauty to the left of me, beauty to the right of me, beauty above me, beauty below me, I’m on the pollen path”, provides some insight into the importance of corn in the traditions of the Diné people. We refer to this path as the Corn Pollen Path because it embodies our Way of Life.
In a strong effort to revitalize our Diné culture and language across the Navajo Nation there has been more of an interest to deliver culturally responsive teaching approaches in our curriculum. In the state of New Mexico, which includes 23 federally recognized tribes, it would behoove many educators to consider varied approaches that incorporate the culture of the students we serve within the school curriculum. This unit is designed to be culturally responsive. Again, a framing sentence can help the reader understand the context. Throughout this unit, students will learn the importance of farming in promoting cultural continuity, a connection with the earth that provides for us, and food sovereignty, which poses such a challenge to indigenous peoples living on reservations. Additionally, a multitude of life lessons will be learned through this process.
Demographics
I teach in the Central Consolidated School District. Mesa Elementary school where I teach is in the community of Shiprock, NM. It is located in the beautiful Four Corners (New Mexico, Arizona, Utah, Colorado) region of the southwestern United States. Shiprock, NM is in the northeastern area within the Navajo Nation. Diné Bikéyah, or Navajoland, is bounded by the corners of our four sacred mountains which rise along the fertile river basin of the San Juan. The Central Consolidated School District covers approximately 3,000 square miles, and serves approximately 6,000 students (of the roughly 150,000 Navajos currently living on the reservation) in 15 schools in five rural communities. According to the 2010 U.S. Census, Shiprock has a population of approximately 9,000. About 90% of the student population is Native American, and almost all (99%) of the students are considered to be economically disadvantaged. Shiprock comprises four elementary schools, one middle school, and two high schools; one is an alternative high school. For the past two years I have had the opportunity to be a 3rd and 4th grade-looping teacher. This upcoming school year, I will continue with my class of two years into the fifth grade. I believe looping has been very beneficial to the students that I serve because it has provided them with consistency in their coursework and expectations. Furthermore, this teaching position has allowed me to guide their educational path through skill development to positively help achieve their learning goals.
Over the course of my teaching experience I have witnessed the challenges students have had to overcome while in the elementary grades. Aside from poverty and family issues, the lack of quality teaching and standardized testing cripples and sets back many students within this population. The elementary grades are the primary years in a student’s educational path that promote a love of learning. It is during this formation period that having access to a licensed and experienced teacher is critical to all children. Many foundational skills are not being well developed in the early years of schooling. As a result, students do not have adequate foundational skills to help support them as they move into higher grade levels. Another challenge is in the area of standardized testing. Predominantly, in grades three through five, licensed and experienced teachers are placed in these grades to focus on meeting specific student outcomes. Unfortunately, students in the lower grades are left with substitute teachers to fulfill their lessons. As a result, students miss out on quality educational instruction; this eventually leads to reading and math gaps. These types of unsupportive structures have failed our students and continue to increase the achievement gap.
In terms of data, it is relevant to note the status of my district to gain a better perspective on the educational environment. According to the 2017-2018 New Mexico Public Education Department (NMPED) school district data, grades three through five proficiency rates noted: 20% of third grade students were proficient, 21% of fourth graders were proficient, and 24% of fifth grade students were proficient in expected mathematical standards. Although the proficiency increases from grade third to fifth, it is still below 50% proficiency. This data reflects that students throughout our district are continuing to struggle with mastering required math skills necessary for math at the secondary level. In my school, grades three through five, the data indicated that only 15% of students were proficient. Equally relevant, according to The National Assessment of Educational Progress (NAEP), 23% of 4th graders in New Mexico are proficient, and in the 8th grade only 16% of students are proficient. For this reason, I have found it necessary to design a lesson plan/curriculum devoted to remediating their understanding of area and perimeter before moving on to volume, the target material. The learning plan I formulate will use agricultural production as a model for mastering the concepts of area and perimeter. My goal is to provide an expanded curriculum design ultimately to address the expected standards of volume in a measurable way that is contextually coherent, consistent and culturally meaningful.
Content
Background
This past year, my fourth graders had difficulty comprehending the meaning of area. As a result, I believe that it is imperative to revisit more basic content before advancing to more complicated concepts like volume. My students will need a stronger command of third and fourth grade Common Core State Standards (CCSS) before they continue focusing on the fifth-grade standards concerning volume. According to Van De Walle, “... a significant leap for students is to move from counting squares inside of a rectangle to a conceptual development of a formula.”1
According to Van De Walle, students must learn mathematics with understanding, coupled with actively building new knowledge from experience and prior knowledge. Learning mathematics with a greater understanding is essential beyond the computational skills. Students should have the ability to think and reason mathematically in order to solve problems they will face in the future.1 My outlook is that students need to think of themselves as mathematicians. As opposed to focusing on the “one right answer” method, students ought to think and talk about mathematics. This mindset strategy will serve them well as they become confident that they can do the math. For students to become good problem solvers, they ought to be capable of monitoring their thinking regularly and automatically.
Content Objectives
This unit is created to help students develop a conceptual understanding of measurements of area, and to apply these concepts to measurement formulas through engaging and meaningful activities. This practical understanding will scaffold their practice with formulas calculating the area of a rectangle.
The unit is designed to reinforce my students’ understanding of measuring and calculating properties of one and two-dimensional space (length and area). It will also be used as an introductory platform for more advanced topics related to calculating three-dimensional volume formulas (in a future unit). Lastly, the unit is designed to incorporate the Eight Mathematical Practices of CCSSM, English Language Learners (ELL) strategies, and to create practical and engaging lessons in which students learn to measure properties of objects in their daily lives.
Measurement Instruction
Measurement refers to the concepts, standards and instruments we use to determine and compare the size of objects.2 It is one of the most fundamental elements of mathematics and appears daily in all our lives. Essentially, measuring is counting out how many of a given standard unit it takes to make up the quantity being measured.2 Another way to explain is, how many unit quantities of the same type “fit in” or are needed to equal, the quantity being measured. To determine the size of a measurement, students will need to know two things: (1) the number of units counted, and (2) what the unit is. For example, 20 inches is a smaller measurement than 3 feet, since it takes 12 inches to make 1 foot. The following ideas can be found in Elementary and Middle School Mathematics: Teaching Developmentally.1
To measure something, one must perform three steps:
- Decide on the attribute to be measured.
- Select a unit that has the attribute.
- Find the number of units that match the object, by filling, covering, matching or using some other method to compare them to the attribute of the object being measured. The number of units required to match the object is the measure.
Attribute: Length; one-dimensional
Units: rods, toothpicks, straws, inches, centimeters, miles, etc.
How many units are as tall as the envelope?
How much string is needed to go across the envelope?
Attribute: Area; two-dimensional
Units: index cards, squares of paper, tiles, square inches, square feet, square centimeters, square kilometers, etc.
How many tiles will cover the surface of the bucket?
For students to develop the mathematical skills of measuring a quantity or object, this skill must be explicitly linked to the concept of measuring as a process of comparing attributes, using measurement units and using measurement instruments.1
Comparison
Since measurement involves comparison, students must learn to compare before they learn to measure.1 At the third-grade level, students should have a good grasp of how to use greater than, less than, and equal to comparisons. In addition, students need to understand and use measurement concepts to better understand the measurement process and its results.1
Students should make sense of basic statements of comparison, such as:
a. “This cup holds less milk than that cup.”
b. “These two boxes weigh the same.”
c. “This table is wider than that table.”
before the following statements can make sense to them:
d. “This table is 5 feet wide”
e. “This bottle holds 4 liters of water”
Length
Length can be described as the size (or “measurement”) of an object (or part of an object) that is one-dimensional.2
When students first learn to measure length, they develop models to measure an attribute in single dimensional space, i.e., along a line. According to Beckman, there are three key ideas of measuring length that should be carefully observed, besides a possible misunderstanding of the role of the unit. Key errors include: students may leave gaps; or they may allow overlaps; or they may not recognize length as the attribute to be measured.2
As students begin to explore the concept of length using standard (customary and metric) units of measurement, they will learn how to answer the following questions: How far? How long? How wide? I would present the following task to students to see how they would go about selecting the appropriate measurement, model, and label regarding the object and attribute which they measure.
Perimeter
Perimeter is the distance around a 2-dimensional shape, or as my students would say “the total length of the outside edges of a shape.” The perimeter of the rectangle below is 20 units.
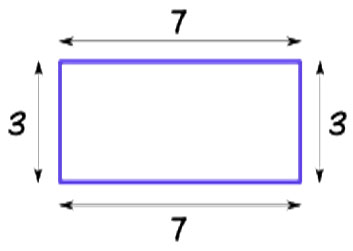
Figure 1
Perimeter of the rectangle is 20 units.
Students will be asked to demonstrate their understanding of perimeter by using a ruler to measure rectangular real-world objects in the classroom. To make clear that perimeter also applies to any planar shape, I will also have my students measure and add the length values of shapes with many edges (for instance, a hexagon or other polygon with more than four sides). During this task students will apply whatever strategy they are most comfortable with. Based on my experience I would expect that students will answer in one of two ways, as in the examples below:

Figure 2
Perimeter of the rectangle is 20 cm.
This lesson will allow me to see which students have good conceptual understanding of how to measure side lengths with whole number units. It will also give me the opportunity to address any misconceptions or misunderstandings that they may have. If needed, revisiting perimeter of rectangles may be a mini lesson before proceeding to the next section.
**It is important to note that for this curricular unit I will not be focusing on perimeter in depth because the majority of my students demonstrated a solid understanding of perimeter in fourth grade. Rather, I will revisit the perimeter concept in my first lesson to activate their prior knowledge and will identify students who may need to be retaught.
The perimeter activity continues to develop ideas about linear measurement. At this point in the lesson, it is assumed that students understand the need for standard units and can use tools that measure in customary systems. At the end of the lesson students will be able to recognize that perimeter is the measure around the outside edges of a two-dimensional shape. Once students have understood how to find the perimeter of rectangles, they will be given polygons, or complicate shapes. In which they will be asked to use an inch ruler to measure the sides of each shape to find the area.
Moving & Additivity Principle
Another fundamental concept of measurement that students should begin to develop is the understanding of additivity. This is especially important when students begin to solve area and volume problems. As students begin to learn how to figure out the area of a shape it is important that they have an understanding of the principles that are used to determine the area of a shape. Outlined below are the following ideas which can be found in the Mathematics for Elementary Teachers with Activity Manual.1
The moving and additivity principles regarding area are as follows (Van De Walle)1: Moving Principle: If you move a shape rigidly without stretching it, then its area does not change. If you rearrange the pieces of an irregular shape to make a simple square or rectangle, it is easy to calculate area using the length times width formula. In the figure below, a small (rectangular) piece has been cut off of an irregular shape and rearranged to make a simple square. The total area of the new, more complicated, shape is the same as the area of the original rectangle. However, the perimeter of the new shape is larger, by four times the height of the small rectangle, than the perimeter of the original rectangle.

Figure C
The figure demonstrates the “Moving Principle.”
Additivity Principle: If you combine (a finite number of) shapes without overlapping them, the area of the resulting shape is the sum of the area of the individual shapes (Figure C.1).

Figure C.1
3 x 5 = 15. 3 x 3 = 9.
So 15 + 9 or 24 square units.
Both of these properties helps the student to decompose shapes and calculate the areas of the pieces. Students should also be taught to subdivide the shape into smaller, measurable pieces.
Following this step, they can then move forward by simply adding the areas of these pieces to demonstrate additivity.1 Consequently, the combined sum will represent the area of the original shape. This process allows students to see the original shape as a combination of the pieces. But then for the pieces, they need to know how to find areas of rectangles. If they also find the perimeter of this shape, they can see, or I can point out, that it is the same as the perimeter of the 10 by 8 rectangle that contains the shape.
It is true for determining the area of a complex shape that, by subdividing the shape into more easily measurable pieces and then applying the additivity principle, it will be easier to make a final calculation of the area of the entire shape.1
Students will start off with a given (rectangular) shape. Next, they will then subdivide the shape.
At this point, they will recognize when they recombine the pieces, without overlapping, the outcome will be a different shape, but with the same area.
Area
I will help my students understand that area is an attribute of a two-dimensional figure. It will be important that they grasp how to measure the area of a region, and that it requires using a chosen 2-dimensional unit (for example, a unit square) to cover the figure without gaps or overlaps.2 When my students were in third grade and learning multiplication strategies, many of them used rectangular arrays to help find the product. During that process, students were given manipulatives such as square tiles to help them develop a conceptual understanding of how multiplication can be represented visually. As we began to explore the concept of area, some students were able to make the connection that rectangular arrays (rows and columns) could also be used to the area of a rectangle (See Figure D).

Figure D
An array of unit squares to solve a multiplication equation, then joining the squares to make a rectangle.
I use the math curriculum EngageNY initially to teach area and student-explored activities that scaffolded students learning in how to apply the area formula. For my unit, I will not be focusing on the initial instruction of area. Instead I want to focus on how to get students to build more of a conceptual understanding of the area model for rectangles with whole number sides.
When students are asked “How did you find the area of a closed figure?”, students will almost immediately students will respond, “Area is equal to length times width,” or “By counting the number of squares in the figure.” The first statement, although correct when the figure is a rectangle, seemed to be challenging for students to use when area was presented in word problems or standardized test questions. On the other hand, the second statement informed me that students may have the basic idea of area, but do not understand of how to apply the area formula for rectangles. For this reason, I believe that students need additional practice and spend time further exploring the concept of area.
Polyominoes
I plan on utilizing polyominoes to help students understand area beyond the area formula. Through this exploration students will realize how complex shapes can be. Additionally, I hope they will learn “to appreciate the simplicity of rectangles.” Polyominoes are a collection of unit squares, combined according to a couple of simple rules:
A domino is made of two unit tiles, a tromino is made of three unit tiles, a tetromino four, pentomino five, and a hexomino is made of six unit tiles. (See Figure E).

Figure E
Examples of a domino, tromino, tetronimo, pentomino, and hexomino.
Tiles that touch should be joined along a whole edge of each, and the figure should be connected, in the sense that you can pass from one tile to any other by going through the middle of edges (not corners). Examples are shown below in Figure F.
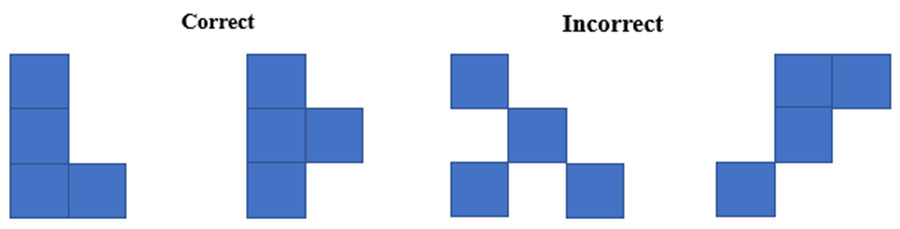
Figure F
Examples of the correct and incorrect way according to the polyomino rules.
Through these “ominoes” students will see that the area of two polyominoes made from the same number of tiles will be the same; however, the perimeters may be different. In the examples below I have illustrated 11 different hexominoes (Figure G) For instance, the hexomino that is a 2 by 3 rectangle (labeled K), and the W hexomino (labeled J) have the same area but a different perimeters. Actually, all the hexominoes in the collection have a perimeter of 14; except for the 2 by 3 rectangle (labeled K), which has perimeter of only 10. Students will explore this concept by creating a variety of polyominoes according to the rules stated above.

Figure G
Example of 11 different hexominoes.
Activities
Perimeter
The perimeter activity continues the development of ideas about linear measurement. At the point of this lesson, it is assumed that students understand the need for standard units and can use tools that measure in customary systems. At the end of the lesson, students will be able to recognize that perimeter is the measure around the outside edges of a two-dimensional shape.
Task
In this investigation, students will select 5 real-world objects in the classroom and measure the perimeter. Students will be encouraged the choice of some non-rectangular objects as a challenge. After selecting a shape, they will also need to choose the tool that will be best for measuring (ruler or yardstick). Students will work in pairs and will record their work on chart paper. As students work, I will circulate the room and ask questions while interacting with pairs, in addition to modeling questions I want the students to ask each other themselves.
Fixed Areas
The objective of this activity is for students to contrast the concepts of area and perimeter. Students will develop the relationship between area and perimeter of different shapes when the area is fixed. In addition to comparing and contrasting the units used to measure perimeter and those used to measure area. I will provide each student with 36 tiles such as 1” x 1” colored tiles, and a sheet of centimeter grid paper.
Students will begin by building a rectangle using 12 tiles at their desks. I will explain that the rectangle should be filled in, not just a border. I will model sketching the rectangle on the whiteboard and will record the dimensions of the read table in a recording chart - for example, “2 by 6”
I will ask, “What do we mean by perimeter? How do we measure perimeter?” Students will discuss in their table groups how to define perimeter and describe how it is measured. Next students will be asked for the perimeter of this (2 x 6) rectangle. I will reiterate and emphasize that the units used to measure perimeter are one-dimensional, or linear, and that perimeter is just the distance around an object. Record the perimeter on the chart.
I will ask, “What do we mean by area? How do we measure area?” Once again students will discuss in their table groups how to define area and describe how it is measured. Students will then record the area of this (2 x 6) rectangle. I will make explicit that the units used to measure area are two-dimensional and, therefore, cover a region. We are counting all the tiles inside the region. After counting the tiles, students will record the area in square units on the chart.
Next students will be asked to make a different rectangle using 12 tiles and record the perimeter and area as before. We will note that, although the areas are is the same, the perimeters are is different. I will challenge my students to make all possible rectangles (1 ´ 12, 2 ´ 6, 3 ´ 4) with 12 square tiles, and we will note that the perimeters are all different.
Task
Students will be asked to see how many different rectangles can be made with 36 tiles. Next they will determine and record the perimeter and area of each rectangle. The following directions will be written on the board:
- Find a rectangle using all 36 tiles.
- Sketch the rectangle on the grid paper.
- Measure and record the perimeter and area of the rectangle on the recording chart.
- Find a new rectangle using all 36 tiles and repeat steps b-c.
Students will be placed in pairs to work collaboratively, but will each be required to draw their own sketches and use their own “Rectangles Made with 36 Tiles” recording sheet. As students begin working, I will question them to be sure they understand the task and meaning of area and perimeter. As I rotate between table groups, I will be monitoring to ensure that students are both drawing the rectangles correctly and recording them appropriately in the chart. I will observe and ask the following questions:
What is the area of the rectangle you just made? What is the perimeter of the rectangle you just made? How is the area different from perimeter? How do you measure area? Perimeter?
As I am observing students I will keep the following questions in mind: Are student confusing perimeter and area? As students form new rectangles, are they aware that the area is not changing because they are using the same number tiles each time? These students may not know what area is, or they may be confusing it with perimeter. Are students looking for patterns in how to find the perimeter? Are students stating important concepts or patterns to their partners? We will end by having a discussion about the shapes of the rectangles with larger or smaller perimeter (longer and thinner means greater perimeter for a given area; more squarish means less perimeter for a given area).
Farming Activity
Lesson 1
I will begin by providing students with one 1” square tile and ask several questions such as, “What is the area of this figure?” “What is the perimeter?” Through careful modeling I will demonstrate on the whiteboard and record the answer. Next, students will be provided with two 1” square titles and asked to put them together make a domino. I will ask them the same questions. I will then ask students to rearrange the tiles and form as many figures as they can using only these two tiles and keeping in mind the rules as mentioned above. Students will continue these steps with trominoes, tetrominoes, pentominoes and hexominoes. Beginning with tetrominoes students will notice that you can have a polyomino with the same area but different perimeters. (See Figure G)
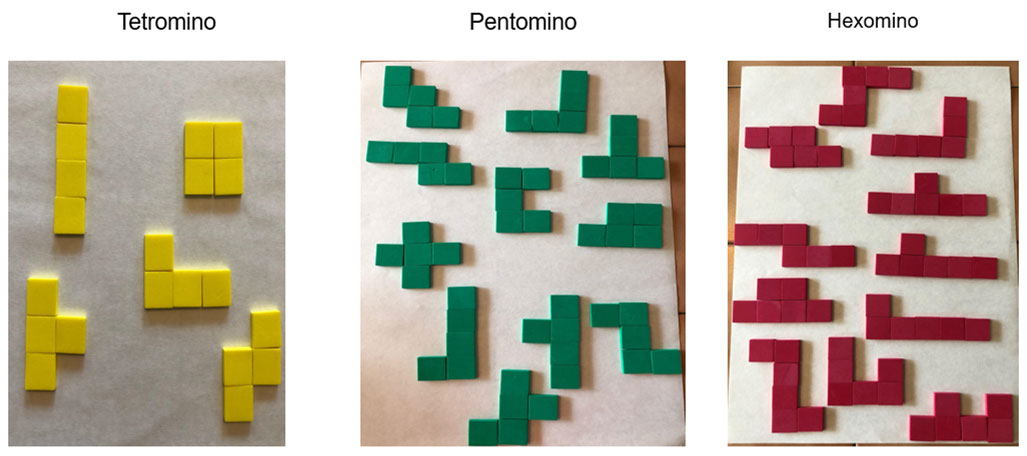
Figure G
Various tetrominoes, pentominoes, and hexominoes.
Students will work in table groups and will document their findings of tetrominoes, pentominoes and hexominoes on graph chart paper and on the Student Response Sheet (see below) before sharing out to the class.
Student Response Sheet
|
Draw Figure (Polyonimo) |
Perimeter |
Area |
|
1. |
||
|
2. |
||
|
3. |
||
|
4. |
||
|
5. |
Lesson 2
In lesson 2 students will take a closer look at squares and rectangles. I will begin by asking them to build three figures that are only rectangles or squares, each of which have an area of 16 sq. inches. (There will only be three ways: 1 x 16, 2 x 8, 4 x 4). (See Figure H)
Figure H
Area of 16 sq. units in three ways: 1 x 16, 2 x 8, 4 x 4.
Next students will mark each of the corners, or vertices, of the figures they’ve created. They will then remove the 1-inch tiles, and they will connect the dots to mark the boundaries of their figure. This will represent their planting field. Throughout all our exercises we will use the scale of 1 in.:1 ft. to indicate the approximate relative sizes of our figural representation compared to its real-world counterpart. I chose this scale, as well as approximate crop yields, to represent values that were close to real life but would still be easy for my students to manipulate. (So they can grasp the concepts of area and perimeter without getting bogged down in overly complicated calculations.)
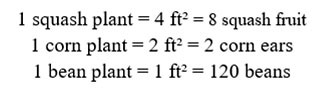
Students will be able to plant three different crops: beans, corn, and squash. Each of these crops will require a different amount of planting area. Beans will require one square inch. Corn will require two square inches. Squash will require four square inches. (This will have to be arranged in a 2 x 2 square, not a rectangle.) See Figure I.

Figure I
Square inch tiles representing the amount of area for each crop.
Students will plant their field however they will be asked to keep in mind the rule of polyominos, that the regions for different plants that touch each other must share at least one complete edge of a square.
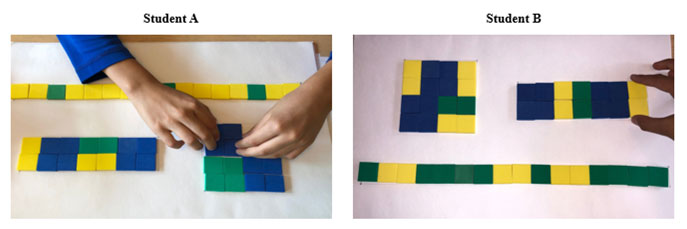
Figure J
Students planting their field according to the rules of polyominos.
The next step will be for students to calculate the area each crop takes up in their planting field. Lastly, using an approximate (the scale of 1 in.:1 ft. to indicate the approximate relative sizes) crop yield per square inch students will calculate how much of each crop they grew.

Students will be provided with 1” x 1” graph paper (individual) or poster size graphic paper (groups of 3 or 4) to draw their three planting fields. Last, students will be asked to share their planting fields using math vocabulary terms: covering, area, square inch, gap, amount.
Lesson 3
Students will be given a scenario of having to plant a field that will grow enough crops to feed one person through the winter months (three months). Prior to the start of this math lesson, the class will have a discussion to gather information about how much a person eats.
My students will start with the given that a person can live on two ears of corn, two squash, and forty beans a day. They will calculate that for one person to survive for a ninety-day winter they will need 180 ears of corn, 180 squash, and 3600 beans. Having calculated this and knowing that one corn plant produces two ears of corn and needs 2 ft² to grow, student can figure out that they will need 180 ft² of space to plant corn. Similarly, knowing one squash plant produces eight squash and needs 4 ft² to grow, they will need 92 ft² of space to plant twenty-three squash plants, and they will need 30 ft² of space for bean plants in order to produce 3600 beans.
The next step in the activity is to have students use a piece of 11 in x 8 ½ inch graph paper to plant a “graphical” farm which would feed one person throughout the winter months. Because a scale of 1 square inch to 1 square foot would not be practical for this lesson each square in the graph paper will represent 1 square foot (I calculated that each piece of graph paper should have 1,452 squares, more than enough space to accomplish this task). My final exercise will be to plant a field to feed a family of 4. I will again use graph paper and have students find out how many square feet of planting space will be required to produce enough crop yield for their objective. Using all that they have learned about polyominos and calculating area as a function of length x width, my students can use their imagination to create a wide variety of different crop arrangements to still produce the required crop yield.
At the end of this project students will share their unique strategies and field designs with one another using topic appropriate vocabulary to describe their rational for arranging crops in the way they chose.
Teaching Strategies
Class Discussion
After completing each activity students will be asked to engage in a discussion, answering the following questions:
1.How did you solve the problem?
2.Why did you solve is this way?
3.Why do you think your solution is correct and makes sense?
Math Journals
Students will also be encouraged to use the following math vocabulary in their discussions. Upon completion of the activity students will then be asked to reflect in their math journals:
1.How did you decide what to do?
2.Did you think about your answer after you got it?
3.Can something you did in this problem help you solve other problems?
Culturally Responsive Teaching
Culturally responsive teaching is defined as using the cultural characteristics, experiences, and perspectives of ethnically diverse students as conduits for teaching them more effectively.5 In my classroom, this approach to teaching is imperative because all my students are Native American and almost all have experienced the world through the lens of an upbringing on the Navajo reservation and in the Diné Culture. I shared in this upbringing, so I believe in my ability to adapt my lessons to this learning environment. As a teacher and a Diné woman, I am not only responsible for teaching the content and standards to students, but also for providing a method that helps my students to become more socially aware of the role they play in their community. This is very important when building a learning platform. It also entails promoting the continuity of my culture and community. I will accomplish this by creating a cultural scaffolding in my lesson planning which will support teachers as they use their knowledge and strategic thinking to serve the best interest of their students.5 An example of how this is performed in my classroom is by setting high expectations, encouraging creative strategies, and incorporating students’ cultural values, traditions, and history into the curriculum. This increases student interest and makes them understand how their instruction applies to the practical realities of their lives.
Growth Mindset
It is essential to establish classroom norms that communicate the expectations I have for my students. It is imperative that I create an environment that encourages students to demonstrate a growth mindset. I believe it is of the utmost importance that all students learn math at the highest levels. By having positive norms and expectations, and using encouraging words with students, I will allow them to begin to feel comfortable and think as mathematicians. Once students feel supported in their learning environment, they will be more willing, open, and without hesitation in demonstrating their math strategies and solutions as they work through problems. This engagement will allow students to begin to think intuitively. The goal is, as Jo Boaler stated, “Children need to see math as a conceptual, growth subject that they should think about and make sense of.”4 By encouraging students to explain their thinking process, the outcome helps students at all academic levels because it allows students to improve on their use of academic vocabulary, and provides them with a platform to share their thought process with their peers.4 This process also invites students to think openly and freely as opposed to being apprehensive in sharing aloud or to their peers. When planning lessons and thinking about the content delivery, I have found that connecting mathematics to real-world situations is positive. Not only do students become engaged, but allows for them to see how they apply their math skills to their daily lives. Lastly, it is imperative that the teaching of math concepts include the use of manipulatives and technology (when appropriate).
Math Talks
In my classroom, I often have the same students immediately answer questions because they already know the answer. This often leads other students to rely on the students they perceive as being the ‘smart ones’ to answer the question. Consequently, in order to prevent this from happening in my classroom, I try to be selective in the types of questioning that I use, especially during our math block. I typically use open-ended questions to allow students to go beyond answering simple recall questions. It requires students to dig a little deeper into their thought process when explaining how they were able to solve a math task. In addition, it offers students a way to collaborate with their peers and to hear a variety of solutions and strategies used by various students to explain their thinking. For this method to work effectively, I have to be careful in my planning and in the development of good questioning strategies when designing lessons.
I have found that Math Talks is a strategy that deeply benefits my English Language Learners and Special Education students. It allows them to have the time they require to process their thoughts. This method also allows them to further explain their thinking aloud to their peers. It in turn allows them to scaffold their understanding of math concepts. Additionally, Math Talks provides students with the opportunity to practice using math vocabulary in a comfortable setting. To encourage success in all students, I believe it is imperative to build confidence in math on a daily basis, especially as the math becomes more abstract in grade three and beyond. Though the Math Talk strategy my students are able to gain a better understanding by building on their prior knowledge and hearing multiple approaches. The goal is to help students make connections via this strategy. I share with all my students that the more strategies they have to solving a problem, the better they become as mathematicians and in developing a true understanding of math. Also, I tell them “If you can’t explain your math thinking, then you really have not grasped a true understanding of the math behind it.”
Inquiry Based Learning & Activities
Inquiry-based learning strategies and activities will be utilized to involve all my students and encourage them to be active learners. All students entering the classroom have prior knowledge and experiences they can use to help them to reinforce their learning. Through the inquiry-based approach, which is student centered, I will ultimately encourage students to develop their own skills. This transfers the responsibilities from teacher to student. It also allows students to become comfortable with struggle and provides them the support of their classmates and teacher to successfully guide them through any frustration. In addition, this approach promotes a diversity of voices and aides in helping students develop their own skills and become content-area experts. As the facilitator, I will guide students by using attentive, individually created questions that allow students to share their ideas and questions about the topic. Plus, it will allow them to use evidence to justify their thinking. Ultimately, this approach promotes a diversity of voices, and allows varying approaches to be heard.
Differentiated Instruction
As a classroom teacher, I find that immense careful and thoughtful planning is required to meet the individual needs of my diverse students. In my teaching experience, I have found considerable success in developing a positive classroom culture through this differentiated approach. Each student is treated as a unique individual, from the moment they enter my classroom. I get to know students as many enter the classroom at different levels. I recognize they need the guidance of a variety of learning styles. Specifically, I am equally attentive to my Special Education, English Language Learners (ELL), gifted students, and students who have academic plans that require specific modifications. A few of the strategies I found to deliver the greatest successes were providing student choice and opportunities to demonstrate their learning through multiple pathways. This allows students to take ownership of the task at hand, in addition to tapping into their creativity.
Appendix
Common Core State Standards (CCSS)
The curriculum unit is designed to provide a framework to reteaching area focused on building students’ understanding of area. It aligns to the CCSS for math in grades third and fourth.
3.MD.C.5 The student will
Recognize area as an attribute of plane figures and understand concepts of area measurement.
3.MD.C.5.A The student will
A square with side length 1 unit, called "a unit square," is said to have "one square unit" of area, and can be used to measure area.
3.MD.C.5.B The student will
A plane figure which can be covered without gaps or overlaps by n unit squares is said to have an area of n square units.
3.MD.C.6 The student will
Measure areas by counting unit squares (square cm, square m, square in, square ft, and improvised units).
3.MD.C.7 The student will
Relate area to the operations of multiplication and addition.
3.MD.C.7.A The student will
Find the area of a rectangle with whole-number side lengths by tiling it, and show that the area is the same as would be found by multiplying the side lengths.
3.MD.C.7.B The student will
Multiply side lengths to find areas of rectangles with whole-number side lengths in the context of solving real world and mathematical problems, and represent whole-number products as rectangular areas in mathematical reasoning.
3.MD.C.7.C The student will
Use tiling to show in a concrete case that the area of a rectangle with whole-number side lengths a and b + c is the sum of a × b and a × c. Use area models to represent the distributive property in mathematical reasoning.
3.MD.C.7.D The student will
Recognize area as additive. Find areas of rectilinear figures by decomposing them into non-overlapping rectangles and adding the areas of the non-overlapping parts, applying this technique to solve real world problems.
3.MD.D.8 The student will
Solve real world and mathematical problems involving perimeters of polygons, including finding the perimeter given the side lengths, finding an unknown side length, and exhibiting rectangles with the same perimeter and different areas or with the same area and different perimeters.
4.MD.A.3 The student will
Apply the area and perimeter formulas for rectangles in real world and mathematical problems.
Standards of Mathematical Practice
MP1.Make sense of problems and persevere in solving them.
Students will solve word problems involving rectilinear figures.
MP4.Model with mathematics
Students will apply multiplication and addition to solve area problems.
MP6. Attend to precision
Students will attend to precision with appropriate vocabulary to describe decomposing rectilinear figures.
Bibliography
- A., Van De Walle John, Karen Karp, and Jennifer M. Bay-Williams. Elementary and Middle School Mathematics Teaching Developmentally. 7th ed. Boston: Pearson/Allyn and Bacon Publishers, 2010.
- Beckmann, Sybilla, and Sybilla Beckmann. Mathematics for Elementary Teachers with Activity Manual. Boston: Pearson Addison Wesley, 2011.
- Boaler, Jo, and Carol S. Dweck. Mathematical Mindsets: Unleashing Students Potential through Creative Math, Inspiring Messages and Innovative Teaching. San Francisco: Jossey-Bass, a Wiley Brand, (2016): 34-50, 172-207.
- Gay, Geneva. Culturally Responsive Teaching: Theory, Research, and Practice. 3rd ed. New York, NY: Teachers College Press, 2018.
Additional Resources
- "Home." Central Consolidated School District Home. Accessed July 14, 2019. http://www.ccsdnm.org/.
Comments (0)
THANK YOU — your feedback is very important to us! Give Feedback