The Backwards and Forwards of Photosynthesis

byLarissa Spreng

One of the things I love most about being a teacher is that each day I get to see the direct impact of the work I do.  Over the past five years, I have seen just how high the stakes are for my students.  But every skill or life-lesson I teach them can open the door for opportunities and put them on the life path to becoming engaged global citizens in an every changing society.  This curriculum unit will allow my students to discover where the energy in fossil fuels actually comes from.  Students will engage in a series of problem-based learning experiences in order to connect several large concepts including: the chemistry of photosynthesis, the role photosynthesis played in the evolution of Earth’s atmosphere, fossil fuel combustion, and atmospheric chemistry. 

The New Haven 7th grade curriculum includes content aligned with the Physical Science and Physical Chemistry seminar topic.  This seminar will connect with the second unit in the 7th grade curriculum (Chemical Properties) including: chemical equations. 10

This curriculum unit will focus on the chemistry behind photosynthesis.  Students will use the chemical equation for photosynthesis to learn about properties of atoms vs. compounds, reactants and products in a chemical equation, balancing chemical equations, and subscripts and coefficients.  On a deeper level my students will be able to discover where the energy in fossil fuels actually comes from by examining the reverse reaction of photosynthesis, combustion. 

This chemical equation will also be used to analyze the role photosynthesis played in the evolution of the Earth’s atmosphere.  Students use problem solving skills to analyze data from air samples collected from amber.  The Keeling curve will also be used to compare oxygen and carbon dioxide trends over the course of seasons and years. 

A major focus of our unit will be on oxygen production and carbon dioxide uptake in photosynthesis and carbon dioxide release in fossil fuel combustion.  I would then like my students to create a culminating project in which they create a 3-D model or diagram to compare the chemical equations for photosynthesis and fossil fuel combustion.

I believe creating a curriculum unit focused on energy sciences, will allow me to change the minds of my students and create citizens capable of making informed decisions about energy use.  This unit will foster transformational change by impacting all areas of my students’ lives, from academic growth to problem solving and career development.  Academically, my students will gain exposure to real world scientific connections.  They will engage in cutting-edge work of the discipline, through hands-on activities and demonstrations.  This unit will also focus on problem solving.  My students, like scientists, will practice thinking critically and creatively to solve problems that relate to the world around them and other fields of science and mathematics.  And finally, this unit will provide my students with a deeper understanding of STEM careers and hopefully spark their interest in pursuing a degree in science, technology, engineering, or mathematics to discover potential future sources of energy.

Energy for Ecosystems

An ecosystem is made up of all the living and nonliving things that interact with each other in a certain place.  The living things in an ecosystem depend on one another, but they also rely on nonliving things around them. 14  Within ecosystems, there are interactions between the living things and the nonliving environmental features, such as water, temperature, sunlight, soil and air.  The abiotic factors impact the living organisms; for example, the temperature and availability of water affect plant and animal growth.  The living organisms impact the environment; for example, plants release oxygen to the air and materials from decomposing leaves enrich the soil. 14  A vital nonliving thing, the sun, is the source of food in some way or another for all living things. 14

All living things require energy and matter in order to maintain order, grow, and reproduce3.  This energy is cycled through ecosystems and is passed from one living thing to another. 14  Organisms rely on a variety of evolutionary strategies to capture, use, and store energy.  But the source of all this energy is sunlight.  The sun is the main source of energy for all life on Earth.  For example, autotrophs capture energy from their environment through photosynthesis and chemosynthesis. 14  Plants, algae, and some bacteria use the energy from the sunlight to make their own food.  This food is the source of energy for all living things in an ecosystem.  For example, herbivores gain the energy they need to survive by eating plants.

Earth’s Cycles5

The world we live in is constantly changing, but many natural phenomena make cycles, allowing them to come back to the way they were.  Some important cycles include the water cycle, oxygen cycle, carbon cycle, nitrogen cycle, and phosphorus cycle. 5 Although these cycles are natural and ongoing, human activities, such as agriculture, industry, and energy production, can disrupt the flow of the Earth’s cycles.  For example, burning fossil fuels, such as coal, oil and natural gas, affects the carbon cycle. 5  To combat these ongoing problems and work toward a “greener” world we need to look for ways to go “green.” 5

Photosynthesis 

The process by which plants use energy from the sun to make their own food is called photosynthesis. 16  In multicellular plants, photosynthesis occurs in tiny structures called chloroplasts in the cells. 16  In most plants, chloroplasts are found in the leaves.  Chloroplasts contain a green pigment called chlorophyll that absorbs the energy from the sunlight. 14  It is this pigment that gives leaves and stems their green color.  The absorbed energy from the sun is used to change carbon dioxide and water into glucose (sugar) and oxygen. 16

Photosynthesis occurs in a series of “enzyme-mediated steps” that allow the plant to capture light energy from the sun and use it to build energy-rich carbohydrates. 3  The process is summarized in the following unbalanced chemical reaction:

CO2 + H2O + Sunlight  ->  C6H12O+ O (1)

Figure 1. Photosynthesis in plants. 1 (At09kg, 2011. Copyright free licensing under Wikimedia Commons.)

The sun is the main source of energy on Earth and it plays a vital role in photosynthesis.  During photosynthesis, carbon dioxide (CO2) and water (H2O) join chemically to produce oxygen (O2) and glucose (C6H12O6), which is an energy-rich sugar.14  Green plants use light energy to make sugar molecules from the atoms of water (H2O) and carbon dioxide (CO2). 6  During this chemical change, green plants release oxygen needed by most organisms for respiration.  Plants and animals take in oxygen and use it to release the energy stored in sugars and other molecules produced during the photosynthesis. 6  During this respiration process, CO2 is released into the air or water.14

Plants’ ability to do photosynthesis is affected by atmospheric conditions such as precipitation amount and air temperature. For example, plants absorb water from the soil using their roots.  Soil is a mixture of materials that includes weathered rocks and decomposed organic material, as well as air and water. 14  The composition of soils affects how air and water move through the soil, and this influences the kinds of plants that can grow and the animals that rely on those plants for food.  Carbon dioxide is another reactant in this reaction and this gas is taken in through small openings in the leaves of plants called stomata. 14  Once inside the leaves, water and carbon dioxide move to the chloroplasts.  A series of chemical reactions lead to the production of glucose and oxygen. 14  Plants use this energy-rich sugar, glucose, for food and release the oxygen into the air as waste.

Energy Behind Photosynthesis

Energy is a property of everything.  Energy must be put into something in order to get energy out.  In the example of photosynthesis, solar energy (light) must be put in order to get chemical energy out.  This process involves taking low-energy chemicals and converting them into high-energy chemicals.  The reactant side to the photosynthesis equation is:  CO2 + H2O + Sunlight. 6  CO2 and H2O have strong bonds with low energy.  While the products side of the chemical equation is:  C6H12O+ O2.  C6H12Oand O2 have  weak bonds with high energy. 

Why is light required?

Since the reactants side is made up of strong bonds, energy is needed in order to break these strong bonds.  Sunlight is the natural energy source for photosynthesis.

Light is an electromagnetic wave.  The light we see is called visible light. 9 This light is only a small part of the electromagnetic spectrum.  White light from the sun is a mixture of all colors of the light spectrum.  Visible light, or white light, can thus be separated into individual colors or light. 9  Visible light is seen as red, orange, yellow, green, blue, indigo, and violet. Each color has a unique wavelength. Red light has a long wavelength, but the lowest energy of all visible light. 9  Violet on the other hand has the shortest wavelength of all visible light, but the highest energy. 9

Light controls many plant processes.  Light can either be absorbed or reflected by substances called pigments.  Most plants are green because the pigment chlorophyll reflects green and yellow light and absorbs the other colors of the spectrum.  Chlorophyll in plants absorbs mostly blue and red wavelengths of light.  Blue wavelengths, 400-450 nm, and red wavelengths, 625-700 nm, are necessary for photosynthesis. 9  Photoperiod responses, the physiological reaction of plants and animals to the length of day or night are also triggered by red wavelengths. 9  Phototropic responses, the growth of plants toward a light source, are triggered by blue wavelengths.9  The average rate of energy capture by photosynthesis around the world is 130 terawatts. 15 This is about seven times the current power consumption of the planet.  Photosynthetic organisms are able to convert around 100-115 thousand million metric tons of carbon into biomass each year. 15 

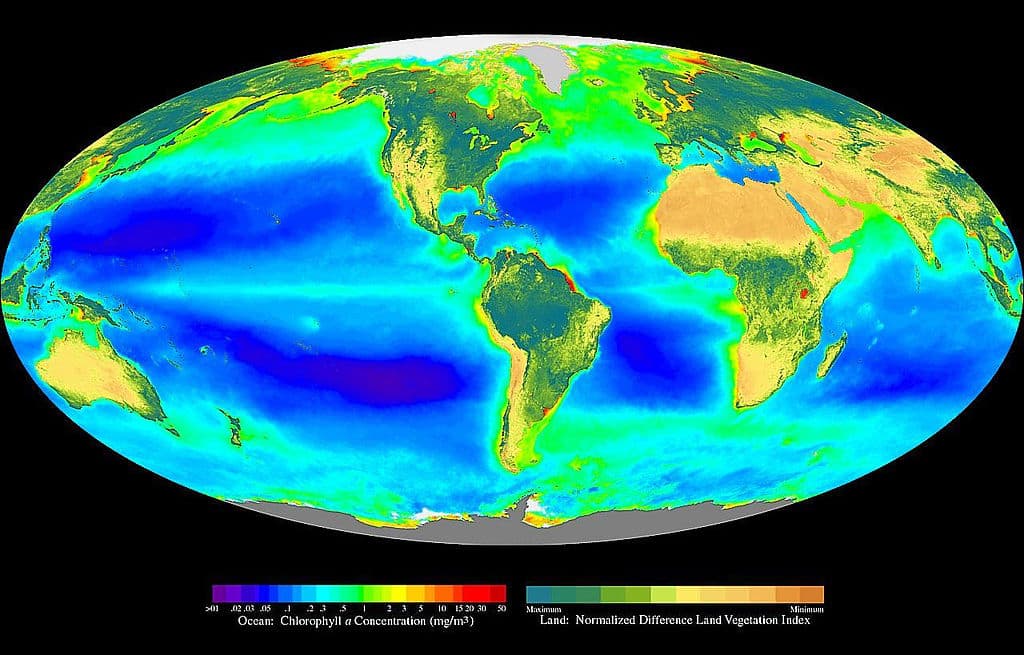
Figure 2.  Composite image showing the global distribution of photosynthesis, including both oceanic phytoplankton and terrestrial vegetation. Dark red and blue-green indicate regions of high photosynthetic activity in ocean and land, respectively. 13 (SeaWiFS Project, 2005. Copyright free licensing under Wikimedia Commons.)

As shown in the figure above, plants and algae dominate the biosphere. 13  Inside the cells on the leaves of plants are special structures called chloroplasts.  These chloroplasts contain layers of membranes and used to be free-living organisms. 13  Scientists believed these organisms were cyanobacteria and data show that they have their own DNA and mechanisms for making proteins.

Process of Photosynthesis

In this light-dependent reaction, some energy is used to remove electrons from water to produce oxygen gas.  The hydrogen ions and electrons freed when water is split are then use to create two other compounds, nicotinamide adenine dinucleotide phosphate (NADPH) and adenosine triphosphate (ATP), the energy of cells. 6  There are five main complexes involved in photosynthesis:  photosystem II (PSII), cytochrome, photosystem I (PSI), ATP (energy), and NADPH (provides electrons). 2 PSII and PSI are the reaction center complexes that are specifically involved with absorbing light and transferring electrons through the electron-transport chain.  Both PSII and PSI contain chlorophyll but they absorb different kinds of light.  PSII and PSI both absorb blue light, but PSI absorbs more red light.6  These photosystems receive light excitation energy from light-harvesting complexes, associated with their reaction centers.  The photosystem is also where charge separation occurs.

When light is absorbed by the chlorophyll in the photosystem it creates an excited state.  This excited state allows the donor to give an electron to the accepting molecule.  This donation of an election to the accepting molecule is called charge separation. 6   Plants are able to create a stable charge separation, so recombination doesn't occur and this energy can be stored. 

Light-dependent reactions

In the light-dependent reactions, one molecule of chlorophyll absorbs one photon of light and loses one electron.  As mentioned above this electron is donated.  It is passed to another form of chlorophyll called pheophytin. 6  This passing of electrons begins to create a flow of electrons known as the electron-transport chain.  This has two affects on the plant cell.  First, it creates a reduction of NADP+ to NADPH.  Secondly, it also creates a proton flow that is necessary for the production of ATP. 2  The chlorophyll molecule is able to regain the electron it lost when water is split and an O2 molecule is released. 

Electrons generated in PSII by water splitting are passed along the electron-transport chain to PSI where another excited state is created when light is absorbed. 2  The electrons passed along the electron-transport chain are used to reduce NADP+ to NADPH, as shown on the Z scheme diagram below. 17 

Figure 3. The Z-scheme. 17 (w:User:Bensaccount, 2005. Copyright free licensing under Wikimedia Commons.)

Chemical Equations

Molecules are identified by chemical formulas. 14  A chemical formula is a group of chemical symbols and numbers that show the kinds and number of atoms in a molecule.14  For example, the formula for water is H2O.  H is the chemical symbol for hydrogen.  O is the chemical symbol for oxygen.  The small number 2 is called a subscript.  It shows that the molecule contains two atoms of hydrogen.  The O has no subscript, which means that the molecule contains only one atom of oxygen.  (Note:  It is not necessary to write 1 as a subscript in chemical formulas or equation.  No subscript recognizes there is only one atom.)

Balancing Chemical Equations

In a balanced chemical equation, certain conditions must be met. A chemical reaction is simply the rearrangement of atoms to form something with a new chemical formula and different properties. 14  Balanced chemical equations involve an equal number of atoms on both the product and the reactant sides of the equation. 14  In the unbalanced photosynthesis equation (1) shown above there are 1 C, 3 O, and 2 H on the reactant side and 6 C, 12 H, and 8 O on the product side.  The following numbers need to be added in order to make both sides of the equation have 6 C, 18 O, and 12 H. 

6 CO2 + 6 H2O + Sunlight  ->  C6H12O+ 6 O2  (2)

Keeling Curve 12

The Keeling Curve (Figure 4) is a graph that plots ongoing changes in the concentration of carbon dioxide in Earth's atmosphere.4  Continuous measurements have been taken since 1958 from the Mauna Loa Observatory in Hawaii, which originally began under the supervision of Charles David Keeling. 12

The Keeling Curve shows a “saw-tooth” pattern, with CO2 levels typically falling from May through September and rising over the rest of the year.12 This cycle is due to the natural exchanges of CO2 from plants. 12 Despite this “saw-tooth” pattern, CO2 levels have continued to rise higher than the year before due to the burning of fossil fuels.12 According to data from Mauna Loa, CO2 levels have increased about 2.2 ppm per year.12  

Figure 4. Atmospheric carbon dioxide concentrations from 1958-2015. 4  (Delorme, 2015.  Copyright free licensing under Wikimedia Commons. Based on data from Dr. Pieter Tans, NOAA/ESRL and Dr. Ralph Keeling, Scripps Institution of Oceanography.)

Activities

Modeling Molecules8

To balance chemical equations, students must know how to count atoms, understand the difference between coefficients and subscripts, and identify reactants and products. Balancing equations reinforces understanding of the law of conservation of mass as students keep in mind that the same number and types of atoms must be on the reactant and product sides of the chemical equation. 8

In this activity, students build models of compounds to help them visualize the reactants and products in chemical reactions and determine the coefficients in chemical equations. 8 This activity is appropriate for a class of middle school students working in pairs.

Materials 8

For this activity students will need 60 gumdrops (5 different colors), toothpicks, and plastic bags. 8

Procedure 8

1.) For each pair of students, place gumdrops (12 of each color) in a small plastic bag. Each student pair also needs the toothpicks.

2.) Divide your class into pairs and distribute the materials.

3.) Give an overview of the activity—explaining that the pairs are to construct molecular models using the gumdrops and toothpicks. They are to model chemical reactions, assigning a color of gumdrop to a specific element. Still using their models, they balance each reaction. Then, they record their final data before moving to the next reaction.

4.) Have students build models of the reactants and products, using the gumdrops and toothpicks for each equation. The gumdrops represent the atoms, and the toothpicks, the bonds. For the purpose of this balancing exercise, it is not important that students model correct bond angles; numbers and types of atoms are the important things.

5.) Have students lay their models out and group them so that they know which models represent the reactants and which represent the products. It may be helpful to have students crease a sheet of notebook paper in half and label the left side “reactants” and the right side “products.”

6.) Once the molecules are built and the reaction is laid out, let students know that in order to balance the reactions they must add complete molecules—not individual gumdrops. Reinforce the difference between a coefficient and a subscript. The coefficient is the number in front of the chemical formula in a chemical equation, indicating the number of molecules. (Absence of a coefficient is understood to indicate 1 molecule.) A subscript indicates how many atoms of an element are in each molecule of a compound. Students should understand that once they build a molecular model, the defined subscripts are unchangeable. Only the coefficients may change in balancing the chemical equation.

7.) Have students count the number of atoms of each element present on the reactant side and compare it with the number of atoms of that element on the product side.

8.) If those numbers are unequal, students must build additional molecules until the numbers match. Then, the number of models of each compound on each side provides the coefficients needed to balance the equation. Have students place the coefficients in the equation and record the final total of each type of atom on the product and reactant side.

Sample Reactions to Balance 8

__N2 + __H2 -> __NH3

__Fe + __HCl -> __H2 + __FeCl3

__CH4 + __O2 -> __CO2 + __H2O

__K + H2O -> __KOH + __H2

__HCl + NaOH -> __NaCl + __H2O

__FeS + HCl -> __H2S + FeCl2

__C2H4 + __O2 -> __CO2 + __H2O

Floating Spinach Disks 7

Spinach leaves contain a lot of chlorophyll, making them perfect for demonstrations of photosynthesis. Students can watch as photosynthesis causes spinach disks to rise and fall when placed in a baking soda solution. 7  The spinach leaves take in carbon dioxide from the baking soda solution causing them to sink to the bottom when placed in a cup of water. 7 However, when they are exposed to the light, the disks use the carbon dioxide and water to produce oxygen and glucose. 7  When oxygen is released from the leaves tiny bubbles are formed causing the disks to float. 7  In this experiment, students will get to watch spinach leaves perform photosynthesis right before their eyes. 

Materials 7

The materials needed for this demonstration include: fresh spinach leaves, single hole punch, baking soda, liquid dish detergent, plastic syringe (no needle, 10 cc or larger), clear cup, and a light source (bright sunlight, lamp, or flashlight). 7

Experimental Procedure 7

1.) Create a bicarbonate solution by mixing 6.3 grams (about 1/8 teaspoon) of baking soda in 300 milliliters of water. (Note: This bicarbonate solution will act as a source of dissolved carbon dioxide for photosynthesis.)

2.) In another container, prepare a dilute detergent solution by stirring a drop of dishwashing liquid in 200 milliliters of water.

3.) Add about half of the baking soda solution to a cup. Add a drop of the detergent solution to this cup. (Note: If the solution forms suds, add more baking soda solution until you stop seeing bubbles.)

4.) Use the hole punch to punch 10-20 disks from your spinach leaves. (Note: It is best to avoid the edges of the leaves or major veins. The demonstration works best with smooth, flat disks.)

5.) Remove the plunger from the syringe and add the 10-20 leaf disks.

6.) Put the plunger back into the syringe and slowly push it down to get rid of as much air as possible, without crushing the leaves.

7.) Place the syringe in the baking soda/detergent solution and fill it with about 3 cc of liquid. Then tap the syringe to suspend the leaves in the solution.

8.) Push the plunger to expel excess air, then place a finger over the end of the syringe and pull back on the plunger to create a vacuum.

9.) While keeping the vacuum with your finger, swirl the leaf disks in the syringe. After 10 seconds, remove your finger to release the vacuum. (Note: It is best to repeat the vacuum procedure 2-3 more times, to ensure the leaves take up carbon dioxide from the baking soda solution and are purged of oxygen bubbles. The disks should sink to the bottom of the syringe when they are ready for the demonstration. If the disks do not sink, try using new spinach disks and a solution with a higher concentration of baking soda and more detergent.)

11.) Pour the spinach leaf discs into the remaining cup of baking soda/detergent solution. (Note:  Make sure to dislodge any disks that stick to the side of the container. Initially, the disks should sink to the bottom of the cup.)

12.) Expose the cup to light using bright sunlight, a lamp, or a flashlight. (Note: As the leaves produce oxygen, bubbles form on the surface of the disks causing them to rise. If the light source is removed from the cup the leaves will sink again.)

Extension Ideas 7

Students can experiment to see what happens when you return the disks to the light.  Students can also experiment with the intensity and duration of the light and its wavelength. 7 One way to set up a control for such an experiment, for comparison, is preparing a cup containing water with diluted detergent and spinach leaf disks that have not been soaked in the bicarbonate solution. 7

The Lights Plants Need 9

In this activity, students will observe and compare three types of light sources.  They will then engage in an experiment to determine how different colors of light affect plant growth.  Some essential questions that can be asked throughout this activity include:  What effect does light have on plants?  What effect does light have on other living things?  How do different colors of light affect plant growth?  How does technology advance science? 9

Materials 9

The following materials will be needed in order to conduct that activity:  60 watt white incandescent light, 6 watt white LED light, 4 bean seeds, 4 250 mL foam or plastic cups, 400 mL potting soil, 8-12 small rocks, 1 plastic milk or water jug full of tap water, 1 250 mL beaker, 1 100 mL gradated cylinder, 1 30 cm x 45 cm piece of plastic wrap or cellophane in four colors (red, blue, green, and clear), 4 wooden dowels, and 1 thin metric ruler. 9

Engage 9

Ask students what they already know about light bulbs and light.  Have them complete a KHWL graphic organizer to record what they KNOW, HOW they know this information, and what they WANT TO KNOW about light bulbs and how they produce light.  Discuss students’ answers. 9

Show students the incandescent light and the LED light without during either on.  Ask students to record the differences between the two lights.  Turn the classroom lights off and turn both lights on and ask students to record their observations.  Show students the NASA video segment Real World: Space Lighting (5:31) which can be viewed on the NASA eClips YouTube channel (https://www.youtube.com/watch?v=z9hq92u0sl0). After watching the video, students should discuss what type of light bulb they think each of the lights are. 9

Explore 9

Organize students into teams and have each team plant four seeds in each cup.  Have them follow the below steps when planting:

1.) Place a rock at the bottom of the plastic cup to help the soil drain.

2.) Use the beaker to measure and fill each of the cups with about 100 mL potting soil. Pour 45 mL of water over the dry soil and let it absorb overnight.

3.) Soak bean seeds in a beaker of water labeled with your team number for 24 hours.

4.) In groups, discuss ways to set up the four colored plastic sheets so that once your plants are positioned near the window or designated light source they will receive equal light through only the appropriate sheet which acts as a light filter. Have students present their solutions to the class and vote on the method that is both secure and allows for the efficient watering and measuring of the plants.

5.) Plant each seed 3 cm deep in each cup.

6.) Lightly cover the seeds with soil. Don’t compact the soil.

7.) Use the graduated cylinder to provide 15 mL of water into each cup. Pour off any excess water.

8.) Place the cups near a window or other designated light source.  Arrange the cups so that each receives the same amount of light.

9.) Set up the plastic sheets as decided in step 4.

10. Planting day is Day 0. Water plants with 15 mL of water every other day (or every Monday, Wednesday, and Friday) for the next 20 days. If the plants appear to be too wet or too dry, discuss and agree to changes to the amount of water as a team. Share your changes and reasons with the class. Discuss what to do about long weekends.

10.) Record plant observations. Check daily to be sure to note the date the seeds first sprout. Once the plants have germinated, measure heights with a metric ruler with a flat “foot” made by folding a narrow piece of index paper and taping it closed around the bottom of the ruler. This will prevent the ruler from sinking into the soil. Measure plant height to the nearest tenth of a centimeter.

Explain 9

Ask students to analyze the plant growth data and create a line graph to represent the data. 

Extend 9

For an extension activity, students can act as engineers to design a new plant experiment to grow the healthiest plants in the shortest amount of time.

Evaluate 9

Have students review and update their KHWL chart by adding what they LEARNED.  Ask students to journal about their response to this question:  How do different colors of light affect a plants growth? 9

Teacher Resources

Gardner, Robert.  Earth’s Cycles: Green Science Projects About the Water Cycle,

Photosynthesis, and More.  Berkeley Heights:  Enslow Publishers, Inc., 2011.

This informative text is paired with hands-on science projects that illustrate the scientific method and that show how our actions effect the environment and its natural cycles. Many of these experiments have great suggestions for potential extension activities and science fair projects.

McGraw-Hill Education.  “Light and Plant Growth.Glencoe.  Accessed August 3, 2016. 

http://www.glencoe.com/sites/common_assets/science/virtual_labs/LS12/LS12.html.  In this virtual lab, students can perform an experiment to test what colors of the light spectrum cause the most plant growth.  They will calculate the plant growth by measuring the height of each plant under different colors of light.  By comparing these measurements and creating a line graph, students can determine which colors of the spectrum cause the most plant growth.

NGSS Lead States. Next Generation Science Standards: For States, By States.

MS.Matter and Energy in Organisms and Ecosystems. Washington, DC: The National Academies Press, 2013. http://www.nextgenscience.org/topic-arrangement/msmatter-and-energy-organisms-and-ecosystems.Provides an overview of performance expectations, science and engineering practices, disciplinary core ideas, and crosscutting concepts. 

Sneideman, Joshua and Erin Twamley, Renewable Energy: Discover the Fuel of the

Future With 20 Projects. White River Junction:  Normand Press, 2016.  This book

discusses the pros and cons of different energy sources.  It shows students future jobs in the field of renewable energy and provides hands-on projects, essential questions, online sources, and student prompts.

University of Reading.  “Measuring the Rate of Photosynthesis of Elodea.”  University of

Reading.  Accessed July 20, 2016. https://www.reading.ac.uk/virtualexperiments/ves/preloader-photosynthesis-full.html. This virtual experiment allows students to measure photosynthesis with different light intensities using an Elodea, an aquatic plant commonly used as aquarium vegetation.

Student Resources

Groleau, Rick.  “Photosynthesis.”  NOVA.  Accessed July 25, 2016.

http://www.pbs.org/wgbh/nova/nature/photosynthesis.html.  This interactive

feature shows how plants use light from the sun to create glucose.  It includes three activities:  the cycle, atomic shuffle, and three puzzles.

O’Donnel, Liam. Understanding Photosynthesis with Max Axiom, Super Scientist.

North Mankato: Capstone Press, 2007.  This graphic novel gives students a chance to follow the adventures of Max Axiom as he explains the science behind photosynthesis.

References

1At09kg.  “The scientific process of photosynthesis.” Wikimedia Commons. Last modified November 2, 2011. https://commons.wikimedia.org/w/index.php?curid=17219609

2, Robert. Molecular Mechanisms of Photosynthesis 2nd Edition.  Hoboken:

Wiley-Blackwell, 2014.

3College Board. AP Biology Lab Manual, Investigation 5: Photosynthesis.  New York:

College Board, 2001.http://www.collegeboard.com/html/apcourseaudit/courses/pdfs/cb-biology-lab-manual-1-24-12.pdf

4Delorme, 2015. “Mauna Loa CO2 monthly mean concentration” Wikimedia Commons. Based on data from Dr. Pieter Tans, NOAA/ESRL and Dr. Ralph Keeling, Scripps Institution of Oceanography. https://commons.wikimedia.org/wiki/File:Mauna_Loa_CO2_monthly_mean_concentration.svg

5Gardner, Robert.  Earth's Cycles: Green Science Projects about the Water Cycle,

Photosynthesis, and More (Team Green Science Projects).  New York: Enslow

Publishers, 2011.

6Hall, David and Krishna Rao.  Photosynthesis (Studies in Biology), 6th edition.

Cambridge:  Cambridge University Press, 1999.

7Helmenstine, Anne Marie. “Easy Photosynthesis Demonstration – Floating Spinach

Disks.” About Education.  Accessed July 15, 2016. http://chemistry.about.com/od/chemistrydemonstrations/fl/See-Photosynthesis-in-Action-Floating-Spinach-Disks-Demonstration.htm

8Jordan, Shauna.  “Balancing Chemical Equations.” Carolina Biology. Accessed July 28,

2016. http://www.carolina.com/teacher-resources/Interactive/balancing-chemical-equations/tr10663.tr

9NASA.  “NASA’s Real World:  The Light Plants Need.”  NASA eClips Educators

Guide.  Accessed August 3, 2016. https://www.nasa.gov/pdf/474243main_RW8-LightPlantsNeed_508.pdf

10New Haven Public Schools.  6th Grade Pacing Guide.  New Haven:  New Haven Public Schools.  Last modified November 12, 2007. http://www.newhavenscience.org/6curroverview.htm

11NGSS Lead States. Next Generation Science Standards: For States, By States.

MS.Matter and Energy in Organisms and Ecosystems. Washington, DC:  The National Academies Press, 2013. http://www.nextgenscience.org/topic-arrangement/msmatter-and-energy-organisms-and-ecosystems.

12Monroe, Rob.  “Is this the last year below?”  Scripps Institution of Oceanography.

Accessed August 2, 2016. https://scripps.ucsd.edu/programs/keelingcurve/2015/10/21/is-this-the-last-year-below-400/#more-1346

13SeaWiFS Project.  Seawifs global biosphere. Wikimedia Commons.  Last modified October 25, 2005.  https://commons.wikimedia.org/w/index.php?curid=387228

14Triumph Learning, LLC.  Connecticut 4th Generation CMT Coach, Science, Grade 8.  New York:  Triumph Learning, 2010. 

15Vlachogianni, Thomais, and Athanasios Valavanidis. "Energy and Environmental Impact on the Biosphere Energy Flow, Storage and Conversion in Human Civilization." American Journal of Educational Research 1, no. 3 (2013): 68-78.

16Walker, D. Energy, Plants, and Man. Sausalito:  University Science Books, 1992.

17w:User:Bensaccount. “Z-scheme.” Wikimedia Commons. Last modified April 16. 2005. 

https://en.wikipedia.org/wiki/File:Z-scheme.png

Appendix A. Implementing District Standards

Connecticut Content Standards

Conceptual Theme 10

Matter and Energy in Ecosystems – How do matter and energy flow through ecosystems?10

Content Standards 10

6.2 - An ecosystem is composed of all the populations that are living in a certain space and the physical factors with which they interact.  Populations in ecosystems are affected by biotic factors, such as other populations, and abiotic factors, such as soil and water supply.  Populations in ecosystems can be categorized as producers, consumers and decomposers of organic matter. 10

Grade Level Concept 10

Populations in ecosystems are affected by biotic factors, such as other populations, and abiotic factors, such as soil and water supply. 10

CMT Expected Performance 10

C 4.  Describe how abiotic factors, such as temperature, water and sunlight, affect the ability of plants to create their own food through photosynthesis. 10

Next Generation Science Standards11

Performance Expectations 11

MS-LS1-6.  Construct a scientific explanation based on evidence for the role of photosynthesis in the cycling of matter and flow of energy into and out of energy. 11

MS-LS1-7.  Develop a model to describe how food is rearranged through chemical reactions forming new molecules that support growth and/or release energy as this matter moves through an organism. 11

Disciplinary Core Ideas 11

LS1.C:  Organization for Matter and Energy Flow in Organisms

Plant, algae (including phytoplankton), and many microorganisms use the energy from light to make sugars (food) from carbon dioxide from the atmosphere and water though the process of photosynthesis, which also releases oxygen.  These sugars can be used immediately or stored for growth or later use.  Within individual organisms, food moves through a series of chemical reactions in which it is broken down and rearranged to form new molecules, to support growth, or to release energy. 11

PS3.D:  Energy in Chemical Processes and Everyday Life

The chemical reaction by which plants produce complex food molecules (sugars) requires an energy input (i.e., from sunlight) to occur.  In this reaction, carbon dioxide and water combine to form carbon-based organic molecules and release oxygen.  Cellular respiration in plants and animals involves chemical reactions with oxygen that release stored energy.  In these processes, complex molecules containing carbon react with oxygen to produce carbon dioxide and other materials. 11


Comments (0)

Be the first person to comment

When you are finished viewing curriculum units on this Web site, please take a few minutes to provide feedback and help us understand how these units, which were created by public school teachers, are useful to others.
THANK YOU — your feedback is very important to us! Give Feedback