Activities
Activity 1
I will read aloud Electrical Wizard: How Nikola Tesla Lit Up the World by Elizabeth Rusch. I will also share the biographical information about Thomas Edison. The students will know their task and will take notes during the instruction and read aloud. Then the students will complete a graphic organizer to compare and contrast Thomas Edison and Nikola Tesla.
Activity 2
For the second featured activity the students will construct batteries from various fruits. The students will use a lemon, a grapefruit, an apple, and a pear. The students will identify the independent and dependent variables and predict which will make the best battery. Then the students will connect a current detector to the fruits to see if an electric current is being generated. The students will record the electric current. Upon completion, the students will be given a snack of the various fruits used. Based on the taste of the fruit, the students will draw a conclusion related to the taste and ability to generate a current.
Activity 3
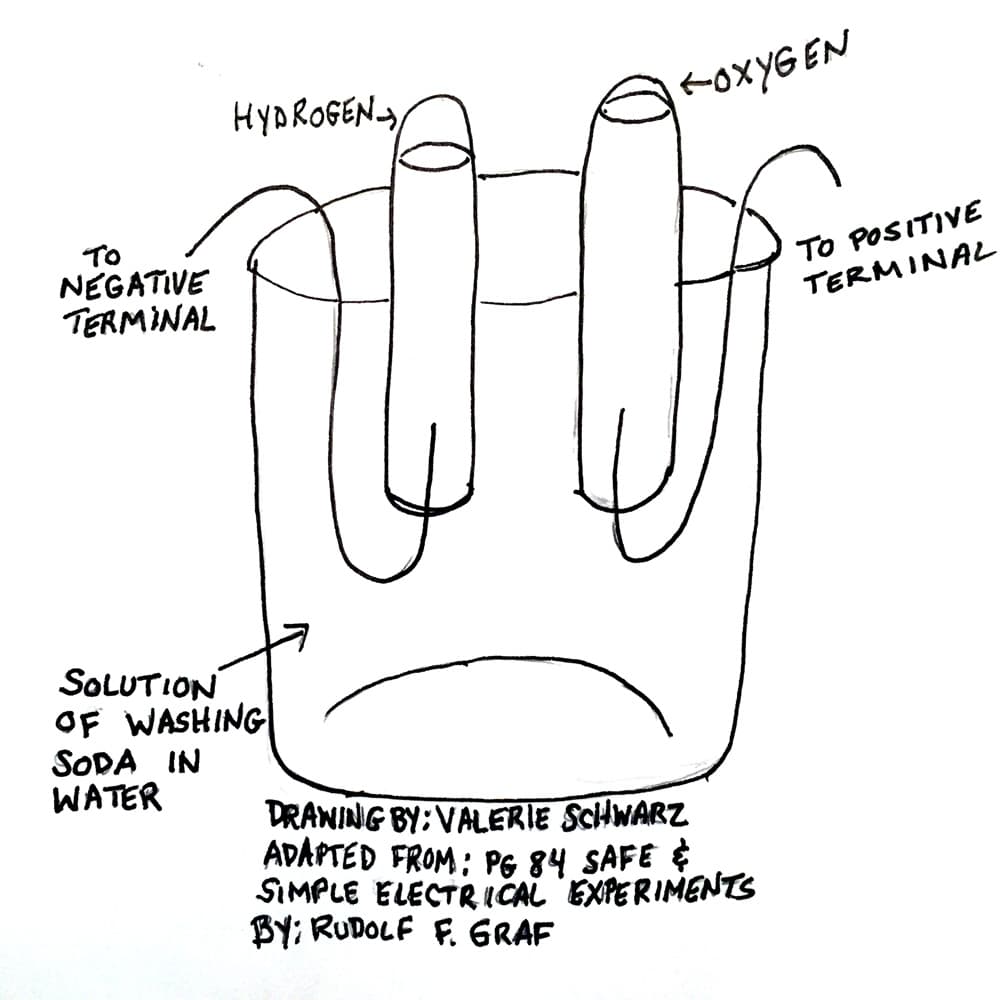
Figure 3: Electrolysis set-up
The students will create a simple motor based on the model provided by Aims Electrical Connections. The materials needed to make the motor are thin wire (not coated), clay, paper clips, a film canister or small cylinder, alligator clips, and a 6 V battery. Using the uncoated wire, wrap it about 5-8 times around the film canister, leaving about 1 inch of excess wire at each end. Now taking a paper clip, pull the innermost loop toward you until the two metal loops of paper clip form a right angle. The paper clip should be able to stand upright. Now take the vertical part and bend the loose end up to make a small circular loop. The paper clip will no longer stand. Do the same with the second paper clip. Now press a small amount of clay on top of the base of each of the paper clips. The small circular loops should be up at the top of the paper clips. Using the wire that you previously wrapped around the film canister, set one end of the excess wire in each loop. Attach wires from the base of each paper clip to the battery. You may need to fiddle with or sand the wire to get a better connection. The set up can be seen in the video embedded in the unit.
Activity 4
The students will make a wet battery using a small Rubbermaid container, a zinc electrode and a copper electrode. The students will add salt to the container, fill it with water, and attach alligator clips from the electrodes to a 6 V battery. The zinc electrode will make bubbles and the copper side will oxidize. This salt bridge battery will lay the groundwork for the next step: electrolysis. The materials for each group are a wide-mouthed jar, two test tubes, a 6 V battery, copper wire, and washing soda (which can be purchased or made by heating baking soda in a baking pan with a lip or a glass baking dish. Spread 2-3 cups of baking soda in the pan. Heat at 400 degrees for about an hour. The finished product should be a fluffy powder.
The set-up is similar. Fill a wide jar or beaker about half way with water. Attach copper wires to each terminal of the battery. Put the free end of the copper wires into the water, being careful not to touch them. Bubbles should appear around the wires. Remove the wires. Add a tablespoon of soda ash and stir the solution. Bend the wires so they form a U. Put the wires back in the solution and add a test tube on top of each wire. The test tube will collect the gases that are being emitted. The gas bubbles are a result of the water molecules being split. The students should notice that there is twice as much gas in one test tube (hydrogen) as compared to the other (oxygen). This is because water is made up of H2O, or two molecules of hydrogen and one of oxygen.
Day 1 Overview of the energy problem
Day 2 Benjamin Franklin- read aloud – PhET – balloons and static electricity
Day 3 Static Electricity – centers – What is attracted? Rubbing a comb to pick up puffed rice.
Day 4 Static Electricity – centers – electroscope – moving ping-pong ball
Day 5 The class will have time to work on Glogster and Thinglink.
Day 6 Michael Faraday – read aloud
Day 7 Faraday’s inventions –video and demonstrations
Day 8 Thomas Edison & Tesla -
Day 9 Experiments with circuits to light lights – longer wire, thicker wire
Day 10 Computer Time – work on Glogster and Thinglink
Day 11 Conductors and Insulators
Day 12 Batteries
Day 13 Batteries
Day 14 Experiment with batteries (different types of fruit)
Day 15 DC and AC current
Day 16 Circuits - series
Day 17 Circuits - parallel
Day 18 Extra time building circuits/ Venn diagram
Day 19 Electromagnets - overview
Day 20 Electromagnet experiments – wrapping wire more – various gauges (thickness) – various core diameters of bolts – various lengths
Day 21 Motors
Day 22 Generators
Day 23 Types of Energy
Day 24 Computer Time – Work on Glogster and Thinglink
Day 25 Computer Time – Work on Glogster and Thinglink
Day 26 Electrolysis
Day 27 Fuel Cells
Day 28 Fuel Cells
Day 29 Computer Time – Work on Glogster and Thinglink
Day 30 Closing
Day 31 Invite Parents and share presentations and our Thinglink page
Comments: