Classroom Activities
Lesson Plan #1
Science Notebooks in the Elementary Classroom. It Makes Sense!
Written for Elementary Science Grades 2-5
50 Minute Lab Period
Objectives
- Using writing as a process for discovery and synthesis of inquiry.
- Modeling many enduring functions of scientists; recording information and data, creating experimental diagrams, forming associations and connections to other learning, and asking thoughtful questions.
- Improving your ability to organize ideas and information to provide a study reference for each unit, as well as a resource to consult for review prior to tests.
Science and Engineering Practices:
- Asking questions and defining problems.
- Developing and using models.
- Planning and carrying out investigations.
- Analyzing data.
- Using mathematics and computational thinking.
- Constructing explanations and designing solutions.
- Engaging in argument from evidence.
- Obtaining, evaluating, and communicating information.
Introduction:
Keeping a science notebook encourages students to record and reflect on inquiry-based observations, activities, investigations, and experiments. Science notebooks are also an excellent way for students to communicate their understanding of science concepts, and for teachers to provide students with feedback.
A science notebook is a strategy for students to record and reflect on inquiry-based observations, activities, investigations, and experiments to increase their understanding of science instruction. Students will use them to communicate their understanding of science concepts to their peers, and for teachers to provide students with feedback on their learning. Student scientists record their observations, ideas, drawings, and other illustrations such as charts, tables, models, and graphs, along with their questions, ideas, and reflections in a running record of their thinking. The same as a scientist would do in a lab.
As a science teacher, I individualize the science notebook organization to the grade level, student interests, abilities, and needs. Here is the makeup of the science notebook that I use.
Materials: composition book or single subject, spiral notebook. I prefer the composition over the spiral because sheets will not be easily torn out. Pencils, pens, markers and crayons. Heavy duty drawing paper or card stock cut to the size of the composition book and stick glue.
Procedures:
Setting up the science notebook.
- Pass out the blank drawing paper or cardstock. Students write their name, group number, if you use groups and homeroom class at the top. Allow students to draw a science related cover. They can color it and glue this to the front of their composition book.
- Inside the first page will be divided into three columns. Each column is titled as date, activity, and page number.
- Skip to the next page on the right and guide students to write the numbers 1-10 on the front of the pages only; starting at the top right corner. This helps to organize students to complete page by page.
- Headings such as focus questions, hypotheses, objectives, reflections are printed at the top of each page as they investigate science objectives.
- Tables, measurements, conversions, equations, formulas, facts, etc. are always added to the sequence order of the pages. Best practice is to have those with the activity itself.
- Glossary: Alphabetical list of new vocabulary and definitions. This is the last 14 pages in their notebook. I fold the pages ahead of time for the students and walk them through the organization of science vocabulary. The first page will be titled Science Vocabulary and Definitions. The front side of the paper, the letters of the alphabet will be listed at the top. A on one side of the column and B on the other side. Continuing until X and Z are completed.
- Create a word/definition wall with words learned to add to glossary. Students can write the definitions, create drawings, diagrams, models, charts, graphs, and so on to understand the word.
- I keep all science notebooks in a dish pan for easy access and distribution.
Lesson #2
How Well Do You Wash?
Written for Elementary Science Grades 2-5
50 Minute Lab Period
Objectives:
- Understand the impact of germs and bacteria on their health.
- Conduct an experiment to test their hypothesis.
- Calculate the percentage of germs on hands before and after hand cleaning methods.
- Analyze class results to determine the best method of cleaning hands before and after food preparation and consumption.
- Recognize the importance of maintaining food safety in the Science lab and at home.
PA Science Standards:
4.4.3.A. Identify Pennsylvania crops that provide food for the table.
4.4.4.A. Describe the journey of local and global agricultural commodities from production to consumption.
4.4.8.A. Identify and describe how food safety issues have impacted food consumption.
Science and Engineering Practices:
- Asking questions and defining problems.
- Developing and using models.
- Planning and carrying out investigations.
- Analyzing data.
- Using mathematics and computational thinking.
- Constructing explanations and designing solutions.
- Engaging in argument from evidence.
- Obtaining, evaluating, and communicating information.
Vocabulary: Germs, Bacteria
Materials: Lab sheet, Fluorescent yellow hi-lighter, UV flashlight, Glo-Germ Gel, “Wet Ones” Antibacterial hand wipes, Liquid soap, Hand Sanitizer Gel, and Access to a sink with running water.
Introduction:
- Have students look at their hands. Ask students, “What have you touched today?”
Then ask students, “Are your hands really clean?”
Procedures:
- Read: Germs Are Not for Sharing, by: Elizabeth Verdick. (Grade 2)
- Read: Food Safety, Chapter 3, by: Christine Taylor-Butler (Grades 3-5)
- Discuss Germs and Bacteria, write student responses on chart paper.
- Ask students, “What happens if we have germs on our hands and then eat food with our hands?” Then ask, “how can we protect ourselves?”
- Inform students of the four different types of hand cleaning methods. (Antibacterial hand wipes, Hand Sanitizer Gel, Plain Warm Water, and Liquid Soap with Warm Water.)
- Have students predict which method they believe will be the most effective at removing germs and bacteria from their hands.
- Discuss the way to show percentages on their lab sheet.
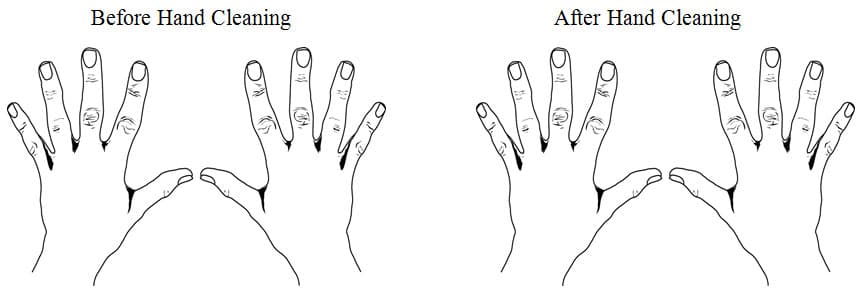
- Students, with the help of the teacher, add 1 drop of Glo-Germ lotion to their palm and have them rub the lotion over the front and of their hands and between their fingers and nails.
- Darken the room and shine the UV flashlight on each student’s hands.
- Students observe their hands, then use the fluorescent yellow highlighter to mark where the germs “Glowed” on their hands lab sheet.
- Determine the percentage on your hands covered with Glo-Germ percent on the lab sheet.
- Assign each group of four students one of the following cleaning methods:
- Wipe hands with Antibacterial Hand Wipes for 20 seconds.
- Wipe hands with Hand Sanitizer Gel for 20 seconds.
- Wipe hands with Plain Warm Water for 20 seconds.
- Wipe hands with Liquid Soap with Warm Water for 20 seconds.
- When treatment methods have been completed, darken the room again and shine the UV flashlight on each student’s hands.
- Students observe their hands, then use the fluorescent yellow hi-lighter to mark where the germs remained on their hands lab sheet.
- Determine the percentage on your hands still covered with Glo-Germ percent on the lab sheet.
- Do the Math – Subtract percentage before treatment from after treatment to determine percentage removed. Record on your lab sheet.
- Collect results and students present their findings to the class in word form.
How Well Do You Wash?
Scientists Day ______ Date ___/___/____
Group Leader ____________________ Reporter ____________________
Materials Manager #1 __________________ Materials Manager #2 _________________
How Well Do You Wash?
Are your hands really clean?
Good hand washing can control the spread of germs and bacteria, which can cause illness.
How well are you doing at washing your hands?
Your task is to test one of four different hand cleaning methods. You will determine the most effective hand cleaning method.
Problem (What question do you want to answer?)
Materials (What do you need to do your experiment?)
Hypothesis (What do you think will happen?)
Procedure (What steps must you follow to do the experiment?)
Observations (What do you see happen during the experiment?)
|
Hand Cleaning Method |
% covered before hand cleaning |
% covered after hand cleaning |
% removed |
Class Average % removed |
|
Antibacterial Hand Wipes, 20 seconds |
||||
|
Hand Sanitizer, 20 seconds |
||||
|
Plain Warm Water, 20 seconds |
||||
|
Liquid Soap with Warm Water, 20 seconds |
Conclusion (What did you learn/discover from the experiment?
Lesson Plan #3
How to Check the pH Level in Sauerkraut?
Written for the Elementary Science Grade 2-5
50 Minute Lab Period
Objectives:
- Students will investigate the pH of sauerkraut.
- Students will design and carry out the investigation of sauerkraut pH and visually illustrate the steps.
- Students will be able to observe the color changes produced by pH indicator in solution of sauerkraut and juice.
PA Science Standards:
4.4.3.A. Identify Pennsylvania crops that provide food for the table.
4.4.4.A. Describe the journey of local and global agricultural commodities from production to consumption.
4.4.8.A. Identify and describe how food safety issues have impacted food consumption.
Science and Engineering Practices:
- Asking questions and defining problems.
- Developing and using models.
- Planning and carrying out investigations.
- Analyzing data.
- Using mathematics and computational thinking.
- Constructing explanations and designing solutions.
- Engaging in argument from evidence.
- Obtaining, evaluating, and communicating information.
Vocabulary: Written on chart paper.
Acid-substance that has a pH less than 7.
Base-substance that has a pH greater than 7.
Indicator-compound that changes color depending on the pH of the solution it is in
pH-measure of the acidity or basicity of a substance, a pH of less than 7 is acidic (lower number = more acidic) and a pH of greater than 7 is basic, in general the scale goes from 1 (very acidic) to 14 (very basic)
Materials: Safety goggles, pH test paper, clean trays, teaspoon, small blender, food safety gloves.
Procedure:
- Discuss with students that pH indicators are compounds that display different colors in different pH conditions. Briefly review pH, acids and bases, and pH indicators.
- Work with students to design a valid investigation like the one outlined in this lesson plan to determine the pH of sauerkraut.
- Work with students to develop questions to investigate. Ensure that students outline the steps of their procedure carefully. Some good leading questions include the following:
- How do we determine what the pH of a sauerkraut?
- Can we make some predictions about the materials that we are going to test?
- A general procedure that could be used is as follows:
- Students place a clean tray in their group.
- Students can take samples of the sauerkraut and juice to puree.
- Students can test the pH and use the chart that comes with the indicator to determine the pH of sauerkraut.
- Have the students illustrate their observations from this experiment.
- Students can determine approximate pH values from the color chart provided with the commercial pH indicator and use this information to determine which solutions are acidic (pH < 7), which are basic (pH > 7) and which are neutral (pH = 7).
- Students can draw conclusions about the acidity of certain types of solutions (cleaners, foods, drinks) and their uses.
- After the students have finished their investigation, they may present their findings to their classmates and compare their results with those of their classmates.
How to Check the pH Level in Sauerkraut?
Scientists Day ______ Date ___/___/____
Group Leader ____________________ Reporter ____________________
Materials Manager #1 __________________ Materials Manager #2 _________________
Student Hypothesis or Question:
____________________________________________________________________________
Materials:
____________________________________________________________________________
Safety Precautions:
____________________________________________________________________________
____________________________________________________________________________
____________________________________________________________________________
Procedure: What are the steps?
Wear Safety Goggles for all lab work.
___________________________________________________________________________
___________________________________________________________________________
___________________________________________________________________________
___________________________________________________________________________
___________________________________________________________________________
___________________________________________________________________________
___________________________________________________________________________
___________________________________________________________________________
___________________________________________________________________________
Illustrate your steps.
Observation of the pH paper: ____________________________________________________
_____________________________________________________________________________
_____________________________________________________________________________
_____________________________________________________________________________
Conclusion:
_____________________________________________________________________________
_____________________________________________________________________________
_____________________________________________________________________________
_____________________________________________________________________________
_____________________________________________________________________________
Comments: