Classroom Activities
Over the course of this unit, students will work in small groups to read and curate their own grade-appropriate, reliable articles about each historical moment. Using these readings and additional teacher support, the small groups will research and present hands-on demonstrations for what they believe are the most sustainable choices for our city and a timeline of social and environmental consequences. They will complete practice worksheets for basic mathematical concepts involved in each historical moment, including basic arithmetic for calculating the mass of CO2 emissions during combustion up to basic calculus for advanced students who wish to pursue Maxwell-Faraday equations for electromagnetic induction.
QTEL Architecture: Preparing the Learner
At the outside of the unit, students will be organized in groups of three to four and will need paper and something to write with to respond to the following three prompts, “When I hear the word energy, I think about…” “One time I heard the word ‘energy’ was…” and “Based on this, I think the word energy means…”. After about two or three minutes have elapsed, they will be prompted to share their responses in a “round robin” fashion, i.e. one student says their answer to number one, then the next student, until all have shared their responses to question one. Allow time for discussion after each question or after all questions have been shared as time or interest level dictates.
The next task to connect them with their existing knowledge is an “Anticipation Guide” which includes six agree/disagree questions about energy that students should already have some knowledge of based on lived experience rather than academic content knowledge, e.g. “Life would be worse if there was no electricity” or “Gasoline has caused more problems than benefits.” Partners should be directed not to write on their paper/digital document until they have talked about their response and why with their partner and learned if they agree or disagree on an answer. Another tip is to ask students to begin on different statements so the whole class is not echoing the same prompt at the same time.
The last task in preparing the learner is a “Notice and Wonder” GIF of a coal fired power plant that turns chemical energy into electricity through a series of energy transformations. This practices observation and question asking in a way that everyone can participate and use language. Teachers can ask for volunteers to share out their findings and record them on a public space or call on individuals or small groups to share.
QTEL “Engaging the Learner” Moment
Moving on to explicit content knowledge, small groups then receive a set of “energy transformation” cards and each student is asked to not show their card but describe it to the others. They must come to a consensus about which card they think comes first and why. Images may have copywrite considerations, so please email the unit creator at cglynn@philasd.org for additional teaching resources. Teachers can give different examples to different groups to prevent cross-group collaboration or give every table the same cards to subtly encourage them to listen to each other as a form of sanctioned “cheating.” Groups should attempt to sequence all three sets of transformations if time allows.
Once they have their sequence cards in order, they can receive a collection of cards naming the different types of energy with duplicates. They must discuss and come to a consensus about which forms of energy are being transformed in each step, possibly with a conversation support card with sentence frames for “I agree with you, but the evidence says…”.
Engaging the Learner: Hands-On Activities
SAFETY FIRST! Working with electricity can be hazardous, and everyone involved in these demonstrations must be aware of risks and safety steps that reduce those risks. An important emphasis is to always respect that red and black plastic insulated wires should always be connected to a measuring device using the same colors, black to black, red to red. In industrial settings, black represents a negative charge and red positive. These colors also correspond to the anode (negative charge, -) and cathode (positive charge, +) on a battery and should also use the respective black to negative, red to positive as indicated on the labeling. Safety glasses reduce risk of injury to the eyes when working with sharp objects or in the event that something overheats and causes a minor explosion (exceedingly rare but possible, and some students like to try). Repeat these warnings at the start of each hands-on activity that involves charge.
For support with resources for this project, educators are encouraged to review the National Energy Education Development (NEED) project and look for professional development opportunities in partnership with local energy companies. Some basic skills educators may need to teach for these units are use of Google suite, how to operate a multimeter, how to strip the plastic insulation off of wires, making closed circuits using a breadboard or soldering iron. (Students should not be allowed to operate soldering irons.) Support for each of these is easily available in video format or by consulting with a professional.
In the first activity of electromagnetic induction, students build “coil” generators out of neodymium magnets and copper coils and measure how much electricity they make with multimeters. To assemble the generators, students wrap cardboard or card stock around a column of magnets, ~2-3” long with enough room for the magnets to move up and down within the column. Then, students use scissors and cardboard to cut two circles with a radius ~1” larger than the diameter of the magnet column and can glue or tape the cardboard discs so that they are ~0.5 – 1” apart. These will be the grips for shaking the generator. Students then wrap a lot of copper wire around the tube of magnets between the two cardboard discs, leaving ~6” hanging from both ends of the wire to allow connection of a multimeter or LED light bulbs. Troubleshooting tip, wrapping the number of wire coils takes way more time than one would expect and students may be able to share the activity in small groups.
Once students have demonstrated for themselves that magnets moving near a copper wire are capable of inducing electric current, they are given 3 V generators in small groups and asked to measure how much electricity is produced by rotating the shaft. They are asked to volunteer in small groups, “What did you do that made more electricity?” They should see that the speed at which they rotated the shaft correlated to an increase in electricity production. Students then receive a “hub” and wooden dowels that attach to the shaft and see if they are able to increase electricity generation.
Bringing out a box fan, students are asked to use wind energy to generate electricity instead of the chemical energy in their bodies that is transformed to motion energy. Using different types of paper or plastic, scissors, tape, glue, and other available craft materials, students are instructed to make turbines to catch the mechanical energy of wind and transform it into electrical energy. Once they measure the production of their first turbine, the voltage is recorded on a shared data table in Google Docs and the model photographed and saved on the same table. Asked to iterate their design to try to increase the amount of wind energy, they make one more version, measure if they produced more or less electricity with their newer design, the data are again recorded and students are asked to reflect on what they observe in the most and least efficient turbine designs, e.g. material, size, shape and possible confounding variables like color, presence or absence of stickers, glitter, etc….
For most classrooms, consider water access before conducting the following hydropower experiment. Using their dowels, hubs, and generators from the wind project, student groups now receive 5-gallon plastic camp jugs with hose attachments, plastic containers in which to build their hydroelectric generators, a vessel to catch water flow, and ready access to paper towels. Small groups are asked to volunteer which turbine they think will generate the most electricity when the source of motion is water instead of wind. It is expected that students will recognize the limits of using paper and will volunteer themselves to adopt plastic or wood as the turbine materials, but they are welcome to experiment with the efficacy of paper pending their capacity for clean-up. After another round of using craft supplies to make turbine blades and affix them inside the plastic containers, groups then work together to arrange the water jugs so that water comes out of the hose onto the turbine blades and is directed into the catchment receptacle (Figure 4). Student groups may or may not be able to correlate the higher the water jug, the more electricity is generated, but many do make the connection between greater pressure on the squishy camp jugs and increases in the speed of the water.
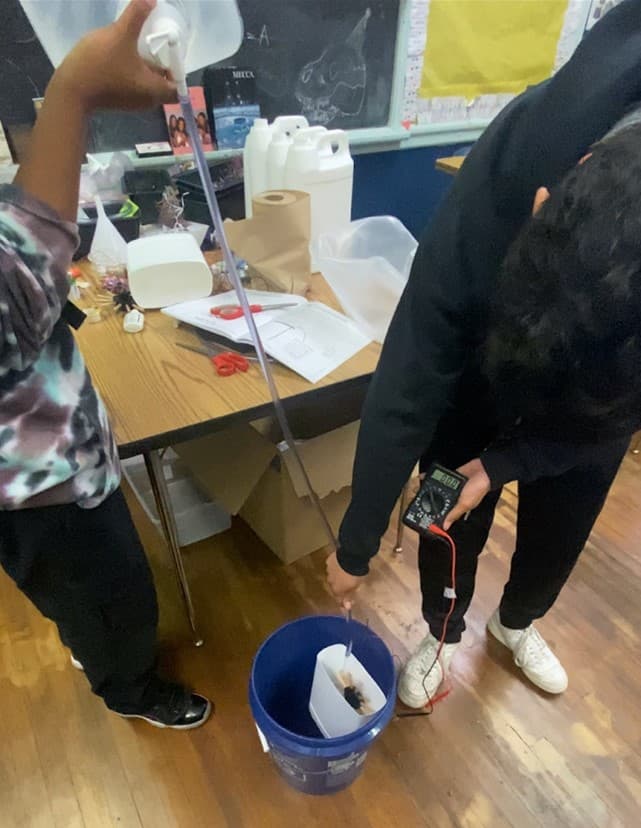
Figure 4. Classroom demonstration of hydroelectric generator110
In the extending learning activity, students choose one type of energy generation they have explored and choose where and how in Philadelphia they would implement an energy generation project. Designed as a collaborative poster, they must include a title, an image to represent their solution, a statement about what types of energy are being transformed, and why they chose their method. Each student uses one colored marker through the project to show their contributions and sign their names in their color at the bottom.
Comments: