Modeling Photosynthesis

byConnie Scercy Wood
The main goal of this unit is to create a way to teach a rather complex process—photosynthesis—in a way that students can concretely visualize and understand. I teach, or have taught, various levels of biology to ninth through twelfth grade students—Biology I regular and honors, Biology II, Advanced Placement (AP) Biology, and International Baccalaureate (IB) Biology II and III. Even the very best students often have trouble with the units on biochemistry, enzymes, and cellular energetics. Cells, they "get"—probably because they can see them under a microscope. But because cells are so small, they seem to have a hard time understanding that these tiny bits of life contain, and do, complex things like enzymatic reactions, respiration and photosynthesis. The cell becomes to them like this black box, where all these things happen, but they really cannot grasp how they happen. How can those processes be so complex and happen so quickly in something so small, and yet be so confusing that we, the complex and highly intelligent multicellular life forms that we are, have trouble understanding it all?

Two of the most difficult topics for students are photosynthesis and respiration, both of which have an effect on the carbon cycle and global warming. Respiration is the breakdown of organic compounds, which provides energy for the cell and releases carbon dioxide back into the atmosphere. The process of photosynthesis removes carbon dioxide from the atmosphere, sequestering it in organic compounds. It also converts light energy into chemical energy, making the Sun's energy available for all living things on Earth. Did someone say energy? Don't we have an energy crisis now? Aren't we paying over $3.00 a gallon for gas to run our cars? Can't we do the same thing that plants do with solar energy, or is that different? And hasn't that guy, Al Gore, been saying something about global warming and how we need to get excess carbon dioxide out of the atmosphere before the sky falls? Do plants and other photosynthetic organisms know something that we don't know?

These are some of the questions I want to try to have my students think about and discuss as we look at just how plants do photosynthesis. I plan to introduce them to current ideas about how to recreate this natural process through artificial photosynthesis—an idea that may help to solve some of our energy and global warming issues. But to understand how artificial photosynthesis might work, they have to understand the basics. So we are back to, "How do I find a way to teach photosynthesis in a way that students can understand?" I have used a variety of methods—diagrams, videos, and labs. Diagrams generally involve chemical symbols, arrows, and cycles drawn on two-dimensional paper, which loses all connection with the plants that these reactions are happening in. Videos have left my students and me similarly less than satisfied. One video I have used even reduced the Calvin Cycle to a bunch of gears. Yes, it was an analogy, but not one that most students could quite understand. Typical experiments involving photosynthesis show the results of what is happening, but again, it turns the cell into a little black box where carbon dioxide comes in and glucose and oxygen go out. The most success I've had was when I used props and my students to act out the processes involved in photosynthesis, turning the classroom into a chloroplast. With this method, I finally achieved a few "aha" moments. I believe it was the three-dimensional aspect of that desperate attempt to enlighten my students that helped them visualize what diagrams and videos and reactions in test tubes did not. In this unit, I will refine those models and props to create a three-dimensional approach to teaching photosynthesis. Once they can visualize the invisible, the models will then be used to tie in the actual processes to what students are observing in lab, and will provide a better basis for the formation of hypotheses and conclusions in inquiry labs. Based on the model and role-playing, students could then develop their own simple models for demonstrating the variations in photosynthesis by C4 and CAM plants.

Following this unit, we will be discussing global warming, and how deforestation and our dependence on fossil fuels are contributing to the problem. Normally, I would teach environmental issues such as global warming along with a unit on ecology, either at the beginning of the course, or at the end. By coupling this topic with photosynthesis, I believe it will help students to make better connections between the causes, effects and possible solutions to this problem. How does cutting down trees have anything to do with global warming? Where does the energy come from that is in fossil fuels?

I teach in an urban high school with a population that is about 46% African American, 39% White, 11% Hispanic and 4% other. I am designing this unit for my AP and IB classes, but plan to use the model with a less detailed explanation of the process, with my Biology I classes. The upper-level biology courses are very diverse, reflecting the school's population. The objectives to be addressed for the AP Biology curriculum include 2.03—an examination of subcellular organelles and how their structure relates to their function, and 2.02—analyzing cellular membranes and mechanisms of transport. The model used in this unit will be a reflection of our current understanding of the structural components of a chloroplast. Objective 3.01 requires that students analyze and examine the purpose, and adaptations of bioenergetic reactions such as photosynthesis, the main focus of this unit. In addition, this unit will cover several AP objectives for the scientific process. Objective 1.01—identification of questions and problems that can be answered through scientific investigations, and objective 1.02—designing and conducting scientific investigations, will be covered as students use what they have learned through models and role-playing to make and test hypotheses. Finally, this unit will address objectives related to ecological principles. Objective 7.02 requires students to examine interactions in ecosystems, including energy flow and element cycling, and objective 7.03 has students assess global issues such as global warming and how human populations can affect the environment.

The goals and objectives for the IB Biology HL are similar to the AP objectives. This unit will reinforce what the IB students will have already learned about membrane structure, the types of membrane proteins, and transport mechanisms across a membrane in Goal 1.4. Goals 2.8 and 7.2 in the IB curriculum address the nature of light energy, photolysis, the light and dark reactions, and the adaptations of C4 and CAM plants. As part of the IB Biology curriculum, I select two topics for more in-depth study. One of these will be Ecology, which includes objectives on energy flow in ecosystems and the carbon cycle (Goal 4.1 and G2), the effects of human actions on the greenhouse effect and what we can do to reduce global warming (Goal 4.5), and how biomass can used as a source of fuel (Goal G5). Here, I hope students will be able to make connections between what they have learned about photosynthesis and how it might be applied to solving the global warming problem, as well as creating renewable energy resources.

Background Information

The main focus of my research has been on photosynthesis and what is currently understood about this process. I think that even teachers often have a difficult time with this topic because we ourselves do not fully understand it. During my time working on this unit, I have tried to clarify my understanding and correct the misconceptions I have had about what happens at the molecular level during photosynthesis. There have been many surprises and many "aha" moments for me, as I have found answers to how some of the steps of photosynthesis work. There is much research still going on about specific molecules and the role they play. So, at some level there are still some black boxes, but they are much smaller and being illuminated all the time by the research being done today.

The following is a summary of what is currently known about photosynthesis—at least to the level at which I want to take it. As I go through this information, I will refer to diagrams of the model and how it and the other activities can be used to demonstrate to students how things are happening. Much of this background information is very detailed. I would not necessarily provide all this detail to my students, or expect them to know all the names of the molecules involved. But, as every teacher knows, you always have one or two students each year who really want to go deeper and understand why something happens the way it does. Now, I feel I have a little better information to help me answer their questions.

Chloroplast Structure

Most of photosynthesis happens in the chloroplasts. The chloroplast is surrounded by an outer double membrane, inside of which are the thylakoids, where the light-dependent reactions occur. (My model does not show this outer membrane, but only the thylakoids. See Figure 1. The outer layer will be represented by covering the model with a double layer of fabric, which is removed after discussion of that structure.) Surrounding the thylakoids is the stroma—an enzyme-filled fluid where the light independent reactions take place. I had always taught that the thylakoids were stacks of individual sacs like pita pockets. This is not true at all. The thylakoids are made from a long continuous membrane folded back on itself in such a way that pockets are created between the layers of membrane. Compressed stacks of these pockets are called grana and are connected by unfolded layers of thylakoid membrane—the lamellae. (Here I plan to use a long piece of fabric, with "right" and "wrong" sides, folded back and forth to create a granum. See the "Fabric Thylakoid Demonstration" in the Lesson Plan section.) There are two different

image 07.05.08.01

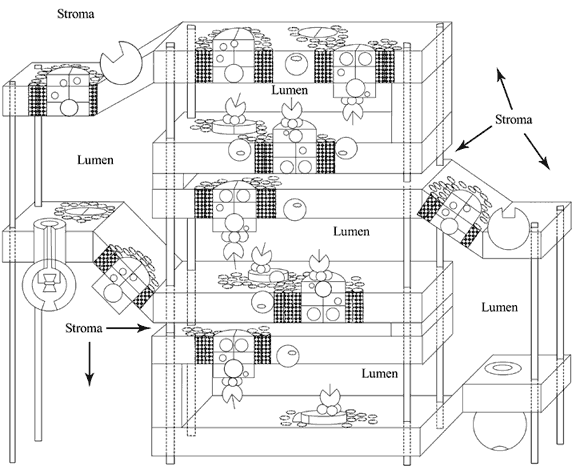
Figure 1 — Model of thylakoid membrane

sides to this membrane—one that faces the stroma and one that faces the space created by the folding of the thylakoid membrane, called the lumen [1, 2]. (After demonstrating the two sides of the thylakoid with the fabric demonstration, I will have students find the stromal and lumen sides of the membrane on the model.) In the thylakoid membranes are clusters of photosynthetic pigments—Photosystem I (PS I) and Photosystem II (PS II), along with proteins, which create an electron transport chain, and ATP synthase. (See Figure 2 for details of these components.)

image 07.05.08.02

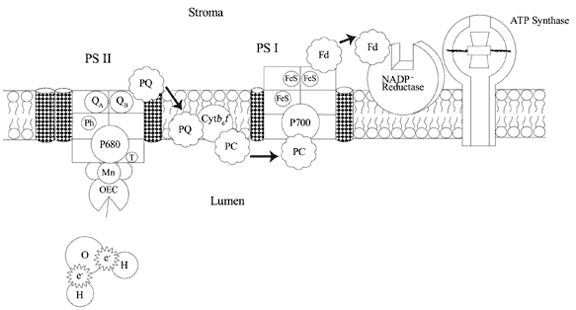
Figure 2 — Thylakoid details

These photosystems contain light absorbing pigments such as chlorophyll and carotenoids, associated with proteins, which are involved in harvesting and converting light energy into chemical energy. At the center of both photosystems are special chlorophyll a and protein complexes known as reaction centers because they respond to the energy of light, either directly or by transfer of energy from antenna pigments, by donating electrons that have absorbed the light energy and been boosted to excited energy levels. (The reaction centers are represented in the model by the Styrofoam cylinders. The hair curlers represent the antenna pigments.) The reaction center of PS I contains a chlorophyll a molecule whose maximum absorption occurs with light at a wavelength of 700 nm. The chlorophyll a molecule in the reaction center of PS II has a maximum absorption wavelength of 680 nm. Both chlorophyll molecules are associated with dimer (two-part) protein complexes. (The two halves of the cylinders represent these dimers.) PS II is most often found in the center of the grana and PS I is found near the ends of the grana or in the connecting membranes of the lamellae. This seems to be related to the structure of the two photosystems. You can see from diagram of the model in Figure 1 and the details of PS I and PS II in Figure 2, that the two photosystems do not sit in the membrane in the same way. PS I extends further out into the stromal side of the membrane and PS II extends out into the lumenal side of the membrane. The grana membrane has mostly PS II complexes, which allow the membrane to stack closely together on the stromal side of the membrane. (Notice the much narrower space between the stromal-side membranes in the grana section of the model in Figure 1.) This would not be possible with the PS I complexes. There also is some evidence that the antenna pigments of PS II complexes connect where the membranes fold back in the grana. This would allow light energy to be transferred to reaction centers across membranes as well as laterally. Because of their structure, PS I and ATP synthase are relegated to the lamellar membranes and to the ends and outer membranes of the grana [2]. Around the reactions centers are clusters of chlorophyll a and b and carotenoids associated with proteins in Light Harvesting Complexes (LHC's) that form a solar-collecting antennae that absorbs and transfers light energy to the reaction centers of the two photosystems. Why are antenna pigments needed? Why doesn't every chlorophyll molecule give off electrons and participate in the light reactions? Well, a photon is absorbed by a chlorophyll pigment about every tenth of a second on a good day—which is not very frequent. Each chlorophyll would also require all the other components necessary for the conversion of light energy to chemical energy—components that would be costly compared to the amount of energy they would be capturing. But, if the energy absorbed by a lot of pigments can be passed to one reaction center, then that one pigment can be kept busy [3]. Antenna pigments may surround one reaction center, or be associated with more than one, so that energy may be passed from one antenna pigment to one of several reaction centers. It also appears that at least one of the LHC of the antenna complexes moves from PS II to PS I and back again to aid in making the most efficient use of the light. If PS II is getting so much light absorbed by its antennae pigments that it cannot replace its electrons quickly enough, then LHCII will shift over to the part of the thylakoid membrane where PS I is located and temporarily dock with it, reducing the amount of light collected for PSII and so that more light energy is being collected and passed to PS I [2].

Photosynthesis occurs in two main phases. The light dependent reactions involve the photosystems and proteins of the thylakoid membrane, and convert light energy into chemical energy. The following equation summarizes the oxidation of water, which happens in the light reactions:

2 H 2O + light energy g 4 H + + 4 e - + O 2

The oxidation of water provides the supply of electrons that keeps the photosystems running. It is also the source of most of the oxygen in the atmosphere.

The light independent reactions occur in the stroma of the chloroplast and involve the enzymatic fixation of carbon dioxide and synthesis of a three-carbon sugar using the energy captured during the light reactions. This does not require light, but there may be light dependent regulation of this process [3]. The equation for the reduction of carbon dioxide is:

CO 2 + 4 H + + 4e - g (CH 2O) n + H 2O

The overall reaction for photosynthesis is shown below:

6 CO 2 + 6 H 2O g C 6H 1 2O 6 + 6 O 2

However, even though glucose is shown as being an end product, the final product in most plants is triose phosphate (a three carbon sugar), sucrose, or starch. The point is that an organic compound is made. Again, as I go through the steps, I will refer to the model and how it can be used during lecture.

The Light Dependent Reactions—Noncyclic Electron Transport

An antenna pigment in Photosystem II absorbs a photon of light energy. If the pigment is near the outer edges of the cluster of pigments, it is probably a high-energy blue wavelength absorbing pigment. Pigments closer in to the reaction center will absorb lower-energy red wavelengths of light. This creates a gradient of energy absorption. As energy is transferred through these antenna pigments, it passes from higher energy-absorbing pigments to lower energy-absorbing pigments, losing just a little heat energy with each transfer. In this way, they "funnel" the absorbed energy to the reaction center. The energy is NOT passed in the form of high-energy electrons, but physically, such as the way one vibrating tuning fork can cause another to vibrate, or the way one pool ball striking another, stops, but causes the second ball to move. Electrons do not get involved until the energy reaches the reaction center [3]. (To get things started, I will shine a light from a lamp onto the model. Mounting the "curler" antenna pigments onto the Styrofoam with little springs, will allow me to wiggle them to show how energy might be passed from one to the other, and then to the reaction center.)

When the energy from a photon of light is received by P680 in PS II, an electron is boosted to a higher energy level—an excited state. (The model must be set up with one of the fuzzy electrons attached to PS II.) The excited state only lasts for a billionth of a second, so it is necessary for the electron to pass from P680 to an acceptor molecule before it falls back to a lower energy level, releasing its energy as heat. In this excited state, P680 becomes much more reductive and reduces the acceptor molecule, a nearby chlorophyll-like component of the reaction center—pheophytin—by transfer of the excited electron. (Transfer the electron from P680 to the pheophytin golf tee.) This makes the pheophytin negatively charged and P680 positively charged. At this point the electron must be transferred very quickly away from pheophytin or the electron will transfer back to P680 +. This is accomplished by the fast transfer of the electron from pheophytin to a quinone molecule on the stromal side of the reaction center—Q A—thus separating the charged molecules by putting some distance between them. (Transfer the electron from pheophytin to the purple Q A ball on PS II.) The electron is then passed to a second quinone—Q B. (Transfer the electron to the yellow-orange Q B ball.) A lipid soluble mobile electron carrier, plastoquinone (PQ), docks in the Q B site until it has picked up two electrons, along with two hydrogen ions from the stroma. (PQ is represented by a large black pompom with two small patches of Velcro glued on to pick up the electrons and hydrogen ions. I have used large pompoms for molecules that are moving in this model. Now if PQ has to pick up two electrons, this means that two photons of light have to be absorbed. But at this point, P680 + has no more electrons to give off. That will be fixed shortly, but in the meantime, I will have one electron already on PQ. Notice that for PQ to pick up electrons in the Q B site, it will be located on the stromal side of PS II, where it will also pick up the two hydrogens—small Styrofoam balls with Velcro.) PQ, now loaded—reduced—with two electrons and two hydrogen ions, detaches from the Q B site and PSII and diffuses within the lipid layer to the luminal side of the membrane. There, when it encounters a molecule of cytochrome b 6/f in the membrane, it transfers its two electrons and the hydrogen ions are released into the lumenal space. One of the things that surprised me was how several different types of molecules in the thylakoid membrane actually move around in order to transfer electrons. (Move PQ down through the membrane to cytochrome b 6/f on the lumenal side of the membrane. Pass the electrons to the cytochrome and release the hydrogens into the luminal space.) As this process continues, hydrogen ions accumulate in the thylakoid lumen, which will later be used to synthesize adenosine triphosphate (ATP). Here was another misconception straightened out—I thought there was a proton pump that was using the energy of the electrons to pump protons across the membrane. Plastoquinone is more of a carrier than a pump. Another mobile electron carrier molecule, located in the luminal space is plastocyanin (PC). PC picks up electrons, one at a time, from cytochrome b 6/f and transfers them to the reaction center P700 + of Photosystem I, making the trip up to a thousand times per second [6]. P700 + would be positively charged because I would be starting PS I from the point where it had already lost an electron from previous excitation by light. (Transfer one of the low-energy electrons from the cytochrome to PC—represented by a large blue pompom with attachment sites—and then to the reaction center P700 +.) By this time the electrons have lost a lot of the energy they had gained from the light as they have been passed from molecule to molecule. A photon of light is absorbed by the antenna pigments of PS I, and the energy is passed from one to the next until it is absorbed by the reaction center chlorophyll, P700, which excites an electron. (Shine the light onto PS I, wiggling the "curler" antenna pigments.) The electron is then passed within the reaction center protein complex through several subunits—chlorophyll Ao, the primary acceptor, quinone A 1, (not included in this model) and then to several iron and sulfur containing proteins [3, 7]. (Remove the electron from P700 and pass it along the Fe-S proteins represented by the hot pink golf tees.) At this point the electron is picked up by another electron carrier, located in the stroma—a ferrodoxin protein (Fd)—which transfers two electrons, one at a time, to ferrodoxin-NADP + reductase (FNR) on the stromal surface of the thylakoid membrane. (One of the electrons should already be placed on FNR, ready for the second to arrive. FNR is represented by a white Styrofoam disk with a notch cut out for NADP +. Ferrodoxin, as a mobile electron carrier, is represented by a large red pompom with an attachment site for one electron. Transfer the electron from the last Fe-S golf tee protein to the red pompom, Fd, and then place Fd on its binding site on FNR.) FNR reduces NADP +, from the stroma, to NADPH with the addition of the two electrons and one hydrogen ion from the stroma.

2 Fd r e d + NADP + + H + g 2Fd o x + NADPH

NADPH, along with ATP, is used in the light-independent reactions to reduce CO 2 to sugar [3]. Since these reactions take place in the stroma of the chloroplast, it also makes sense that this reaction takes place on the stromal side of the thylakoid membrane. Structure is related to function! (Attach the K'nex connector, representing NADP +, to the notch in FNR, and attach a hydrogen ball from the stroma and the two electrons onto the NADP + molecule, creating NADPH. Release the Fd pompom from FNR.)

At this point, both reaction center molecules have given off electrons that have to be replaced before the process can begin again. The P680 reaction center became positively charged once the excited electrons were transferred to the pheophytin and were sent on their way to PS I. Adjacent to P680 + is a tyrosine amino acid (Tyr z) which donates an electron to P680 +, returning P680 to its neutral state, but Tyr z also gives off a hydrogen ion, making Tyr z very reactive. (Tyrosine, represented by a brass thumbtack, should have an electron on it as the demo begins. Remove this electron and transfer it to P680.) Tyrosine then accepts a proton and an electron from a structure containing 4 manganese atoms on the luminal side of PS II, called the oxygen-evolving complex (OEC). Two water molecules bind to the OEC—perhaps to the four, now positively charged, manganese ions—and are oxidized to form O 2. The electrons from water replace those lost by the manganese ions, and the hydrogen ions are released into the thylakoid lumen where they contribute to the hydrogen ion concentration [1]. (Take a water molecule and attach it to the OEC by placing the oxygen onto the toothpick. Pull off the hydrogen ions and release them into the lumen. Place the two fuzzy electrons onto two of the pale yellow manganese balls of the OEC. Release the oxygen ball into the lumen. Do the same for one more water molecule. Take the two oxygen atoms and put them together with a toothpick and release this oxygen molecule from the chloroplast. Remove an electron from one of the manganese molecules and pass it to Tyr z.) Light does not directly activate the OEC to split water. It is the light captured by PS II and the subsequent oxidation of the reaction center that starts the sequence of redox reactions that lead to water being split as its electrons are removed [8]. Electrons, from the oxidation of water, therefore, pass through both PS II and PS I in a linear fashion, until they are ultimately accepted by NADP + to form NADPH.

ATP is made using the energy of the proton gradient established by plastoquinone's transferal of hydrogen ions from the stroma to the lumen of the thylakoid during electron transport from PS II to PS I. Hydrogen ions are also released into the lumen when water is split to release oxygen, and electrons for P680 +. This accumulation of hydrogen ions creates both a difference in charge (electrical potential) and a difference in pH (chemical potential) across the thylakoid membrane. Together these are called the proton motive force [3]. This force provides the energy used by the ATP synthase enzymes, located in the stromal lamellae membranes, to phosphorylate ADP to ATP as the hydrogen ions diffuse back across the membrane through the enzyme. Since the initial energy necessary to transport the electrons and protons came from light, this form of ATP synthesis is called photophosphorylation. Although there is still much to learn about how ATP synthase uses the flow of hydrogen ions to make ATP, it is known that there is a part of the enzyme that rotates as the protons go through. This rotation may cause a conformational change in other parts of the enzyme with the result that ATP is produced from ADP and inorganic phosphate. The rate of ATP production is about one ATP produced for every three to four hydrogen ions that are moved through the enzyme [3]. (ATP synthase is represented by the noodle/paddle-wheel filled Styrofoam ball combination. The paddle wheel represents the rotating part of the enzyme; however, it is probably oriented in the wrong direction, and should be in the portion of the enzyme that is embedded in the membrane. For purposes of demonstrating ATP synthesis, I chose to put it in this direction so I could drop hydrogen ion balls through, turning the paddle wheel, much as water turns a water wheel. It would be very difficult to show ATP being made with this model, so at this point I will break away from the model and just tell the students that we don't quite know how ATP gets made, but show them my favorite representation of ATP—the ATP gun. (See the Appendix for a description of this demo.)

Cyclic Transport

Sometimes, electrons do not flow from PSI to NADP +, but travel in a circular path so that they end up back on PSI. In this case, the excited electrons from P700 are transferred through the photosystem, but instead of being transferred to ferrodoxin reductase, they are picked up by plastoquinone and travel through the pathway that returns the electrons to P700 + at the energy level they were at before excitation. But just as in the noncyclic pathway, hydrogen ions are transported by PQ across the thylakoid membrane, setting up the conditions for chemiosmosis and ATP synthesis. No oxygen is produced, nor is NADP + reduced in this cyclic pathway [4]. This pathway will provide the cell with energy in the form of ATP, but without the hydrogens provided by NADPH during the Calvin cycle; its purpose may be to simply make up for a shortfall of ATP provided by noncyclic electron transport so that there will be enough for the synthesis of carbohydrates in the Calvin cycle [5]. (To demonstrate cyclic flow, pass an electron from PS I along the Fe-S golf tees proteins, to the red ferrodoxin, and then to the black PQ. After picking up another electron, PQ must pick up two hydrogen ions from the stroma, and then release them into the lumen as the electrons are transferred to cytochrome b 6/f. The electrons are then picked up by the blue PC pompom and transferred back to P700 +, completing the cycle. The hydrogen ions can be used to make ATP when they diffuse out through ATP synthase.)

The Calvin Cycle or Light-Independent Reactions

The second stage of photosynthesis takes place in the stroma of the chloroplast and involves the fixation of carbon dioxide and the production of sugars using the high energy molecules ATP and NADPH produced in the light reactions. The Calvin cycle can be divided into three stages: carboxylation (carbon fixation), reduction, and regeneration [3]. (Here, I leave the model, except to tell the students that we are taking NADPH and ATP out of the thylakoids and bringing them further out into the stroma—which is now the classroom area around the thylakoid model. The idea of a cycle is often taken too literally by students. To help them understand that the steps of the Calvin cycle are all occurring simultaneously, I will have them simulate a cycle with the activity "Kool-Aid Cycle". (See Lesson Plans, Day 5) Once they realize how cycles work, I will go through the steps of the Calvin cycle as students play the roles of the molecules involved as described in the Lesson Plan section, Day 5.

In carboxylation, an enzyme called rubisco (ribulose-biphosphate carboxylase/oxygenase) is required in order to fix carbon dioxide gas coming into the chloroplast. It is probably the most abundant protein on the planet. Chloroplasts are full of it and there are a lot of plants. They need a lot because it is not a very efficient enzyme. It can fix only a few CO 2 molecules per second. In addition, O 2 can also combine with rubisco in place of the CO 2, reducing the plant's photosynthetic ability. It may be that rubisco evolved in anaerobic bacteria when there was little oxygen in Earth's atmosphere. As more oxygen was released into the atmosphere, the enzyme lost much of its efficiency due to competition with O 2, but not enough so that it was selected against [3].

A molecule of carbon dioxide gas is combined with a five-carbon compound called ribulose 1,5-biphosphate, or RuBP by the enzyme rubisco. This forms a very unstable six-carbon compound which immediately breaks down into two, three-carbon compounds—3-phosphoglycerate (PGA). This must occur with two more CO 2 molecules in order for the final product to be made—a triose phosphate sugar.

In the reduction stage, a series of enzymatically-catalyzed reactions uses the products of the light-dependent reactions to reduce PGA. The 6 (3C)-PGA molecules are first phosphorylated using six ATPs to produce glycerate 1, 3-bisphosphate (GBP). Each GBP is then reduced when NADPH is used to replace one of the phosphate groups with a hydrogen atom. Six (3C) glyceraldehyde 3-phosphates (G3P) are formed. Five of these, phosphorylated by three ATPs, are enzymatically shuffled around in the regeneration stage to reform the 3 (5C)-RuBP molecules. One will be retained as a triose phosphate and be used in forming either a starch molecule in the chloroplast, or a sucrose molecule in the cytoplasm. They leave the chloroplast through translocator proteins in the chloroplast membrane that exchange triose phosphate molecules for inorganic phosphates from the cytoplasm [3].

Photorespiration, C4, and CAM Plants

As I mentioned before, the enzyme rubisco, fixes CO 2, but will also bind with O 2, producing one PGA and a phosphoglycolate. The reactions that eventually convert phosphoglycolate into PGA are costly in terms of energy and result in one less CO 2 molecule being fixed. This process is called photorespiration. It often occurs when temperatures are high and conditions are dry. To reduce evaporative water loss, plants will close their stomata, which keeps the water in, but also keeps in the O 2 produced in photosynthesis, and keeps out more CO 2. Oxygen levels build up in the leaves, making it more likely that rubisco will bind with O 2 rather than CO 2 [3].

Plants that carry out the Calvin cycle and produce a 3C PGA when they combine CO 2 with RuBP are known as C3 plants. These kinds of plants are most affected by photorespiration, and include many crop plants like wheat and potatoes, and plants of temperate climates. Other types of plants have evolved ways of dealing with this problem. C4 plants (sugar cane, corn, and other grasses) have special cells near the vascular bundles or veins, called bundle sheath cells. These plants fix CO 2 in the mesophyll cells by combining CO 2 with a 3C compound, phosphoenolpyruvate (PEP) to form a 4C oxaloacetate instead of PGA, hence the name C4 plants. Oxaloacetate is then reduced using NADPH to form malate, which is transported to the bundle sheath cells. In the bundle sheath cells, the malate is decarboxylated (meaning the CO 2 is released) into pyruvate and CO 2, and the NADPH is regenerated. The pyruvate is transported back to the mesophyll cells where it is converted back into PEP. Rubisco is found in the bundle sheath cells and takes advantage of the higher concentrations of CO 2 present to carry out the Calvin cycle. There is a cost to the plant because of the energy required in the transport of molecules from mesophyll to bundle sheath cells. This cost is offset by the advantages of having to deal with less photorespiration when conditions are hot and dry. Then the C4 plants can afford to close up their stomata, reducing water loss, because they have secured high concentrations of CO 2 in the bundle sheath cells [3].

CAM (crassulacean acid metabolism) plants reduce water loss and avoid photorespiration by keeping their stomata closed during the day and open them at night to let in CO 2. During the night the CO 2 is fixed in the mesophyll cells by combining with PEP. It then goes through a series of enzymatic reactions, which convert it into malate. The malate is stored in the vacuole of the cell as malic acid. In the daytime, the malic acid is released from the vacuole and is transported into the chloroplast where CO 2 and PEP are released by decarboxylation, and the Calvin cycle is carried out, while stomata are closed. However, there is an energy cost to making malate, and the vacuole can only store so much malic acid. The plant may not get as much CO 2 as if it had kept its stomata open, so growth tends to be slow. CAM plants include cacti, pineapples, and other succulent plants [3].

One benefit to the higher CO 2 levels that are creating global warming is that C3 plants will be better able to avoid photorespiration because of the improved CO 2 to O 2 ratio. Higher temperatures, however, may increase evaporative water loss and offset the advantages.

Lesson Plans

Day 1—Leaf Structure

Warm-up Questions

What might be some ways that plant cells would look different from animal cells? What are some reasons we need plants? If plants could talk, what might they say about needing us? What might plants need to live? How might they get these things?

Students start the unit by learning about leaf structure. First, they are required to make a diagram of a leaf cross-section and a chloroplast using their textbook and labeling and writing descriptions of the functions of all the parts. This can be done as a homework assignment the previous night to give more class time for the lab work. Once they are familiar with what they should be looking for, I have them observe, draw and label prepared cross-sections of leaves using a microscope. After a review of the function of stomata from their diagram assignment, students then will observe stomata under the microscope. The best plant for this is called Wandering Jew, Tradescantia zebrine. It has leaves with a lot of very bright purple pigment on the underside, but the guard cells show up as bright green. There is no mistaking them. Students do not even have to peel the leaf. All that is required is to make a wet mount slide of a small piece of the leaf with the underside facing up. Students draw, measure, and count the number of stomata per unit area of leaf. They also observe what happens to the stomata when a solution of salt water is drawn under the cover slip, causing the guard cells to lose turgor pressure and close the stomata. Once they know what to look for, I ask students to predict how the stomata might be different on different types of leaves. Will size vary? Number? Location? Shape? They then select several different types of leaves and test their hypotheses by recording their observations and conclusions in their lab notebooks. Class closes with a discussion of the results.

The night's assignment includes having students read background information on the making of starch pictures—one of the next day's labs. This information can be found at the following website:

http://www.oxygraphics.co.uk/starchpics.htm

Day 2—Chloroplast Structure

Warm-up Questions

What kinds of plant parts would you expect to find chloroplasts in? What might someone say that pigments are? Where might you find pigments in plants? What pigments would you expect to find in leaves? What seems to be happening when leaves change color in the fall?

Cytoplasmic Streaming

I want students to observe real chloroplasts. The easiest plant to do this with is the American waterweed, Elodea canadensis, sometimes sold as Anacharis, Egeria densa. I often have students observe this plant under the microscope, but sometimes they are unable to find the chloroplasts involved in cytoplasmic streaming. In case they have trouble, I use a short video clip of cytoplasmic streaming of chloroplasts. The following website has a very good video loop that clearly shows the chloroplasts:

http://www.microscopy-uk.org.uk/mag/artnov00/dwelodea.html

I have students measure the chloroplasts using the microscope and make drawings of them. They determine an average number of chloroplasts per cell, and describe which cells they see cytoplasmic streaming in and how the chloroplasts are moving in those cells. They are then asked to hypothesize about the following questions: Why some cells in the same leaf have cytoplasmic streaming and others do not. Why is cytoplasmic streaming observed in the Elodea and not in the Wandering Jew plant observed on the previous day? What could they do to increase the speed of cytoplasmic streaming in the Elodea cells? Observations and responses are recorded in their lab notebooks.

Starch Pictures

In order to show the distribution of chloroplasts in a leaf, and to demonstrate that starch is stored in the chloroplasts following photosynthesis, I will have students create starch pictures on leaves. This is done by exposing the leaves of a geranium plant to a negative or slide projected from a slide projector after the plant has been stored in the dark for 48 hours—depleting its starch reserves. The plant will begin to make starch again, but only in the chloroplasts receiving the light coming through the light areas of the negative. Iodine staining reveals the areas of the leaf where starch has been produced, and creates the image. Detailed instructions can be found at the following website:

http://www.accessexcellence.org/AE/AEC/AEF/1996/morishita_pictures.html

I will have students set up the leaves in the glass plates with the image projected on them in our darkened stockroom to eliminate other light sources affecting the images. During the time needed for the leaves to make the starch, we can begin the paper chromatography activity described below. Before leaving class, the students will remove the leaves from the glass plates and soak the leaves in the hot alcohol bath. Past experience has shown that the leaves can be left in the alcohol bath overnight (with the heat source turned off!) and stained the next day.

Paper Chromatography

After a discussion about what pigments might be in chloroplasts, I have the students gather several types of leaves from trees outside the classroom. Since I am usually teaching this unit in the early fall, I tell them to collect some leaves that are starting to change colors, as well as some green leaves of the same type. I always have on hand some Southern Magnolia leaves. This tree is an evergreen, has very thick leaves, and always gives wonderful results in case other leaves have already started losing their chlorophyll. Paper chromatography is a method of separating molecules by solubility, size and their attraction to the paper. This lab is a modification of the AP Biology Lab 4, part A. Instead of preparing a solution of the leaf pigments, I have students use the edge of a coin to press the leaf pigments into the chromatography paper in a straight line across the bottom of the strip, about one half inch up. The pigment must be above the level of the solvent or it will all end up in the bottom of the jar. This method saves prep time and students can test a variety of different leaves. They must take care, however, to get a thick straight line of pigment on the paper, and not to tear through the paper with the coin. The strip should be about 2.5" by 4", and folded in half lengthwise. The students can put a line of pigment at the bottom of each half and the fold makes it stand up in the chromatography jar. (See Figure 3.) This method works best with actual chromatography paper rather than the coffee filters sometimes recommended as an alternative, because the thicker paper stands up better to being pressed by the coin. The strip is then placed in chromatography solvent—90% petroleum ether and 10 % acetone. Use a jar with a lid to contain the fumes. If you do not have these chemicals, alcohol or fingernail polish remover may work.

image 07.05.08.03

Figure 3. Chromatography lab setup.

As the solvent moves up the paper, it dissolves the pigments from the leaf and they begin to separate and move up the paper with the solvent. This only takes about ten minutes or so, depending on the solvent and the paper used. Because of the different properties of the pigments, they will move at various rates. Some will be more soluble, some will have a higher affinity for the paper fibers. Where students might have only seen green when they looked at a leaf, the chromatography paper will show other pigments that were in the leaf. Leaves that have changed colors will reveal a lack of chlorophyll. Chlorophyll a will show up as a bright Kelly green to bluish green. Chlorophyll b shows up as a yellowish green, usually below the chlorophyll a. Carotenoids will appear as pale yellow to an orange-yellow near the solvent front. Students should be able to identify the different pigments present in the leaves and measure the distance that each pigment migrated, compared to the solvent front. The ratio is known as the R f value of the pigment and can be used by the students to compare pigments from different species. Students record their observations, measurements and attach the chromatography paper into their lab notebooks.

Day 3—Light Reactions Lecture with Demonstration Model

Warm-up questions

What might plants require for photosynthesis? What might be produced during photosynthesis?

Students should be able to answer most of these questions based on what they have learned in previous science classes, or from what they have observed in the activities of the past two days. Or they could just make an educated guess. The wording of the questions is deliberate—"What might be produced?" I am assessing what my students may know about photosynthesis, but I don't want them to feel like there is just one answer that they have to know at this point.

Lecture and Demonstration Model

I then introduce students to the demonstration model of a chloroplast that I have built. (Instructions and plans are included in the Appendix.) I ask students what parts they might be able to identify based on the diagrams and activities they have done so far. They should be able to recognize the membranes of the chloroplast and perhaps some of the pigments based on the colors in the model. As I go over chloroplast structure, I will also use the "Fabric Thylakoid Demonstration" described below, and ask students to find similar layers in the model. I will refer to the components of the model as I proceed with a lecture on the light reactions. The background information on the light reactions given in this unit includes the references to the model I plan to use. Students will be given the two diagrams of the model from Figures 1 and 2 to make notes on. At the end of the lecture, I will have volunteers come up and manipulate the model to show how electrons flow from water to NADPH through PS II and PS I at different points during non-cyclic flow. The idea is that by having a three-dimensional structure that simulates as closely as possible how photosynthesis works in a chloroplast, that students will have a better grasp of what is going on.

Fabric Thylakoid Demonstration

To show students how the thylakoid membrane is folded to form grana and lumen and lamellae, use a 10 yard piece of fabric which has definite "right" and "wrong" sides. Identifying the "right" side of the fabric as the luminal side of the thylakoid membrane, fold the fabric back and forth to create grana and lamellae. (See Figure 4.) The "lumen" of the fabric thylakoids should have the "right" side of the fabric facing it. This demonstration shows how the thylakoids could be formed from just one or two membranes.

image 07.05.08.04

Figure 4 — Fabric thylakoid

Day 4—AP Lab 4B—The Light Reactions

Warm-up question

What role does NADP + play in the light reactions?

Photosynthesis Lab

In this AP lab, students test the effects of light and darkness, and boiling on the reduction of NADP by PS I in isolated spinach chloroplasts. The effects are measured by substituting a blue compound, DPIP (-2-6-dichlorophenol-indophenol), for NADP +. The DPIP becomes more and more colorless as it is reduced. This change in color can be measured with a spectrophotometer. The more DPIP that is reduced, the more photosynthesis that is taking place. An on-line version of this lab can be found at

http://www.ekcsk12.org/science/aplabreview/plantpigmentsandphotosynthesislab.htm

I begin this lab by showing students how to use the spectrophotometers. I then ask the class to use the demonstration model to explain what the DPIP is supposed to do in this lab. After completing the lab, students are given additional questions that relate the lab results to the demonstration model:

  • Does isolation of the chloroplasts affect the light reactions? Why or why not?
  • Describe what is happening in the model when the chloroplasts are exposed to light.
  • What happens when they are placed in the dark?
  • Show on the diagram of the model where the DPIP would come into play.
  • What does changing the length of exposure to the light do in the thylakoids?
  • What would be happening in the model if the chloroplasts are boiled?

The idea is for them to relate what is happening in the cuvette to what they can see in the model.

Day 5—Calvin Cycle Lecture and Role-play

Warm-up questions

Where might the O 2 come from in photosynthesis? What else is made at the end of photosynthesis? How does CO 2 get into the chloroplast? How does water get into the chloroplast?

The Kool-Aid Cycle

Objective: Students will discover how cycles such as the Calvin cycle work and how some components leave the cycle and some are maintained in the cycle.

Materials: large plastic cups, plastic spoons, 2 quart pitchers or other container, Powdered, unsweetened Kool-Aid in pre-measured 0.5 g amounts, sugar pre-measured in 1/8 cup portions, water, measuring cups.

Procedure:

  • Set up stations around the room for each of the following items: 2 Kool-Aid stations, 2 sugar stations, 2 water stations, 3 spoon stations, one pitcher station with several pitchers, 2 "dishwashing" stations. Like stations should not be next to each other if possible. Assign one student to man each station except the pitcher station. If the class is small, you can combine tasks at a station, but there must be at least 2 of each station except the pitcher station.
  • Divide the rest of the students into teams. Give these students plastic drinking cups. Their task is to make enough Kool-Aid to fill up a 2-quart pitcher. The problem is they can only make one cup at a time, and they must go to the different stations, in order, to get the job done. They do not have to go to the same stations each time. If someone else is being served, then the student has to wait or go to the other station for that part of the cycle. (If the class is small, you could omit creating teams and just time them on how long it takes to fill one pitcher, then discuss what happened and if they can think of ways the process could be speeded up without breaking the rules.)
  • Each student with a cup must first go to a Kool-Aid station where the person manning that station will pour the aliquot of powdered Kool-Aid into the cup.
  • Next the student with the cup must go to a sugar station. Again, the person manning that station will distribute the sugar into the cup.
  • Next is a water station. Here they will receive 1 cup of water, measured out by the person manning that station.
  • Then on to a spoon station, where the person manning that station will stir the Kool-Aid until it dissolves
  • With the final product complete, the student may now visit the pitcher station and pour their Kool-Aid into a pitcher.
  • Before they can begin the cycle over again, they must visit a dishwashing station where they will have their cup rinsed out by the person at that station.
  • Finally, they are ready to begin the cycle again, continuing until they have filled their group's pitcher.
  • Have everyone fill a cup with Kool-Aid to drink and discuss the following questions.

Questions for Discussion:

  • How was this activity like a cycle?
  • Describe how the students with the cups moved around during this activity?
  • What might the people manning the stations represent?
  • What were the reactants and products of this activity?
  • What was not changed in the activity?
  • Was anything recycled? How?
  • What station got backed up the most? How could this be prevented?
  • How many times did the cycle have to occur before the pitcher was full?
  • What might happen to the cycle if all the pitchers were filled and no one wanted to drink anymore Kool-Aid?

The Calvin Cycle Sashay

Students are given an outline of the Calvin cycle to complete after we act out the steps in the form of a square dance. As this interactive "lecture" on the Calvin Cycle proceeds, students are given roles to play as each molecule enters the cycle. Depending on the number of students, you may have to adjust the number of characters that are represented.

Following the dance, we will discuss how the dance related to the Kool-Aid activity and how it compares to a textbook diagram of the Calvin cycle.

One student, or the teacher, will be Calvin Rubisco and call the dance. Calvin, of course, is the enzyme who gets this whole thing started by bringing the dancers together. During the first part of the dance there should be 3 couples—Ruby Pea (RuBP) and Carbon Dioxide in each couple. Later on you will need 2-6 students to be ATP, and 2-6 to be NADPH. (Of course, these can be recycled, too!) The Rubys each hold 5 Styrofoam "carbon" balls connected with toothpicks, with a ball labeled as a phosphate group on each end.

image 07.05.08.05

Each Carbon Dioxide just holds one of the large Styrofoam balls to represent CO 2.

Changes in names are denoted during the dance by flipping a set of nametags that hang around the dancers' necks.

  • 3 Sets: RuBP—PGA—GBP—G3P—RuBP
  • 1 Set: CO 2—PGA—GBP—G3P(sugar)
  • 2 Sets: CO 2—PGA—GBP—G3P—(sit down)
  • ATP Sets: ATP—ADP
  • NADPH Sets: NADPH—NADP+

Walk students slowly through the dance at first, until they have worked out the movements. Then try it with square dance music. Let the music play a bit between calls if students need time to put things together.

The dance begins with the three couples in a circle. Rubisco calls the dance:

Chorus 1: Circle left all day long, we'll make sugar from dusk til dawn.

Circle-cycle to the right, we'll even make sugar into the night.

(Dancers circle left, then right)

Allamande left, allemande right, Ruby find a partner and hang on tight.

(Ruby and CO 2 dancers walk in opposite directions in a circle, alternating each other on the right and left hand sides, until they meet their partner again.)

Ruby and Carbon one day meet, combine their carbons, ain't that sweet!

Put your carbons all together, 6 for now, but they won't weather.

(Here the Ruby and CO 2 partners attach all their balls together to form a 6-carbon compound.)

Chorus 1: Circle left all day long, we'll make sugar from dusk til dawn.

Circle-cycle to the right, we'll even make sugar into the night.

(Couples circle left and then right, holding their new molecule between them.)

Share your carbons equally. Once was 6 C's, now there's 3.

(Couples split apart the 6-carbon compound and form two 3-carbon compounds, each with one phosphate attached. Each partner holds one of the new PGA molecules)

Chorus 2: Flip your card, you're something new.

Remember what you have to do!

(Couples flip their name cards to PGA)

Pretty good allies, PGA, but you'll go your separate ways.

Chorus 1: Circle left all day long, we'll make sugar from dusk til dawn.

Circle-cycle to the right, we'll even make sugar into the night.

(All dancers circle left and right)

Now new dancers come on in, with energy to make us spin!

(ATP dancers enter the circle with "phosphate" balls)

A-T-P has en-er-gy, to give to you, with a "P"

(ATP dancers attach a phosphate to each PGA dancer's molecule.)

Chorus 2: Flip your card, you're something new.

Remember what you have to do!

(PGA dancers flip their cards to GBP after receiving a phosphate from ATP. ATP flips to ADP and moves off the dance floor.)

GBP, you're looking fine, with 2 phosphates, you're divine!

Now new dancers come on in, with more energy to make us spin!

(NADPH dancers enter the circle, each with a hydrogen and 2 electron balls)

Chorus 1: Circle left all day long, we'll make sugar from dusk til dawn.

Circle-cycle to the right, we'll even make sugar into the night.

(All dancers circle left and right)

N-A-D-P-H gives you, a proton and electrons—2!

(NADPH dancers attach a proton and 2 electrons to the GBP dancers' molecules.)

Re-duced now and ain't that great, Lets get rid of 1 phosphate.

(GBP dancers throw one of their phosphates into the air, and off the dance floor. ADP dancers can pick them up.)

Chorus 2 : Flip your card, you're something new.

Remember what you have to do!

(GBP dancers flip their cards to G3P, NADPH flips to NADP+ and moves off the dance floor.)

Chorus 1: Circle left all day long, we'll make sugar from dusk til dawn.

Circle-cycle to the right, we'll even make sugar into the night.

(G3P dancers circle left, then right.)

Now there are six G3P's, five must stay and one must leave.

Turn and wave bye-bye for now. S(H)e'll be sugar anyhow!

(One of the dancers leaves the dance floor. The other 5 wave good bye.)

G3Ps you are so sweet, but our cycle's not complete.

In the center all join in, to put 5 carbons back again.

You'll need the help of an old friend, 3 ATPs are here to lend.

(The 5 G3P dancers come together and pull apart and reform their balls, along with 3 phosphates from the ATP dancers to make 3 RuBP molecules.)

Chorus 2: Flip your card, you're something new.

Remember what you have to do!

(Three of the G3P dancers flip to RuBP and hold the new molecules. Two dancers flip to a "Sit down" card. ATP flips to ADP)

All the RuBPs circle right, Three with 5 C's—you did just right!

This circle dance begins again, when 3 more carbons come on in!

Day 6—C4 and CAM Plants

Warm-up questions

What might happen if rubisco could also bind with O 2? How might living in the desert affect photosynthesis in a plant?

Models of C4 and CAM plants

Students will be given notes on the adaptations of these types of plants based on the background information included in this unit. They will then have a choice of completing one of the following two assignments:

  • Take our skit for the Calvin cycle and revise it, or create a whole new skit, to demonstrate what happens in either C4 or CAM plants. Present your skit to the class.
  • Design a plant with adaptations that allow it to carry out photosynthesis in some extreme environment. You must address new ways of carrying out either the light reactions or the Calvin cycle, as well as any specialized structures that the plant would need.

Appendix

Instructions for Building a Thylakoid Membrane Model

Materials:

36" X 12" X 2" Styrofoam sheets—5

¼" X ½" X 36" balsa wood strips—7

rubber bands

Toothpicks, wooden skewers and Styrofoam glue are used to connect Styrofoam pieces together.

The Styrofoam lipid bilayer. (See Figure 5.)

  • Cut 3 of the 36" sheets in half, creating 6, 18" sections that will form the granum of the model.
  • Cut two 4" sections and two 1" sections from a big sheet for the spacer sections of the granum.
  • Attach the 4" and 1" spacer pieces to the 18" layers as shown in the diagram using toothpicks and glue.
  • To insert the balsa wood support strips, first mark the corners where they will be inserted 1" in from both sides. You can push the strips through the foam quite easily. Use a balsa strip to make all the holes before assembling all the layers of the granum. You can then start from the bottom and add each layer to the balsa supports. Tie or wrap rubber bands around the balsa supports just below the layers so that they will not slip down. Trim off excess wood at the top as necessary.
  • For the side pieces (lamellar membranes), cut four 8" sections from one large sheet of foam. Cut angled ends on these to attach to the main unit. Cut four 6" pieces to form the horizontal sections of the lamellar membranes.
  • Attach the angled pieces to the 6" pieces with glue and wooden skewers. Taping these while the glue dries may help ensure a good connection.
  • For the higher lamella membrane on the left, cut two balsa wood strips approximately 26" long and push these through the two 6" foam pieces at the corners to provide supports as shown in Figure 1.
  • For the lower lamellar membrane on the right, cut two balsa strips approximately 16" long and push through the corners of the horizontal 6" side pieces as you did for the left side.
  • Attach the angled side pieces to the granum as shown in Figure 1, using glue and wooden skewers. Use tape to hold the foam steady as the glue dries. Wrap and tie rubber bands around the balsa supports to keep the foam from slipping down.
  • With a permanent black pen, draw the lipid bilayer onto the foam edges. Where only the phospholipid heads would be showing—the surface of the membrane—attach bubble wrap to make it look like the heads.

image 07.05.08.06

Figure 5 — Construction details for the membrane of the thylakoid model

The Photosystems (See Figure 6.)—You will need as many of the parts described here as necessary for the number of photosystems you plan to put on your model. If there is something you can't find, make substitutions that make sense for what the structure or molecule has to do.

1. The reaction centers are made using green 3" X 1" Styrofoam disks. For a reaction center on the edge, cut one disk into quarters. Attach these four quarters to the membrane with glue and toothpicks so that they form two half disks stacked on top of each other. (The reason they were cut into quarters is so the vertical split created will be the boundary of the two dimer units of the reaction center.)

2. Cut another disk in half. Place the two halves back together on the surface of the foam membrane so that the reaction center appears to extend either above or below the membrane. Be sure to note the differences in the position of PS I and PS II in the membrane and in the grana/lamellae.

3. On the flush surface of the membrane, glue a thin layer from a disk, to show the position within the membrane.

4. To show the parts of the reaction centers that extend past the membrane in the middle of the model, just glue down a disk that has been cut in half to show the dimer sections. Add any parts such as the OEC that would be part of that section. Cut small sections of the "antenna" curlers and glue/toothpick around the reaction center. They should be in a circle around PS I and in clusters around PS II.

5. The following is a list of PS and membrane components and the appropriate colors. Refer to Figure 6 for placement. Glue and toothpick will hold most items onto the model. (Half a Styrofoam ball is referred to as a hemisphere.)

  1. Q A—3/4" purple hemisphere
  2. Q B—3/4" yellow-orange hemisphere
  3. Phe—green golf tee
  4. P680—1 ½" bright green hemisphere
  5. Tyr z—brass thumbtack
  6. Cytb 6f—1 ½" red orange ball
  7. P700—1 ½" blue-green hemisphere
  8. Fe-S—hot pink golf tee
  9. Antenna pigments—2 ½" X ½" curlers painted green, yellow-green and yellow.
  10. NADP+ reductase—3" X 1" white Styrofoam disk, notched as shown in Figure 6.
  11. ATP Synthase—a 1 ½" pool "noodle", split and hollowed out, connected to a 3" Styrofoam hemisphere, hollowed out, and containing a paper paddle wheel on a wire axle. (See Figure 6)
  12. Mn part of OEC—four ½" pale yellow balls held together with toothpicks
  13. OEC—1 ½" white sphere with a ¾" wedge cut out.
  14. The following are mobile and are not permanently attached:
  15. Hydrogen ions—1/2" white Styrofoam balls
  16. Water molecule—two hydrogens as above connected by toothpicks to a 1 ¼" ball for oxygen, along with 2 electrons*
  17. PQ—1 ¾" black pompom
  18. PC—1 ¾" blue pompom
  19. Fd—1 ¾" red pompom
  20. Electrons*—1/2" silver tipped white pompoms
  21. NADP+—two 1 ½" interconnected K'nex standard blue connectors

6. Attach Velcro with strong glue to any parts where there are binding sites, where electrons will be carried, etc.

7. Label parts of the model as needed.

image 07.05.08.07

Figure 6 — Construction details for the thylakoid components

image 07.05.08.08

Figure 7-Completed thylakoid model.

The ATP Gun Demonstration

(This is not an activity I created. The idea was passed down to me—as so many things are—by other teachers who discovered it, so I do not know who originally created it. My thanks to the person who did; it is one of my favorite analogies. I describe it here as I use it in my classroom.)

Adenosine triphosphate (ATP) has been described as the energy currency of the cell. It is composed of an adenine molecule, a ribose sugar and three phosphate groups. The three phosphate groups are held together by unstable bonds that break easily and release a lot of energy. Energy is transferred from ATP to another molecule when the bond holding the third phosphate group is broken by hydrolysis and the third phosphate group is temporarily transferred to the molecule. At some point, the inorganic phosphate group is released. The remaining molecule with two phosphate groups is called adenosine diphosphate (ADP). ATP can be regenerated by combining ADP with and inorganic phosphate during respiration.

I use a toy dart gun as the ATP molecule. Dollar stores are the best places to find them. Ideally, the gun must be the kind that is spring loaded and shoots a sucker tipped dart. (I do not let students handle the gun, because the type that works best fires the dart with a lot of force and is meant for shooting at targets, not people.) Label the handle of the gun "Adenine", the upper part of the gun "Ribose" and on the barrel draw two phosphate groups. The third phosphate group will be represented by the dart. Label the sucker end of the dart with a "P".

To demonstrate how energy is transferred by ATP, I show the class the loaded "ATP gun". Just slight pressure on the trigger, and the dart is released with a lot of energy. I usually point it at something that I know the dart will stick to—an open cabinet door works well. This shows how the bond is easily broken, but releases a lot of energy. The energy is transferred with the dart, or third phosphate group. When the dart hits the cabinet door, it will move, or even shut, showing the transfer of the energy from the "ATP gun" to another "molecule". Eventually the dart falls off the target, showing also that the phosphate group does not remain on the molecule. I can use it over again—just like real phosphate groups are used over again. The gun is also no longer ATP, but ADP, because it now has only two phosphates. I can make ATP again by recombining the dart with the gun. But if I just place the dart into the gun, it does not stay in place very well and will not fire. I have to push the dart in with considerable force to create the "bond", just as energy must be used to regenerate ATP. I pull the gun out several times during the year when cellular energy topics come up.

Acknowledgement

Thank you to Rachel Wood for her technical assistance in turning my rough sketches into the finished figures seen in this unit.

Citations

[1] Szalai, V.A. and Brudvig, G.W. (1998, November-December). How plants produce dioxygen. American Scientist, Vol. 86, 542-551.

[2] Allen, J.F. and Forsberg, J. (2001, July). Molecular recognition in thylakoid structure and function. Trends in Plant Science, Vol. 6, No. 7, 317-326.

[3] Blankenship, R.E. (2002) Molecular Mechanisms of Photosynthesis. Blackwell Science Ltd.

[4] Walker, D.A. (1992). Energy, Plants and Man, 2 nd edn. Brighton: Oxygraphics Limited.

[5] Raven, P.H., Johnson, G.B., Losos, J.B., Singer, S.R. (2005). Biology, 7 th edn. New York: McGraw-Hill.

[6] Whitmarsh, J. (2004). Electron Transport and Energy Transduction. Retrieved July 12, 2007, from USDA Agricultural Research Service Web site: http://www.ars.usda.gov/Services/docs.htm?docid=3527&page=3&pf=1&cg_id=0

[7] Jensen, P.E., Bassi, R., Boekema, E.J., Dekker, J.P., Jansson, S., Leister, D., Robinson, C., Scheller, H.V. (2007). Structure, function and regulation of plant photosystem I. Retrieved July 12, 2007, from Website: http://gbb.eldoc.ub.rug.nl/FILES/root/2007/BiochBiophActaJensen/2007BiochimBiophysActaJensen.pdf

[8] Brudvig, G.W. —personal communication, July 30, 2007.

Teacher Resources

Walker, D.A. (1992). Energy, Plants and Man, 2 nd edn. Brighton: Oxygraphics Limited.

—easy to read and understand book on photosynthesis, global warming and renewable energy

Whitmarsh, J. (2004, July 14). Electron Transport and Energy Transduction. Retrieved July 1, 2007, from USDA Agricultural Research Service, Photosynthesis Research Unit Website: http://www.ars.usda.gov/Services/docs.htm?docid=3527&page=1 —article

—Detailed review of photosynthesis

http://www.microscopy-uk.org.uk/mag/indexmag.html?http://www.microscopy-uk.org.uk/mag/artnov00/dwelodea.html —video clip of cytoplasmic streaming of chloroplasts in Elodea.

http://www.npr.org/news/specials/climate/video/ —animated video clips about carbon and global warming

http://www.astc.org/iglo a site with activities and links to other sites on global warming

http://www.npr.org/templates/story/story.php?storyId=11253361 —site contains a game and video clip about stabilizing carbon emissions you can download for students to play

http://photoscience.la.asu.edu/photosyn/education/learn.html —Arizona State University website on photosynthesis and related topics

http://www.newtonsapple.tv/video.php?id=915 —site contains a video clip on photosynthesis basics

Student Resources

http://www-saps.plantsci.cam.ac.uk/articles/broad_anlit.htm 2 CUTE kid friendly stories by D. Walker. The first is about photosynthesis and global warming, the second, about photosynthesis and the evolution of photosynthesis (caution on his editorial comments about creationism and ID). Also, it rambles on a bit during the evolution part.

http://www.oxygraphics.co.uk/starchpics.htm background information on starch pictures.


Comments (2)

    Connie Scercy Wood (East Mecklenburg High School, Charlotte, NC)
    Subject taught:
    Equation Formatting Problems
    You will see that the formulas in the unit for photosynthesis look a little odd. Apparently, the method I used for inserting the formulas did not transfer well to the website. Where there are "g's" there should be arrows.
    DULLI CHANDRA AGRAWAL (BANARAS HINDU UNIVERSITY, INDIA, VARANASI, UP)
    Subject taught: PHYSICS
    MODELLING PHOTOSYNTHESIS
    PLEASE DO READ MY PAPER
    PHOTOSYNTHETIC SOLAR CONSTANT BY D. C. AGRAWAL. THIS HAS APPEARED IN LATIN AMERICAN JOURNAL OF PHYSICS EDUCATION (2009).
    D C Agrawal

Send us your comment

When you are finished viewing curriculum units on this Web site, please take a few minutes to provide feedback and help us understand how these units, which were created by public school teachers, are useful to others.
THANK YOU — your feedback is very important to us! Give Feedback