Appendix A. Worksheets
Making a Hair Hygrometer (adapted from a worksheet provided in a workshop I attended entitled Climate Change Institute given by Chabot Space Science Center. According to the facilitator, he got the procedure from http://www.education.noaa.gov).
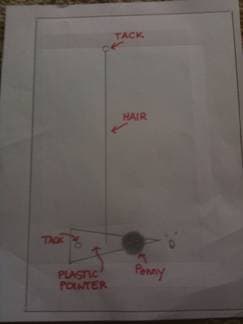
1. Cut a small piece of plastic such as an old identification card into a triangle as shown in the diagram. This will serve as the pointer.
2. Poke a thumb tack through the pointer near the base of the triangle. Turn the tack around until the pointer moves freely around the tack.
3. Tape a penny onto the pointer near the tip of the triangle.
4. Glue three hair strands, which are about 8 inches long, onto the plastic between the tack hole and the penny.
5. Use a thumb tack to fasten the pointer to one of the long sides of a shoe box about ¾ of the way down the side, making sure the pointer can still move freely around the tack.
6. Attach a second tack about one inch from the top of the box in line with the spot where the hair is glued to the pointer.
7. Pull the free ends of the hair tight so that the pointer is horizontal. Wrap the hair around the upper tack and glue to hold the hair in place.
8. Mark on the box as "0" where the pointer is pointing at when it is completely horizontal.
9. Observe what happens to the pointer when humidity changes. When the air is humid, hair absorbs moisture and will expand and lengthen, making the pointer move down. When air is dry, hair contracts and shortens and the pointer moves up.
Making Pyramid Foldable TM and Three-Tab Foldable TM (These are just two of several foldables developed by Dinah Zike. Foldables are graphic organizers that can be used in the classroom in a variety of ways.)
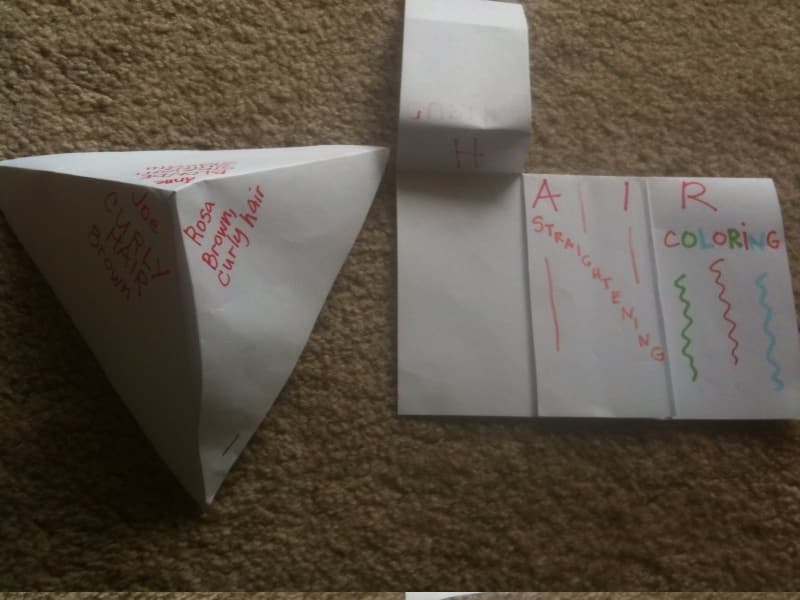
Pyramid Foldable TM
1. Fold a 8.5 x 11 paper taco style and cut off the extra rectangular portion.
2. Open the paper and fold it taco style again in the opposite way so that the two creases now form an "x".
3. Cut from one end of one valley to the center of the "x". This creates two flaps.
4. Make a pyramid by gluing one flap under the other.
Three-Tab Foldable TM
1. Fold a 8.5 x 11 paper length-wise or hot dog style.
2. Fold the right side toward the center such that half of the paper is covered.
3. Fold the left side over the right side such that there are three equal sized sections.
4. Open the left and right folds and cut along the two valleys to create three windows or tabs.
Comments: