Content
Background
This past year, my fourth graders had difficulty comprehending the meaning of area. As a result, I believe that it is imperative to revisit more basic content before advancing to more complicated concepts like volume. My students will need a stronger command of third and fourth grade Common Core State Standards (CCSS) before they continue focusing on the fifth-grade standards concerning volume. According to Van De Walle, “... a significant leap for students is to move from counting squares inside of a rectangle to a conceptual development of a formula.”1
According to Van De Walle, students must learn mathematics with understanding, coupled with actively building new knowledge from experience and prior knowledge. Learning mathematics with a greater understanding is essential beyond the computational skills. Students should have the ability to think and reason mathematically in order to solve problems they will face in the future.1 My outlook is that students need to think of themselves as mathematicians. As opposed to focusing on the “one right answer” method, students ought to think and talk about mathematics. This mindset strategy will serve them well as they become confident that they can do the math. For students to become good problem solvers, they ought to be capable of monitoring their thinking regularly and automatically.
Content Objectives
This unit is created to help students develop a conceptual understanding of measurements of area, and to apply these concepts to measurement formulas through engaging and meaningful activities. This practical understanding will scaffold their practice with formulas calculating the area of a rectangle.
The unit is designed to reinforce my students’ understanding of measuring and calculating properties of one and two-dimensional space (length and area). It will also be used as an introductory platform for more advanced topics related to calculating three-dimensional volume formulas (in a future unit). Lastly, the unit is designed to incorporate the Eight Mathematical Practices of CCSSM, English Language Learners (ELL) strategies, and to create practical and engaging lessons in which students learn to measure properties of objects in their daily lives.
Measurement Instruction
Measurement refers to the concepts, standards and instruments we use to determine and compare the size of objects.2 It is one of the most fundamental elements of mathematics and appears daily in all our lives. Essentially, measuring is counting out how many of a given standard unit it takes to make up the quantity being measured.2 Another way to explain is, how many unit quantities of the same type “fit in” or are needed to equal, the quantity being measured. To determine the size of a measurement, students will need to know two things: (1) the number of units counted, and (2) what the unit is. For example, 20 inches is a smaller measurement than 3 feet, since it takes 12 inches to make 1 foot. The following ideas can be found in Elementary and Middle School Mathematics: Teaching Developmentally.1
To measure something, one must perform three steps:
- Decide on the attribute to be measured.
- Select a unit that has the attribute.
- Find the number of units that match the object, by filling, covering, matching or using some other method to compare them to the attribute of the object being measured. The number of units required to match the object is the measure.
Attribute: Length; one-dimensional
Units: rods, toothpicks, straws, inches, centimeters, miles, etc.
How many units are as tall as the envelope?
How much string is needed to go across the envelope?
Attribute: Area; two-dimensional
Units: index cards, squares of paper, tiles, square inches, square feet, square centimeters, square kilometers, etc.
How many tiles will cover the surface of the bucket?
For students to develop the mathematical skills of measuring a quantity or object, this skill must be explicitly linked to the concept of measuring as a process of comparing attributes, using measurement units and using measurement instruments.1
Comparison
Since measurement involves comparison, students must learn to compare before they learn to measure.1 At the third-grade level, students should have a good grasp of how to use greater than, less than, and equal to comparisons. In addition, students need to understand and use measurement concepts to better understand the measurement process and its results.1
Students should make sense of basic statements of comparison, such as:
a. “This cup holds less milk than that cup.”
b. “These two boxes weigh the same.”
c. “This table is wider than that table.”
before the following statements can make sense to them:
d. “This table is 5 feet wide”
e. “This bottle holds 4 liters of water”
Length
Length can be described as the size (or “measurement”) of an object (or part of an object) that is one-dimensional.2
When students first learn to measure length, they develop models to measure an attribute in single dimensional space, i.e., along a line. According to Beckman, there are three key ideas of measuring length that should be carefully observed, besides a possible misunderstanding of the role of the unit. Key errors include: students may leave gaps; or they may allow overlaps; or they may not recognize length as the attribute to be measured.2
As students begin to explore the concept of length using standard (customary and metric) units of measurement, they will learn how to answer the following questions: How far? How long? How wide? I would present the following task to students to see how they would go about selecting the appropriate measurement, model, and label regarding the object and attribute which they measure.
Perimeter
Perimeter is the distance around a 2-dimensional shape, or as my students would say “the total length of the outside edges of a shape.” The perimeter of the rectangle below is 20 units.
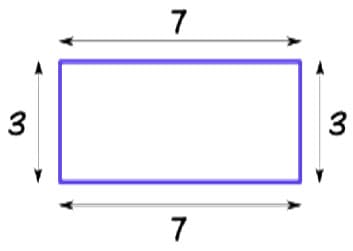
Figure 1
Perimeter of the rectangle is 20 units.
Students will be asked to demonstrate their understanding of perimeter by using a ruler to measure rectangular real-world objects in the classroom. To make clear that perimeter also applies to any planar shape, I will also have my students measure and add the length values of shapes with many edges (for instance, a hexagon or other polygon with more than four sides). During this task students will apply whatever strategy they are most comfortable with. Based on my experience I would expect that students will answer in one of two ways, as in the examples below:
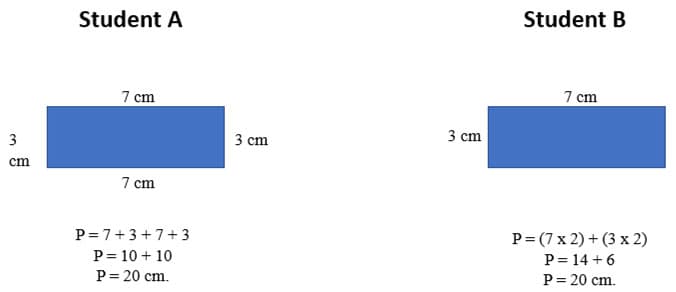
Figure 2
Perimeter of the rectangle is 20 cm.
This lesson will allow me to see which students have good conceptual understanding of how to measure side lengths with whole number units. It will also give me the opportunity to address any misconceptions or misunderstandings that they may have. If needed, revisiting perimeter of rectangles may be a mini lesson before proceeding to the next section.
**It is important to note that for this curricular unit I will not be focusing on perimeter in depth because the majority of my students demonstrated a solid understanding of perimeter in fourth grade. Rather, I will revisit the perimeter concept in my first lesson to activate their prior knowledge and will identify students who may need to be retaught.
The perimeter activity continues to develop ideas about linear measurement. At this point in the lesson, it is assumed that students understand the need for standard units and can use tools that measure in customary systems. At the end of the lesson students will be able to recognize that perimeter is the measure around the outside edges of a two-dimensional shape. Once students have understood how to find the perimeter of rectangles, they will be given polygons, or complicate shapes. In which they will be asked to use an inch ruler to measure the sides of each shape to find the area.
Moving & Additivity Principle
Another fundamental concept of measurement that students should begin to develop is the understanding of additivity. This is especially important when students begin to solve area and volume problems. As students begin to learn how to figure out the area of a shape it is important that they have an understanding of the principles that are used to determine the area of a shape. Outlined below are the following ideas which can be found in the Mathematics for Elementary Teachers with Activity Manual.1
The moving and additivity principles regarding area are as follows (Van De Walle)1: Moving Principle: If you move a shape rigidly without stretching it, then its area does not change. If you rearrange the pieces of an irregular shape to make a simple square or rectangle, it is easy to calculate area using the length times width formula. In the figure below, a small (rectangular) piece has been cut off of an irregular shape and rearranged to make a simple square. The total area of the new, more complicated, shape is the same as the area of the original rectangle. However, the perimeter of the new shape is larger, by four times the height of the small rectangle, than the perimeter of the original rectangle.
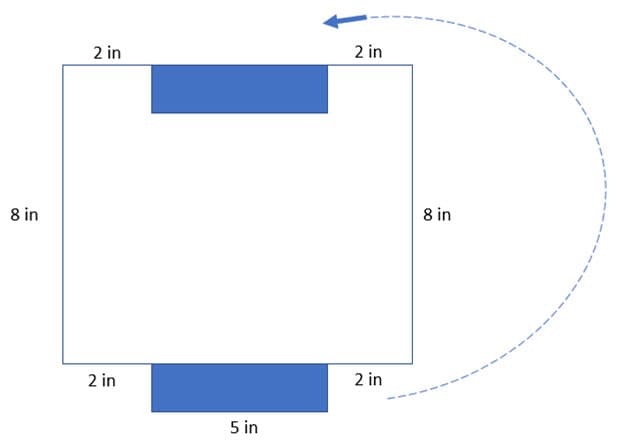
Figure C
The figure demonstrates the “Moving Principle.”
Additivity Principle: If you combine (a finite number of) shapes without overlapping them, the area of the resulting shape is the sum of the area of the individual shapes (Figure C.1).

Figure C.1
3 x 5 = 15. 3 x 3 = 9.
So 15 + 9 or 24 square units.
Both of these properties helps the student to decompose shapes and calculate the areas of the pieces. Students should also be taught to subdivide the shape into smaller, measurable pieces.
Following this step, they can then move forward by simply adding the areas of these pieces to demonstrate additivity.1 Consequently, the combined sum will represent the area of the original shape. This process allows students to see the original shape as a combination of the pieces. But then for the pieces, they need to know how to find areas of rectangles. If they also find the perimeter of this shape, they can see, or I can point out, that it is the same as the perimeter of the 10 by 8 rectangle that contains the shape.
It is true for determining the area of a complex shape that, by subdividing the shape into more easily measurable pieces and then applying the additivity principle, it will be easier to make a final calculation of the area of the entire shape.1
Students will start off with a given (rectangular) shape. Next, they will then subdivide the shape.
At this point, they will recognize when they recombine the pieces, without overlapping, the outcome will be a different shape, but with the same area.
Comments: