Area
I will help my students understand that area is an attribute of a two-dimensional figure. It will be important that they grasp how to measure the area of a region, and that it requires using a chosen 2-dimensional unit (for example, a unit square) to cover the figure without gaps or overlaps.2 When my students were in third grade and learning multiplication strategies, many of them used rectangular arrays to help find the product. During that process, students were given manipulatives such as square tiles to help them develop a conceptual understanding of how multiplication can be represented visually. As we began to explore the concept of area, some students were able to make the connection that rectangular arrays (rows and columns) could also be used to the area of a rectangle (See Figure D).

Figure D
An array of unit squares to solve a multiplication equation, then joining the squares to make a rectangle.
I use the math curriculum EngageNY initially to teach area and student-explored activities that scaffolded students learning in how to apply the area formula. For my unit, I will not be focusing on the initial instruction of area. Instead I want to focus on how to get students to build more of a conceptual understanding of the area model for rectangles with whole number sides.
When students are asked “How did you find the area of a closed figure?”, students will almost immediately students will respond, “Area is equal to length times width,” or “By counting the number of squares in the figure.” The first statement, although correct when the figure is a rectangle, seemed to be challenging for students to use when area was presented in word problems or standardized test questions. On the other hand, the second statement informed me that students may have the basic idea of area, but do not understand of how to apply the area formula for rectangles. For this reason, I believe that students need additional practice and spend time further exploring the concept of area.
Polyominoes
I plan on utilizing polyominoes to help students understand area beyond the area formula. Through this exploration students will realize how complex shapes can be. Additionally, I hope they will learn “to appreciate the simplicity of rectangles.” Polyominoes are a collection of unit squares, combined according to a couple of simple rules:
A domino is made of two unit tiles, a tromino is made of three unit tiles, a tetromino four, pentomino five, and a hexomino is made of six unit tiles. (See Figure E).

Figure E
Examples of a domino, tromino, tetronimo, pentomino, and hexomino.
Tiles that touch should be joined along a whole edge of each, and the figure should be connected, in the sense that you can pass from one tile to any other by going through the middle of edges (not corners). Examples are shown below in Figure F.
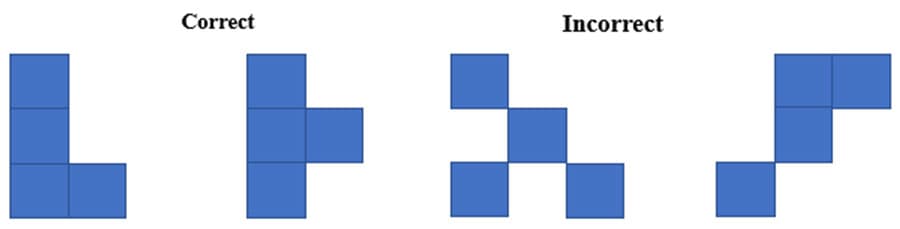
Figure F
Examples of the correct and incorrect way according to the polyomino rules.
Through these “ominoes” students will see that the area of two polyominoes made from the same number of tiles will be the same; however, the perimeters may be different. In the examples below I have illustrated 11 different hexominoes (Figure G) For instance, the hexomino that is a 2 by 3 rectangle (labeled K), and the W hexomino (labeled J) have the same area but a different perimeters. Actually, all the hexominoes in the collection have a perimeter of 14; except for the 2 by 3 rectangle (labeled K), which has perimeter of only 10. Students will explore this concept by creating a variety of polyominoes according to the rules stated above.

Figure G
Example of 11 different hexominoes.
Activities
Perimeter
The perimeter activity continues the development of ideas about linear measurement. At the point of this lesson, it is assumed that students understand the need for standard units and can use tools that measure in customary systems. At the end of the lesson, students will be able to recognize that perimeter is the measure around the outside edges of a two-dimensional shape.
Task
In this investigation, students will select 5 real-world objects in the classroom and measure the perimeter. Students will be encouraged the choice of some non-rectangular objects as a challenge. After selecting a shape, they will also need to choose the tool that will be best for measuring (ruler or yardstick). Students will work in pairs and will record their work on chart paper. As students work, I will circulate the room and ask questions while interacting with pairs, in addition to modeling questions I want the students to ask each other themselves.
Fixed Areas
The objective of this activity is for students to contrast the concepts of area and perimeter. Students will develop the relationship between area and perimeter of different shapes when the area is fixed. In addition to comparing and contrasting the units used to measure perimeter and those used to measure area. I will provide each student with 36 tiles such as 1” x 1” colored tiles, and a sheet of centimeter grid paper.
Students will begin by building a rectangle using 12 tiles at their desks. I will explain that the rectangle should be filled in, not just a border. I will model sketching the rectangle on the whiteboard and will record the dimensions of the read table in a recording chart - for example, “2 by 6”
I will ask, “What do we mean by perimeter? How do we measure perimeter?” Students will discuss in their table groups how to define perimeter and describe how it is measured. Next students will be asked for the perimeter of this (2 x 6) rectangle. I will reiterate and emphasize that the units used to measure perimeter are one-dimensional, or linear, and that perimeter is just the distance around an object. Record the perimeter on the chart.
I will ask, “What do we mean by area? How do we measure area?” Once again students will discuss in their table groups how to define area and describe how it is measured. Students will then record the area of this (2 x 6) rectangle. I will make explicit that the units used to measure area are two-dimensional and, therefore, cover a region. We are counting all the tiles inside the region. After counting the tiles, students will record the area in square units on the chart.
Next students will be asked to make a different rectangle using 12 tiles and record the perimeter and area as before. We will note that, although the areas are is the same, the perimeters are is different. I will challenge my students to make all possible rectangles (1 ´ 12, 2 ´ 6, 3 ´ 4) with 12 square tiles, and we will note that the perimeters are all different.
Task
Students will be asked to see how many different rectangles can be made with 36 tiles. Next they will determine and record the perimeter and area of each rectangle. The following directions will be written on the board:
- Find a rectangle using all 36 tiles.
- Sketch the rectangle on the grid paper.
- Measure and record the perimeter and area of the rectangle on the recording chart.
- Find a new rectangle using all 36 tiles and repeat steps b-c.
Students will be placed in pairs to work collaboratively, but will each be required to draw their own sketches and use their own “Rectangles Made with 36 Tiles” recording sheet. As students begin working, I will question them to be sure they understand the task and meaning of area and perimeter. As I rotate between table groups, I will be monitoring to ensure that students are both drawing the rectangles correctly and recording them appropriately in the chart. I will observe and ask the following questions:
What is the area of the rectangle you just made? What is the perimeter of the rectangle you just made? How is the area different from perimeter? How do you measure area? Perimeter?
As I am observing students I will keep the following questions in mind: Are student confusing perimeter and area? As students form new rectangles, are they aware that the area is not changing because they are using the same number tiles each time? These students may not know what area is, or they may be confusing it with perimeter. Are students looking for patterns in how to find the perimeter? Are students stating important concepts or patterns to their partners? We will end by having a discussion about the shapes of the rectangles with larger or smaller perimeter (longer and thinner means greater perimeter for a given area; more squarish means less perimeter for a given area).
Comments: