Area and Perimeter
The measure of the space inside a region is called area, and it is measured in square units. The perimeter is a measure of length around the boundary of the region, and it is a linear measurement. My students have a difficult time with area and perimeter, as they often confuse the two measurements and which units to use for each.
I suspect there are several reasons why this is a source of confusion. First, area and perimeter are often taught at the end of the school year as I am trying to get through the curriculum and preserve some time for review prior to state testing. In my haste, I often quickly jump to the formulas, thus skipping the hands-on process of measuring area and perimeter. Since fourth graders are new to algebraic formulas, the formulas are easily confused or forgotten. Typically students measure the area and perimeter of rectangles and squares, which are simple shapes in terms of calculating area and perimeter. The procedures of adding up all four sides or multiplying the length by the width are not tied to deeper meaning, thus the confusion.
In the latter stage of Level 1 in van Hiele’s Theory of Geometric Thought, students should analyze the properties of shapes. Analyzing the properties of shapes is also included in the early stage of Level 2 Informal Deduction. By working with area and perimeter the students will not only develop their measurement skills, but also develop a deeper understanding of the properties of shapes.
Paving the Area
The idea of paving a road or a parking lot conjures up images of a large steamroller covering an entire space with hot, black macadam. This is the image I want my students to have in their head when they think about area. There is a short video listed in the student resources section to help the students visualize the process.
Once my students have the image, the strategy is to pave squares and rectangles around the school and schoolyard with square units. It is important to remind the students that the squares must touch, but not overlap. Once a rectangle or square is covered with square units, the representation looks like, and is in fact, an array. The commutative law holds true, that the rectangle can be rotated and the area will stay the same. A 4 x 6 rectangle has an area of 24 square units. A 6 x 4 rectangle also has an area of 24 square units.
The students will use a variety of square units such as squares of paper, 1 inch tiles, Cheez-It®, floor tiles, construction paper squares, or Starburst® to cover a variety of surfaces throughout the classroom, school, and schoolyard. The hands-on nature and the use of “square units” will help the students remember the proper units for area.
Measuring Perimeter
Perimeter is the linear distance around the outside of a shape. The class may start out by taking a walk around the perimeter (a city block) of the school grounds while identifying other real world objects that represent perimeter. I will provide multiple opportunities for the students to determine perimeter with Cuisenaire® rods, toothpicks, pencils, rulers, string, yardsticks, tape measures, coffee stirrers, and Wikki Stix® around the school and schoolyard. The idea is to help the students visualize perimeter and have a conceptual understanding of the units for measuring it.
Is There a Relationship between Perimeter and Area?
In order for the students to develop a deeper understanding of area and perimeter, it is important for them to explore area and perimeter deeply to distinguish between the two measures. There is a very weak relationship. There are figures with arbitrarily small area and arbitrarily large perimeter. There is a minimum perimeter for a given area; the exact value depends on the type of figures you allow. The van Hiele’s Theory of Geometric Thought includes the “relationships among properties” in the later stage of Level 2. When I look at these Levels of Geometric Thought and think about my students, they are expected to understand the properties of shapes. Some of the standards certainly include relationships among the properties. I see my students at the upper stage of Level 1 and the early end of Level 2. In order to move my students forward in their level of geometric thought, I need to meet them where they are and push forward. Because of this, it makes sense once my students understand the properties of area and perimeter to explore the differences between area and perimeter.
The next few strategies that I have selected for this curriculum unit are specifically designed to help students distinguish between area and perimeter. The general strategies are to use multiple representations, specifically visual models and charts to record, display, and analyze the data. In one of the tasks the students will explore a problem with a “fixed area.”
In the “fixed area” task the students are to make as many rectangles as they can make using 36 square tiles. Once the students create the rectangles, they sketch them onto grid paper. Then they calculate the area and perimeter of each. If they understand the idea of area; they won’t have to calculate it: they will know it is 36. It is helpful to provide a chart for collecting their data. After careful analysis of the data, the students should notice some patterns.
The questions asked were the key component of the lesson, which took the task to a new level. The students are to compare the smaller perimeters and find the pattern. I went through the task myself, and this was when the light bulb came on for me. First I drew the rectangles in my notebook in a random manner. Then, I ordered the perimeters from greatest to least then looked at each figure. The pattern I noticed was that the “tall and skinny” rectangles had the greatest perimeter, while the “short and stout” rectangles had smaller perimeters (see Table 4).

Then I worked through a Fixed Perimeter problem where the perimeter was 36 units. I started with a square with sides that were 9 units. So my first rectangle that I drew was 9 x 9 units. Immediately, I decided that I needed to have a system to find all of the rectangles. I increased the length by one and decreased the width by one. Soon I had a nice “chart” (see Table 5) that looked like this:
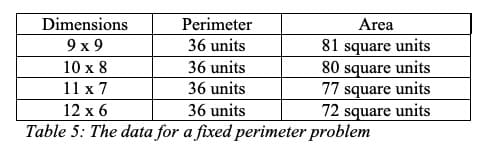
This chart continued until I reached 17 x 1. A pattern emerges in the chart: as the perimeter gets longer and skinnier, the area decreases. I want the students to discover that with a fixed perimeter, the square is the rectangle with the largest area. This idea is important because it can be generalized. With a fixed perimeter, the polygon with the largest area is always the regular polygon, or the polygon with equal sides and angles.
However, once I went through this exercise, I saw the pattern emerge and realized why this task is meaningful. It integrates many great math skills. The students have to calculate area and perimeter, record data, analyze data, make generalizations, and explore the relationship. The students will work in small groups and engage in discourse to discover a pattern, and come to a conclusion. This type of exercise requires critical thinking, collaboration, and leads the students to understanding the relationship between a fixed perimeter and the largest area. This process will lead my students to a deeper understanding of area and perimeter. That is certainly more meaningful then finding the area and perimeter of a rectangle over and over again!
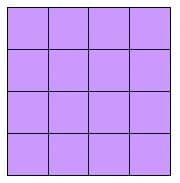
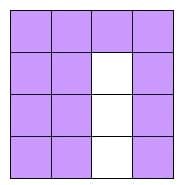
The next activity begins by finding the area and perimeter of a square. Then one unit square is removed, then another, and another. Each time a square is removed, the area is calculated. The area is decreasing by 1 square unit every time a square is removed. As you follow the progression, pay attention to the perimeter. It may surprise you!
Progression 1.1
The area is 16 square units and the perimeter is 16 units.
Progression 1.2
Then one square unit is removed. The area is reduced by 1 and equals 15 square units and the perimeter remains the same (16 units).
Progression 1.3
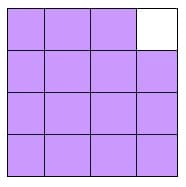
Another square unit is removed so the area goes to 14 square units and the perimeter is still 16 units.

Progression 1.4
Remove another square. The area equals 13 square units and the perimeter is still 16 units.
Progression 1.5
When four squares are removed the area is 12 square units and the perimeter is 16 units again!
Progression 1.6
Remove another square and the area is equal to 11 square units while the perimeter remains 16 units.

Progression 1.7
When another square unit is taken away, the area becomes 10 square units and the perimeter is still 16 units.
Progression 1.8
You guessed it. Take away another square. The area will equal 9 square units and the perimeter will equal 16 units.
Progression 1.9
Take away another square and the area reduces by one again and equals 8 square units. The perimeter continues to equal 16 units.
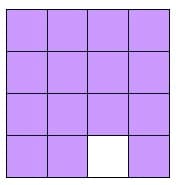
Progression 1.10
When one more square unit is removed the area is 7 square units and the perimeter is…you guessed it…16 units.
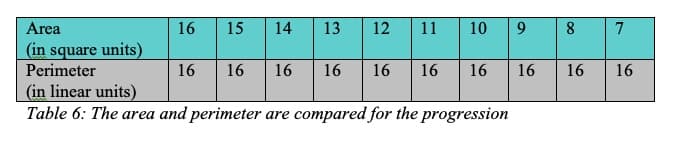
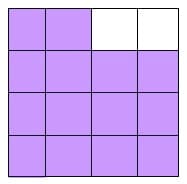
The progression shows that the area can vary significantly for a fixed perimeter. In the chart the area decreases from 16 square units to 7 square units, or decreases by more than half. Thus, the perimeter remains unchanged. See Table 6.
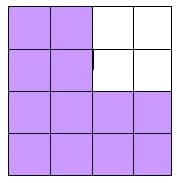
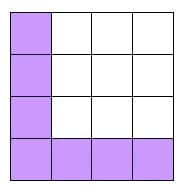
In the next progression, the area decreases one square unit at a time, but the perimeter increases.
Progression 2.1
In the figure above, the area is 16 square units and the perimeter is also 16 units.
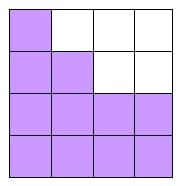
Progression 2.2
One square is removed. The area is 15 square units and the perimeter is 18 units.
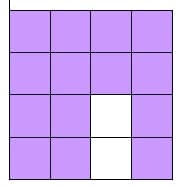
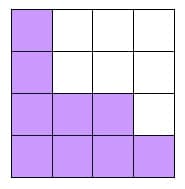
Progression 2.3
Again a tile is removed, the resulting area is 14 square units and the perimeter is 20 units.
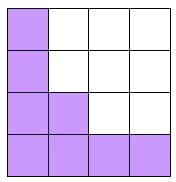
Progression 2.4
Remove another tile. The resulting area is 13 square units and the perimeter is 22 units.

Progression 2.5
Another tile can be removed and the area is12 square units and the perimeter is now 24 units. See Table 7.
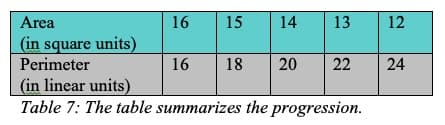
The two progressions above show that area and perimeter are two distinct measurements, and one has no bearing on the other. The area and perimeter problems above exemplify the type of thinking that I will have my students engage in to develop deeper meaning and distinguish between area and perimeter.
More Complicated Area and Perimeter Problems
Next, I want my students to explore a variety of perimeter and area problems that have nuances. This is a strategy used in Singapore math to help the students develop critical thinking skills. In the United States, the tendency is to have students complete multiple problems with different numbers, which results in rote skills.
The problems I encountered in a Singapore math book require that students push the sides’ lengths outward and create an enclosing rectangle. Once the enclosing rectangle is drawn or envisioned, the calculation of the perimeter is the same as the calculation for the perimeter of a rectangle.
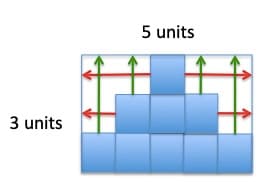
Figure 13: A model of stair steps shows the enclosing rectangle strategy for perimeter.
The diagram (Figure 13) shows the strategy of making the enclosing rectangle. The length and the width of the enclosing rectangle are congruent to the length and width of the “stair step” figure.
I want students to realize that it isn’t always necessary to count every linear unit. By “pushing” the lengths out, students can create the enclosing rectangle or square with an equivalent length. This method will reduce the potential for errors caused by miscounting.
The next type of problem that I will present to my students is also from Singapore math. See Figure 14. I think of these problems as “paved with rectangles.” The area of the square or rectangle is subdivided into smaller rectangles that require problem solving and critical thinking to determine the area or perimeter. The students will work in small groups not only for collaboration, but also to make them use math language and so I can gain insight into their thought processes. The Singapore Math Challenge Grade 3+ book listed in the bibliography offers various problems that may look similar, but have subtle differences.

Figure 14: David made a square by putting three identical rectangles together. The perimeter of each rectangle is 32 cm. What is the perimeter of the square?
The final type of problem that my students will explore involves finding the area and perimeter of the special classes of quadrilaterals, and particularly, parallelograms and trapezoids. The strategy is to decompose a parallelogram into a rectangle and two triangles. See Figure 15. The typical way is to drop two perpendicular segments thus revealing a rectangle and two triangles. Then remove one triangle, translate it next to the other triangle to form a rectangle. Once the parallelogram has been recomposed into a rectangle, the students can proceed to either pave the area with tiles or measure the sides and apply the formula for the area of a rectangle: A = l × w or A = b × h (aka base × height). Although the rectangle has the same area as the parallelogram, it has a smaller perimeter. So, parallelograms are good shapes to show the independence of area and perimeter, because the side lengths clearly determine the perimeter, but give few clues as to the area. If you fix the side lengths of a parallelogram, the area can be as small as you want. The largest possible area for the parallelogram is when it is a rectangle; then it is the product of the side lengths. Rhombi are special parallelograms, so this same technique will work for them as well.
Some mathematics educators suggest that the formula A= l × w is limited because it only applies to rectangles. The formula A= b × h is more unifying than A = l × w because it can be generalized for all parallelograms, and also is a springboard to understanding the area formula for a triangle A= ½ b × h.
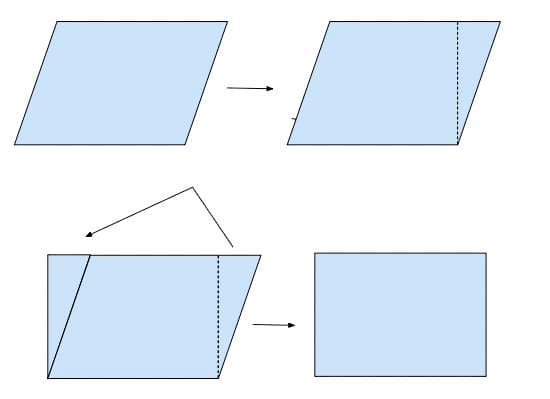
Figure 15: The diagram depicts how to lop off part of a parallelogram, reposition it, and form a rectangle.
Similarly, an isosceles trapezoid can be decomposed into a rectangle (or square) and two triangles. In a similar way, manipulate the subsequent shapes into a rectangle. The students know how to find the area and perimeter of the rectangle.
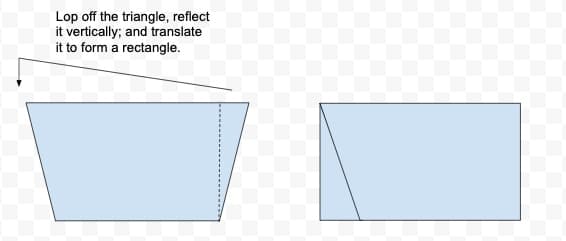
Figure 16: The diagram above shows how to reconfigure an isosceles trapezoid into a rectangle.
The isosceles trapezoid is unique, and this strategy will not work for all trapezoids. A more general technique that works for all trapezoids is to double the trapezoid. Combine the two figures to form a parallelogram, as described above (see Figure 17 below). Then decompose the parallelogram as explained above, to reveal the hidden rectangle and two triangles. Rearrange the parts and turn it into a rectangle. Voila!
In this example, the center of the parallelogram gets constructed. It is the midpoint of one of the (possibly) non-parallel edges of the trapezoid. Rotating the trapezoid around this point makes a second copy. When the two copies are joined, they form a parallelogram (see Figure 17). Once the original trapezoid is doubled, forming a parallelogram, students can work through the steps modeled above to determine the area of the parallelogram. The steps were: lop off two triangles, recompose the two triangles and the rectangle into a larger rectangle, then find the product of the side lengths. It is important to remember that the goal is to find the area of the original trapezoid. So once the product of the rectangle is determined, the product must be halved, since the initial trapezoid was doubled. Thus, the parallelogram reflects the area of two trapezoids. So in order to find the area the students will pave the area and divide it by two. Thus, the formula is ½ (b × h). I will allow my students to use the formula if they can figure it out, otherwise they will tile the rectangle and divide by two. As I believe, “Shortcuts are the privilege of experts!”
Keep in mind that the base of the parallelogram that is the double of a trapezoid has length equal to the sum of the parallel sides of the trapezoid. I will not get this deep with my fourth grade students, but a few may figure it out on their own.
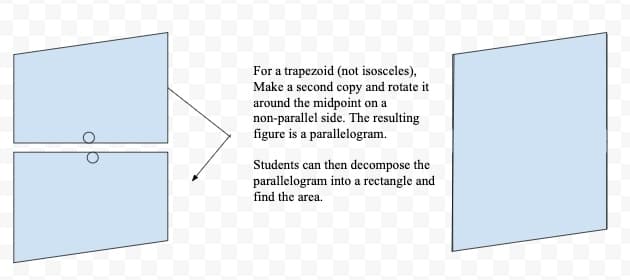
Figure 17: The diagram above shows how to duplicate a trapezoid and reposition it around the bisecting midpoint of a non-parallel side to form a parallelogram.
This formula should look familiar. It is the area for a triangle. The triangle is the case when one of the parallel sides of the trapezoid has length 0! I am not going to go into the area of triangles, because in Virginia that is a fifth grade objective. However, the students should be ready after working through this curriculum unit.
These types of exploration should build a strong geometric foundation with deep understandings around the concepts of area, perimeter and quadrilaterals. Roger Howe says, “If we can understand the area of a parallelogram, we can understand the areas of all of the special classes of quadrilaterals.”12
Comments: